Difference between revisions of "optiPoint 410/420 CorNet IP (HFA) to SIP migration"
The Wiki of Unify contains information on clients and devices, communications systems and unified communications. - Unify GmbH & Co. KG is a Trademark Licensee of Siemens AG.
m (Migrate optiPoint 410/420 CorNet-IP/HFA phones to SIP moved to Migrate optiPoint 410/420 CorNet IP (HFA) phones to SIP: consistent spelling) |
|||
| (47 intermediate revisions by 4 users not shown) | |||
| Line 1: | Line 1: | ||
| − | + | {{Breadcrumb|0|0|Clients & Devices|optiPoint|optiPoint 410/420}} | |
| − | + | {{Discontinued|en|Devices}} | |
| − | |||
| − | |||
| − | + | This migration procedure is for upgrading an [[optiPoint 410/420]] CorNet IP phone V5.1.2x to [[SIP]] V6.0.56 and later. | |
| + | The procedure can be performed on a per phone basis (local admin menu or via [[WBM]]) - described on this page - or, starting with [[optiPoint_410/420_S_Release_Notes#V7_R4.1.0|V7R4.1.0]], via [[DLS]]. | ||
| + | == Precondition == | ||
| + | Please check your hardware revision against the data in the product release note (section "Hardware revisions supported") as not all HW revisions shipped with CorNet IP protocol will support SIP. See also [[SIP V6.0 optiPoint compatibility|optiPoint HW compatibility]]. | ||
| − | + | == Connect the phone to LAN == | |
| + | # Connect the optiPoint CorNet IP phone to the [[LAN]] (<tt>DHCP=on</tt> is default). The assumption is that [[DHCP]] is available in your local area network. The phone will reboot. | ||
| + | # Depending on the version of the CorNet IP application installed | ||
| + | :* either you may be prompted to enter the subscriber number, then continue with [[#Subscriber number is prompted|Subscriber number is prompted]] | ||
| + | :* or you may '''not''' be prompted, then continue with [[#Subscriber number is not prompted|Subscriber number is not prompted]]. | ||
| − | + | == Fully qualified subscriber number == | |
| − | + | === Subscriber number is prompted === | |
| − | + | # Enter your fully qualified subscriber number. | |
| + | # Confirm <tt>Save Changes</tt> with the [[Image:opk-ok.png]] key.<br>The display shows:<br><tt>Administration</tt><br><tt>01=Configuration?</tt> | ||
| + | Continue with [[#Detect the phone's IP address|Detect the phone's IP address]]. | ||
| − | + | === Subscriber number is not prompted === | |
| − | |||
| − | + | If you have not been prompted for the subscriber number, the display will show <tt>Invalide GW Adress</tt> or <tt>No subscriber number</tt>. | |
| − | Continue with | + | # Press the [[Image:opk-ok.png]] key.<br>The display shows:<br><tt>Administration</tt><br><tt>01=Configuration?</tt> |
| + | # Continue with [[#Detect the phone's IP address|Detect the phone's IP address]]. | ||
| − | + | == Detect the phone's IP address == | |
| − | + | # Press the [[Image:opk-ok.png]] key. The display shows:<br><tt>Enter admin password</tt><br><tt>_</tt> | |
| − | + | # Enter the admin password (default: [[Image:opk-1.png]] [[Image:opk-2.png]] [[Image:opk-3.png]] [[Image:opk-4.png]] [[Image:opk-5.png]] [[Image:opk-6.png]].<br>The display shows:<br><tt>Config:</tt><br><tt>01=Network?</tt> | |
| + | # Press the [[Image:opk-ok.png]] key and the [[Image:opk-re.png]] key to select <tt>02=Terminal IP addr.?</tt>. | ||
| + | # You may read the IP address and use this to switch over to the [[WBM]] by using a web browser (Microsoft Internet Explorer recommended). | ||
| − | + | Continue with [[#Download new firmware|Download new firmware]]. | |
| − | + | == Download new firmware == | |
| + | # In the Web browser's URL row type in <tt>https://Phone-IP-Address</tt>, e.g. <tt>https://192.168.1.2</tt> or <tt>http://Phone-IP-Address:8085</tt>, e.g. <tt>http://192.168.1.2:8085</tt>. | ||
| − | Administration | + | # Enter the <tt>Administration</tt> menu (default password: ''123456''). |
| − | + | # Select the <tt>Upload/Download</tt> section. | |
| + | # Select <tt>Download application</tt>. | ||
| + | # Start a standard [[FTP]] server (e.g. [http://support.3com.com/software/utilities_for_windows_32_bit.htm 3Com Daemon]), and fill out the relevant FTP data, refer to the screenshot below.<br>[[Image:wbm-op410-420-ftp.gif|200px|'''File transfer''' screenshot in optiPoint 410/420 phone WBM]] | ||
| + | # Continue with [[#Restore factory settings|Restore factory settings]]. | ||
| − | + | == Restore factory settings == | |
| − | + | After successful restart of the application, it is recommended to perform a factory reset. | |
| − | + | * How to [[optiPoint 410/420 S factory reset]] | |
| − | |||
| − | |||
| − | |||
| − | |||
| − | |||
| − | |||
| − | |||
| − | |||
| − | |||
| − | |||
| − | |||
| − | |||
| − | |||
| − | |||
| − | |||
| − | |||
| − | |||
| − | |||
| − | |||
Latest revision as of 14:04, 17 December 2014
|
You are here: |
|
Please visit Devices to get further information about the current product portfolio.
This migration procedure is for upgrading an optiPoint 410/420 CorNet IP phone V5.1.2x to SIP V6.0.56 and later.
The procedure can be performed on a per phone basis (local admin menu or via WBM) - described on this page - or, starting with V7R4.1.0, via DLS.
Contents
Precondition
Please check your hardware revision against the data in the product release note (section "Hardware revisions supported") as not all HW revisions shipped with CorNet IP protocol will support SIP. See also optiPoint HW compatibility.
Connect the phone to LAN
- Connect the optiPoint CorNet IP phone to the LAN (DHCP=on is default). The assumption is that DHCP is available in your local area network. The phone will reboot.
- Depending on the version of the CorNet IP application installed
- either you may be prompted to enter the subscriber number, then continue with Subscriber number is prompted
- or you may not be prompted, then continue with Subscriber number is not prompted.
Fully qualified subscriber number
Subscriber number is prompted
- Enter your fully qualified subscriber number.
- Confirm Save Changes with the
 key.
key.
The display shows:
Administration
01=Configuration?
Continue with Detect the phone's IP address.
Subscriber number is not prompted
If you have not been prompted for the subscriber number, the display will show Invalide GW Adress or No subscriber number.
- Press the key.
The display shows:
Administration
01=Configuration? - Continue with Detect the phone's IP address.
Detect the phone's IP address
- Press the key. The display shows:
Enter admin password
_ - Enter the admin password (default:


 .
.
The display shows:
Config:
01=Network? - Press the key and the
 key to select 02=Terminal IP addr.?.
 - You may read the IP address and use this to switch over to the WBM by using a web browser (Microsoft Internet Explorer recommended).
Continue with Download new firmware.
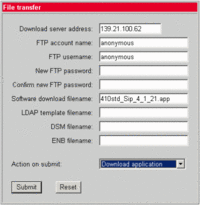
Download new firmware
- In the Web browser's URL row type in https://Phone-IP-Address, e.g. https://192.168.1.2 or http://Phone-IP-Address:8085, e.g. http://192.168.1.2:8085.
- Enter the Administration menu (default password: 123456).
- Select the Upload/Download section.
- Select Download application.
- Start a standard FTP server (e.g. 3Com Daemon), and fill out the relevant FTP data, refer to the screenshot below.
- Continue with Restore factory settings.

Restore factory settings
After successful restart of the application, it is recommended to perform a factory reset.


