|
|
| (10 intermediate revisions by the same user not shown) |
| Line 27: |
Line 27: |
| | == ODS Assistant == | | == ODS Assistant == |
| | | | |
| − | === Data Sources ===
| |
| | | | |
| − | === Add new SQL Data Source to ODS ===
| + | === Database === |
| − | If you select the "Add" button within the Data Source window, a new dialog opens, which allows the configuration of a new connection to a SQL datbase. Five tabs leads you, dependent on the type of SQL datasource through the whole configuation process.
| |
| − | | |
| − | | |
| − | ==== Database ====
| |
| | | | |
| | [[Image:ODS_vTiger_1.png|500px]] | | [[Image:ODS_vTiger_1.png|500px]] |
| | | | |
| − |
| |
| − | ===== Database access=====
| |
| − |
| |
| − | '''ODBC driver'''
| |
| | | | |
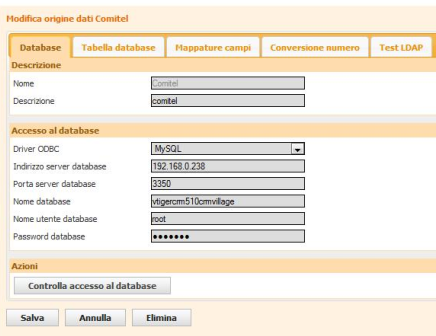
| | vTiger bases on an mySQL database | | vTiger bases on an mySQL database |
| | | | |
| − | ==== Database Table ====
| + | === Database Table === |
| − | Within this example the table is selcted which contains the relevant user data | + | Within this example the table "vtiger_account" is selcted which contains the relevant user data |
| | | | |
| | [[Image:ODS_vTiger_2.png|500px]] | | [[Image:ODS_vTiger_2.png|500px]] |
| Line 51: |
Line 42: |
| | Note: Within V3R2 only one table can be selected here | | Note: Within V3R2 only one table can be selected here |
| | | | |
| | + | === Field Mappings === |
| | + | Within the penultimate step you map the SQL database table attributes to the Open Directory fields, which are finally presented by the LDAP server. |
| | | | |
| − | ==== Field Mappings ====
| + | [[Image:ODS_vTiger_4.png|500px]] |
| − | Within the penultimate step you map the SQL database table attributes to the Open Directory fields, which are finally presented by the LDAP server. The mapping is done in the way, that the available attributes of the selected table are presented at the left side and the Open Directory Sevices (LDAP) field at the right side.
| |
| − | | |
| − | The table attribute can be chosen by a click to the attribute within the drop down menu. An already used and assigned attribute is presented in blue color. Multiple assignments of an attributes to different LDAP fields are allowed.
| |
| − | | |
| − | [[Image:ODS_Inst_8.png|500px]]
| |
| − |
| |
| − | At the Open Directory Service side the available fields are presented also within a drop down menu. Selection is done by mouse click. Within the drop down menue only the “available” (not assigned) fields are presented for mapping.
| |
| − | | |
| − | A preview function allows to check the output of the assigned Open Directory fields by browsing through the database entries.
| |
| − | | |
| − | Already mapped fields are displayed on the screen. Add and remove operations are available for editing the mapping.
| |
| − | | |
| − | '''Note:''' Mapping of multiple attributes to one Open Directory field is not possible.
| |
| − | | |
| − | ==== Number conversion ====
| |
| − | Within a connected database telephone numbers could be stored in different formats.
| |
| − | The Number Conversion function allows you to normalize the the retrieved phone numbers into a full qualified number format (e.g. +12 (345) 678 90).
| |
| − | This is could be necessary for correct caller identification. Number conversion can be configured per data source.
| |
| − | The stored phone numbers within the source database are not modified.
| |
| − | | |
| − | [[Image:ODS_Inst_9.png|500px]] | |
| − | | |
| − | If You enable the function by a tic within the “Active” checkbox, the additional dial parameters are presented and can be populated.
| |
| − | You have to determine the localization, for which the telephonenumber were entered in teh database and enter the suitable data. In case that the data source is located at the same place as the ODS (OSO system) the apropriate settings can be imported from the OSO configuration by pressing the button "Query System Settings".
| |
| − | You can also configure if the phone numbers in the database starts with a dialout prefix or not. This setting is needed, as in some counties a ‘0’ as prefix cannot be differentiated from the national access prefix (e.g. in Germany).
| |
| − | | |
| − | '''Note:'''
| |
| − | Number conversation can fail in some cases, e.g. if parts of the phone number are missing or if an odd notation is used.
| |
| − | In this case the telephone number have to be corrected within the datasource.
| |
| | | | |
| − | ==== LDAP Test ====
| + | === LDAP Test === |
| | Administration menue of Data Sources offers also the test of the configured parameters. Selection of the LDAP Test Tab allows user to check, if the the settings and configuration made before, deliver the requested data. | | Administration menue of Data Sources offers also the test of the configured parameters. Selection of the LDAP Test Tab allows user to check, if the the settings and configuration made before, deliver the requested data. |
| | | | |
| − | [[Image:ODS_Inst_10.png|500px]] | + | [[Image:ODS_vTiger_5.png|500px]] |
| − | | |
| − |
| |
| − | Pressing the button “Run test” will seach within the configured datasource and displays all entries of the datasource and the content of the configured Open Directory Service data fields (LDAP fields).
| |
| − |
| |
| − | In case that the output within some fields does not meet the expectation (e.g. Phone number conversion is wrong), configuration can be adjusted and the test can be repeated as often until the results are satisfying.
| |
| − | | |
| − | ==== Save Datasource configuration ====
| |
| − | | |
| − | At the end of the database configuration the settings should be saved. Afterwards the data source name is available within the left column under the “Data Sources” headline .
| |
| − | Further information about the data source is available within the Data Sources Main Window.
| |
| − | A data source can be modified or deleted by pressing the appropriate button after data source selection within the Main Window.
| |
| − | | |
| − | === Maintenance ===
| |
| − | | |
| − | The maintenance screen allows you to check the current status of the Open Directory Service and to restart the service. The actual status is displayed in a status line .
| |
| − | | |
| − | [[Image:ODS_Inst_11.png|500px]]
| |
| − | | |
| − | For better visibility a colored icon represents the status in addition to the plain text.
| |
| − | | |
| − | * Green: Status “Running” No action required
| |
| − | * Grey: Status “Not Running” Activation of the service required.
| |
| − | | |
| − | If a red, blinking dot apperas in the main navigation behind the Maintenance text an Open Directory Service restart is required due to configuration modifications.
| |
| − | | |
| − | The restart of the Open Directory Service can be performed by a mouse click on the Restart button. If the “Restart” button ist greyed out, Open Directory Service has to be activated first at the “Settings” page.
| |
| − | | |
| − | A succeeding dialog box informs you about the result of the restart action.
| |
This How To describes the connection of a vTiger database to OpenScape Office (OSO) by using the OpenDirectory Service (ODS).
It is written based on OSO version V3R2. Deviations may occur, if higher versions are used.
Only the vTiger relevant settings are described here. For general ODS configuration issues have a look at:
All data shown here and also the screenshots are examples only, which are used to demonstrate the capabilities.
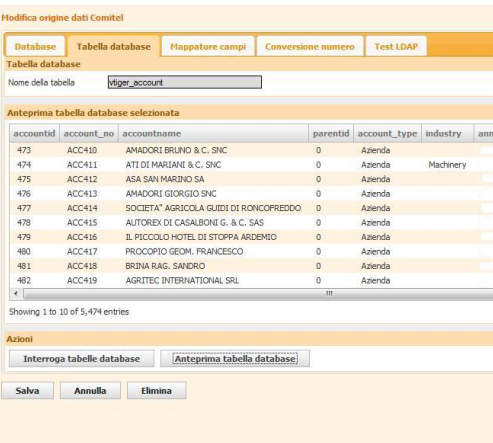
Within this example the table "vtiger_account" is selcted which contains the relevant user data
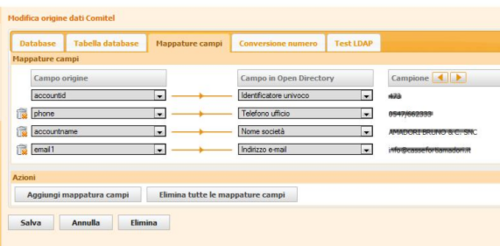
Within the penultimate step you map the SQL database table attributes to the Open Directory fields, which are finally presented by the LDAP server.
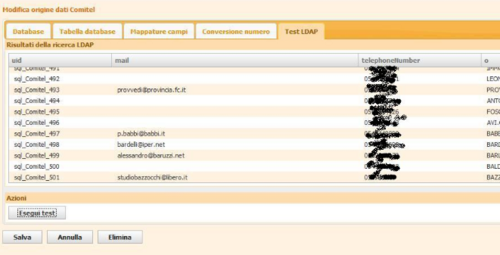
Administration menue of Data Sources offers also the test of the configured parameters. Selection of the LDAP Test Tab allows user to check, if the the settings and configuration made before, deliver the requested data.


