Screenshots from OpenStage Phone Display
The Wiki of Unify contains information on clients and devices, communications systems and unified communications. - Unify GmbH & Co. KG is a Trademark Licensee of Siemens AG.
| Systematics | |
| Family: | OpenStage |
| Model: | OpenStage 40 OpenStage 60 OpenStage 80 |
| Relation: | API/SDK related |
| Release: | V2 R0 |
Contents
Software Requirements
Following software is necessary for making OpenStage screenshots:
- OpenStage V2 R0 software
- SSH Client (suggested: putty: http://www.chiark.greenend.org.uk/~sgtatham/putty/download.html)
- TFTP Server (suggested tftp32: http://tftpd32.jounin.net/)
- Picture viewer (suggested irwanview + Plugins: http://www.irfanview.de/)
Making a screenshot on OpenStage is a little bit tricky. You need some experience in network technologies. But once configured the making of screenshots is quite easy and can be done whenever you want. The following description is a step by step manual following an example configuration.
- IP-Address PC: 172.28.133.107
- IP-Address Phone:
Software preparation
- Download and Install Putty
- Download and Install tftp32
- Download and install irfanview
- Download and install irfanview Plugins
Remark: Be sure, that the plugins for irfanview are installed. Otherwise the raw format can not be read.
Start the TFTP server
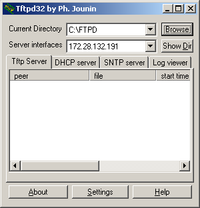
Files can be up- and downloaded from/to the phone by using tftp. The server shows the listening IP address and the files directory.:
- IP Address of the TFTP server: 172.28.133.107
- File transfer directory: C:\FTPD
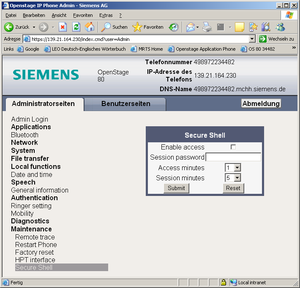
Enable the SSH access at the phone
- Enable Access: Activate the SSH session = Yes
- Session Password: Login password for the SSH session, example: 123456
- Access minutes: Set to 15 minutes
- Session minutes: Set to 60 minutes
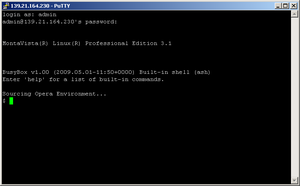
Open a terminal session to the phone
Use the SSH client to connect to the phone. The user name for ssh access is always admin. Please use the configured password for login.
- User: admin
- Password: 123456
An open terminal session is present after successful login.
Screeshots
Manual screenshots
OpenStage 15/20/40/60/80:
- Copy the frame buffer of the screen into a file:
cat /dev/fb0 > /tmp/screenshot.raw - Transfer the File to the PC:
tftp -pl /tmp/screenshot.raw -r screenshot.raw 172.28.133.107
Automatic screenshots
OpenStage 15/20/40/60/80:
This mode is useful, if you need more than one screenshot of the phone. The screenshots are made with a small shell script, which automatically transfers the file to the PC. Unique file names are auto-matically generated.
Shell Script scrsh.sh:
FN=os80ss$(date +%Y%m%d-%H%M%S).raw
cat /dev/fb0 > /tmp/$FN
tftp -pr $FN -l /tmp/$FN 172.28.133.107
- Copy the script to the phone:
tftp -gr scrsh.sh 172.28.133.107 - Make the script executable:
chmod 777 scrsh.sh - Make screenshot:
./scrsh.sh
Import the screenshot and save it in a different format
OpenStage 60/80
| Make sure that irfanView with plugins is installed. |
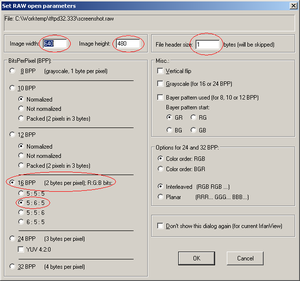
IrfanView parameters for RAW import
Adopt following parameters:
| Parameter | OpenStage 60 | OpenStage 80 |
|---|---|---|
| Image witdth | 320 | 640 |
| Image height | 240 | 480 |
| File header size | 1 | |
| BitsPerPixel (BPP) | 16 | |
| R:G:B bits | 5:6:5 | |
The screenshot is now seen in IrfanView. You can convert the picture in any format you want with the Save as function.
Automatic Conversion
If many screenshots must be converted into a new format the manual Save as method is complicated. IrfanView offers a batch conversion option, which can be used.
Open the batch conversion menu via File -> Batch Conversion/Rename.
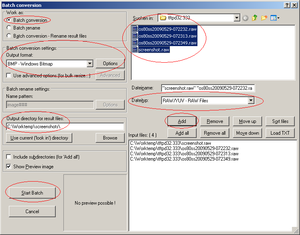
IrfanView batch conversion menu
- Work as: Batch conversion
- Batch conversion settings: Select your favourite Image format (BMP in this example)
- Output directory for result files: Select the directory where the program should store the converted Files (Example: C:\Worktemp\screenshots\)
- File Type: Set the file type to raw
Mark the files to be converted and press Add to add the files into the Input file list.
Click Start Batch to start the batch conversion. The Set RAW open parameters menu must be accepted for each file to be converted, but IrfanView keep the previous settings. So a simple click is needed to go to the next file.
OpenStage 15/20/40
| Make sure that irfanView with plugins is installed. |
The generation of OpenStage 15/20/40 screenshots is a little bit more difficult. The raw format of these phones is a one colour binary format, which can not be read by an imaging program. A header must be put in front of the file, which tells the imaging program which kind of bitmap is contained in the raw image. The SUN raster file format is used to for this purpose.
Adding the file header can be done in DOS or Linux by using build in commands.
Raster file header for OpenStage 15/20/40 screenshots: ![]() Header40
Header40
DOS:
type Header40.im1 > ScreenOS40.im1
type screenshot.raw >> ScreenOS40.im1
LINUX:
cat Header40.im1 > ScreenOS40.im1
cat screenshot.raw >> ScreenOS40.im1
The file can be opened by Irfanview after this modification.
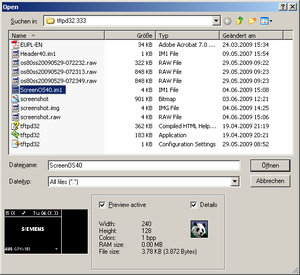
Open raster file with IrfanView
The screen is opened in negative colors. To correct this problem use the feature ‘Image-> Negative’ of IrfanView
Automatic Conversion
If many screenshots must be converted into a new format the manual Save as method is complicated. IrfanView offers a batch conversion option, which can be used.
Open the batch conversion menu via File -> Batch Conversion/Rename.
The usage is similar to the procedure described for OpenStage 60/80. Because of the wrong colour format the Advanced Options must be used to correct this:
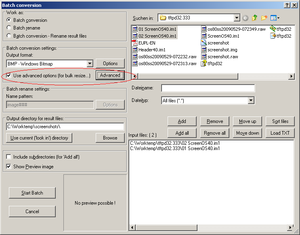
Batch conversion with Advanced Options
Please check the Negative option for the batch conversion.
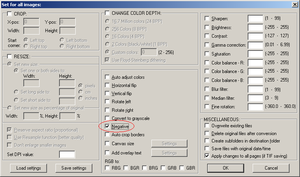
Advanced Option Batch Conversion
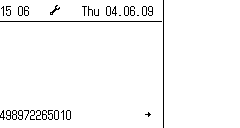
As result an OpenStage 40 screenshot is generated:

