Difference between revisions of "OpenScape CP600 Feature Example Videos ENG"
The Wiki of Unify contains information on clients and devices, communications systems and unified communications. - Unify GmbH & Co. KG is a Trademark Licensee of Siemens AG.
Hans.zeiner (talk | contribs) |
Hans.zeiner (talk | contribs) (→V1 R5 (in progress)) |
||
| Line 650: | Line 650: | ||
</div> | </div> | ||
| − | === ''' V1 R5 | + | === ''' V1 R5 ''' === |
<div class="toccolours mw-collapsible mw-collapsed"> | <div class="toccolours mw-collapsible mw-collapsed"> | ||
| Line 731: | Line 731: | ||
|} | |} | ||
'''requirement''': Multiline and Configured Label | '''requirement''': Multiline and Configured Label | ||
| + | </div> | ||
| + | </div> | ||
| + | |||
| + | === ''' V1 R6 Feature Karten ''' === | ||
| + | |||
| + | <div class="toccolours mw-collapsible mw-collapsed"> | ||
| + | ==== ''' Bluetooth Tastatur ''' ==== | ||
| + | Mit der Unterstützung von Bluetooth Tastaturen vereinfacht sich die Eingabe und die Suche nach Kontakten. Das Telefon kann dabei vollständig über die Tastatur gesteuert werden. | ||
| + | Bitte beachten Sie, dass jeweils nur eine Tastatur oder ein Fernauslöser an das Telefon angeschlossen werden kann. | ||
| + | <div class="mw-collapsible-content"> | ||
| + | {| class="noborder" style="float:center" | ||
| + | | valign="top" class="noborder" | | ||
| + | {{Info| | ||
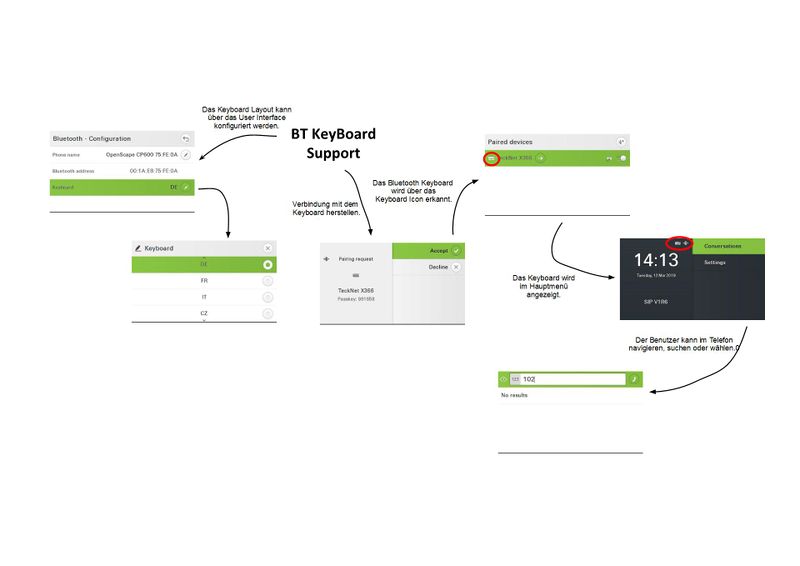
| + | 1. Verbinden Sie die Tastatur mit dem Telefon und folgen Sie dabei den Anweisungen aus der Tastaturanleitung. | ||
| + | <br><br> | ||
| + | 2. Die verbundene Tastatur wird im Hauptmenü angezeigt. | ||
| + | <br><br> | ||
| + | 3. Mit der Tastatur lassen sich sowohl Eingaben, als auch Steuerbefehle an das Telefon schicken. | ||
| + | }} | ||
| + | | valign="bottom" class="noborder" | [[Image:02_BT_Keyboard.jpg|800px]] | ||
| + | |} | ||
| + | '''Voraussetzung''': Pairing von BT Geräten, wie in diesem [[ OpenScape_CP600_Feature_Example_Videos#BT_Freisprechen_mit_dem_Smartphone | Video ]] gezeigt. | ||
| + | </div> | ||
| + | </div> | ||
| + | |||
| + | <div class="toccolours mw-collapsible mw-collapsed"> | ||
| + | ==== ''' Bluetooth Fernauslöser ''' ==== | ||
| + | Mit der Unterstützung von einem Bluetooth Fernauslöser ist es möglich eine Funktion aus den Favoriten oder von einem Key Modul 600 mit einem Fernauslöser zu bedienen. | ||
| + | Bitte beachten Sie, dass jeweils nur eine Tastatur oder ein Fernauslöser an das Telefon angeschlossen werden kann. | ||
| + | <div class="mw-collapsible-content"> | ||
| + | {| class="noborder" style="float:center" | ||
| + | | valign="top" class="noborder" | | ||
| + | {{Info| | ||
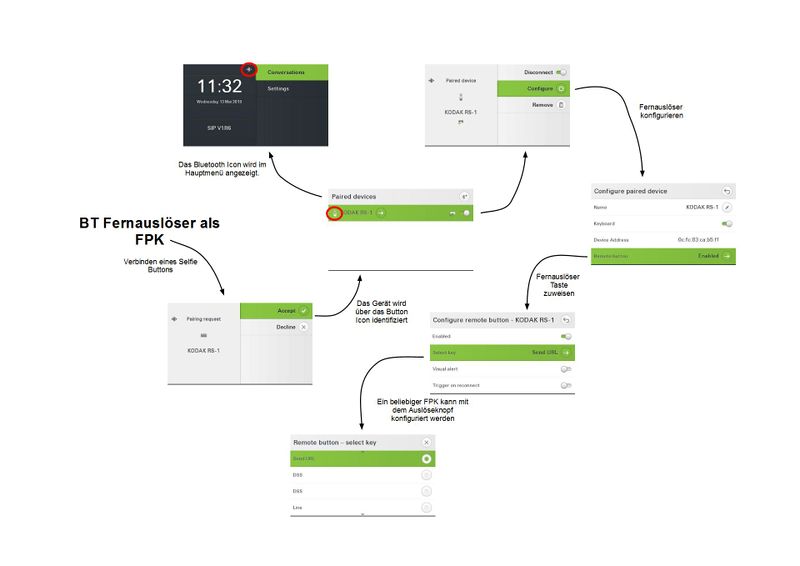
| + | 1. Verbinden Sie den Fernauslöser mit dem Telefon und folgen Sie dabei den Anweisungen aus der Anleitung des Fernauslösers. | ||
| + | <br><br> | ||
| + | 2. Weisen sie dem Fernauslöser eine Funktion aus Ihren Favoriten oder von einem Key Modul zu. | ||
| + | <br><br> | ||
| + | 3. Der verbundene Fernauslöser wird im Hauptmenü angezeigt. | ||
| + | <br><br> | ||
| + | 4. Der Fernauslöser funktioniert nun in der selben Weise wie die Taste am Telefon. | ||
| + | }} | ||
| + | | valign="bottom" class="noborder" | [[Image:04_BT_Remote_FPK_DE.jpg|800px]] | ||
| + | |} | ||
| + | '''Voraussetzung''': Pairing von BT Geräten, wie in diesem [[ OpenScape_CP600_Feature_Example_Videos#BT_Freisprechen_mit_dem_Smartphone | Video ]] gezeigt. | ||
| + | </div> | ||
| + | </div> | ||
| + | |||
| + | <div class="toccolours mw-collapsible mw-collapsed"> | ||
| + | ==== ''' E/A Cockpit und Mobility ''' ==== | ||
| + | Diese Funktionen verbindet E/A Cockpit mit mobilen Arbeitsplätzen. Verbindet man einen E/A Cockpit Status, z.B. 'Zum Anrufbeantworter' mit der Abmeldung am Telefon, so wird dieser Status automatisch in E/A Cockpit eingestellt, wenn man sich am Telefon abmeldet. | ||
| + | Diese Funktion kann vom Administrator eingerichtet werden. | ||
| + | <div class="mw-collapsible-content"> | ||
| + | {| class="noborder" style="float:center" | ||
| + | | valign="top" class="noborder" | | ||
| + | {{Info| | ||
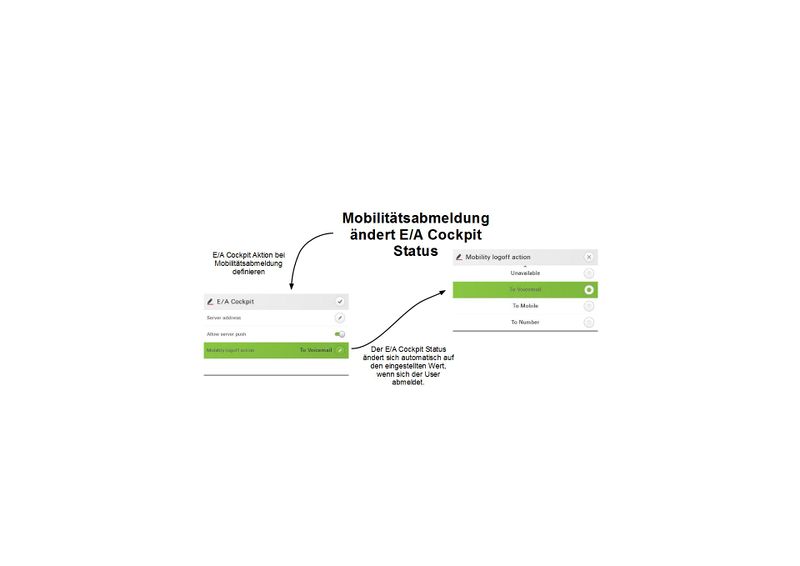
| + | 1. Definieren Sie in den E/A Cockpit Einstellungen die Aktion, die bei einer Abmeldung am Telefon durchgeführt werden soll. | ||
| + | <br><br> | ||
| + | 2. Meldet man sich am Telefon ab, wird automatisch der vorab einstellte Status eingestellt. | ||
| + | <br><br> | ||
| + | }} | ||
| + | | valign="bottom" class="noborder" | [[Image:06_EA_Mob_DE.jpg|800px]] | ||
| + | |} | ||
| + | '''Voraussetzung''': [[ Assistant_Cockpit_(de) | E/A Cockpit]] ist am Telefon eingerichtet. | ||
| + | </div> | ||
| + | </div> | ||
| + | |||
| + | <div class="toccolours mw-collapsible mw-collapsed"> | ||
| + | ==== ''' Bestandsverwaltung mit LLDP-MED ''' ==== | ||
| + | Das LLDP (Link Layer Discovery Protocol) ist ein herstellerunabhängiges Layer-2-Protokoll, das die Möglichkeit bietet, Informationen zwischen Nachbargeräten auszutauschen. | ||
| + | Alle CP Telefone teilen nun Informationen zur Hardware und zur Software über dieses Protokoll mit anderen Netzwerkkomponenten, so dass damit eine einfache Bestandsverwaltung möglich wird. | ||
| + | <div class="mw-collapsible-content"> | ||
| + | {| class="noborder" style="float:center" | ||
| + | | valign="top" class="noborder" | | ||
| + | {{Info| | ||
| + | Neue LLDP-MED Attribute: | ||
| + | |||
| + | Hersteller | ||
| + | * Hardware Version | ||
| + | * Modell | ||
| + | * Uboot Version | ||
| + | * Firmware Version | ||
| + | * Seriennummer | ||
| + | <br><br> | ||
| + | }} | ||
| + | | valign="bottom" class="noborder" | [[Image:08_LLDP_MED_DE.jpg|800px]] | ||
| + | |} | ||
| + | </div> | ||
| + | </div> | ||
| + | |||
| + | <div class="toccolours mw-collapsible mw-collapsed"> | ||
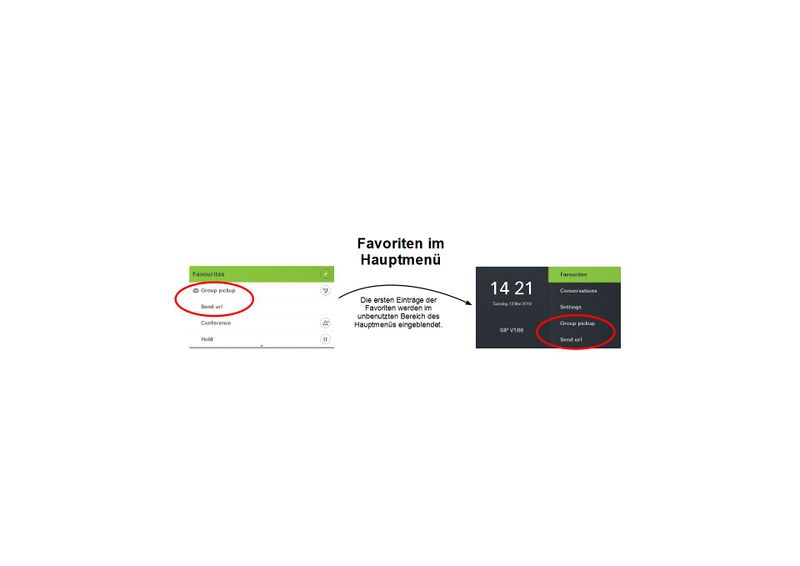
| + | ==== ''' Favoriten im Hauptmenü ''' ==== | ||
| + | Wenn im Hauptmenü unbenutzte Einträge vorhanden sind, werden diese mit Einträgen aus dem Favoritenmenü aufgefüllt. Dadurch erleichtert sich der Zugriff auf diese Favoriten, da sie nun in beiden Menüs zu finden sind. | ||
| + | <div class="mw-collapsible-content"> | ||
| + | {| class="noborder" style="float:center" | ||
| + | | valign="top" class="noborder" | | ||
| + | {{Info| | ||
| + | |||
| + | Freie Einträge im Hauptmenü werden mit Favoriten aufgefüllt.}} | ||
| + | | valign="bottom" class="noborder" | [[Image:10_Fav_HauptM_DE.jpg|800px]] | ||
| + | |} | ||
| + | </div> | ||
| + | </div> | ||
| + | |||
| + | |||
| + | <div class="toccolours mw-collapsible mw-collapsed"> | ||
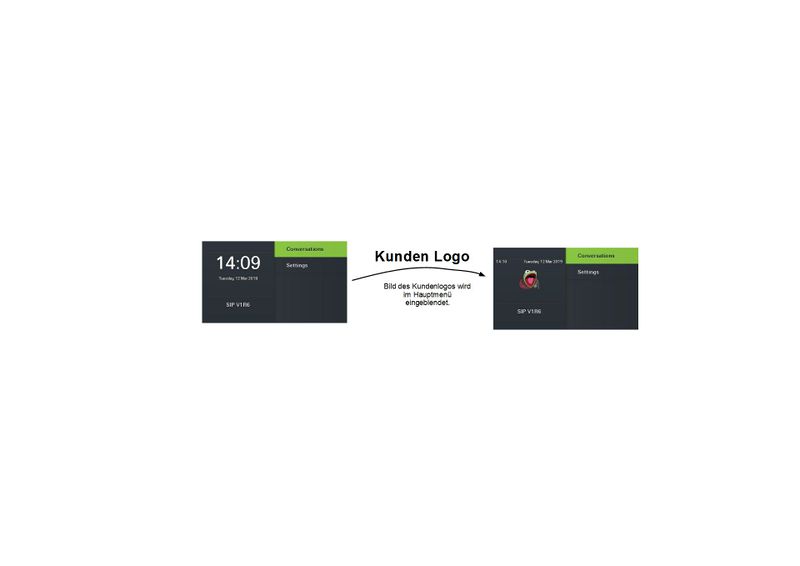
| + | ==== ''' Logo im Hauptmenü ''' ==== | ||
| + | Der Administrator kann im CP400/600/600E in Logo einspielen, dass dann im Hauptmenü angezeigt wird. Dadurch lassen sich leicht Notrufnummern, Logos oder Gruppenbezeichnungen in das Telefonfon integrieren, so dass es ab individuellen Bedürfnisse des Kunden angepasst werden kann. | ||
| + | <div class="mw-collapsible-content"> | ||
| + | {| class="noborder" style="float:center" | ||
| + | | valign="top" class="noborder" | | ||
| + | {{Info| | ||
| + | |||
| + | Kundenlogo wird im Hauptmenü eingeblendet.}} | ||
| + | | valign="bottom" class="noborder" | [[Image:12_Customer_Logo_DE.jpg|800px]] | ||
| + | |} | ||
| + | </div> | ||
| + | </div> | ||
| + | |||
| + | <div class="toccolours mw-collapsible mw-collapsed"> | ||
| + | ==== ''' Einen neuen Kontakt/Konversation erstellen ''' ==== | ||
| + | Über das Kontextmenü der Konversationsliste kann eine neue Konversation/Kontakt manuell erstellt werden. <div class="mw-collapsible-content"> | ||
| + | {| class="noborder" style="float:center" | ||
| + | | valign="top" class="noborder" | | ||
| + | {{Info| | ||
| + | 1. Wählen Sie das Kontextmenü der Konversationsliste aus. | ||
| + | <br><br> | ||
| + | 2. Erstellen Sie eine neue Konversation. | ||
| + | <br><br> | ||
| + | 3. Die neue Konversation wird in der Konversationsliste angezeigt.. | ||
| + | }} | ||
| + | | valign="bottom" class="noborder" | [[Image:14_New_Conversation_DE.jpg|800px]] | ||
| + | |} | ||
| + | '''Wichtig''': Der [[ OpenScape_CP600_Feature_Example_Videos#Namens_Update_f.C3.BCr_existierende_Konversationen_.28Signalling_-.3E_Signalling.29 | Namensupdate über Signalling ]] muss deaktiviert sein, sonst wird die Konversation mit den Informationen aus der Anlage überschrieben. | ||
| + | </div> | ||
| + | </div> | ||
| + | |||
| + | <div class="toccolours mw-collapsible mw-collapsed"> | ||
| + | ==== ''' Filterfunktion für Konversationen ''' ==== | ||
| + | Konversationen können nach Typ gefiltert werden. Folgende Filterkriterien sind möglich: | ||
| + | * Alle | ||
| + | * Verpasst | ||
| + | * Angenommmen | ||
| + | * Gewählt | ||
| + | * Kontakte | ||
| + | * Andere | ||
| + | |||
| + | <div class="mw-collapsible-content"> | ||
| + | {| class="noborder" style="float:center" | ||
| + | | valign="top" class="noborder" | | ||
| + | {{Info| | ||
| + | 1. Wählen Sie das Kontextmenü der Konversationsliste aus. | ||
| + | <br><br> | ||
| + | 2. Aktivieren Sie die Filterfunktion. | ||
| + | <br><br> | ||
| + | 3. Die Konversationsliste kann nun über die oben genannten Kriterien gefiltert werden. | ||
| + | }} | ||
| + | | valign="bottom" class="noborder" | [[Image:14_New_Conversation_DE.jpg|800px]] | ||
| + | |} | ||
| + | </div> | ||
| + | </div> | ||
| + | |||
| + | <div class="toccolours mw-collapsible mw-collapsed"> | ||
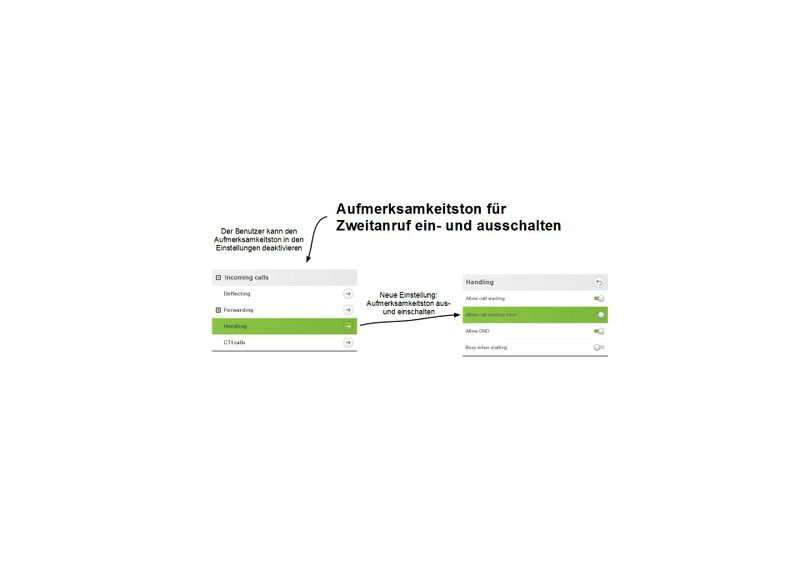
| + | ==== ''' Aufmerksamkeitston aus- und einschalten ''' ==== | ||
| + | Der Aufmerksamkeitston signalisiert akustisch einen Zweitanruf in ein bestehendes Gespräch. Dies kann unter Umständen störend sein und den aktiven Anruf unterbrechen. Daher kann man nun den Aufmerksamkeitston für Zweitanrufe abschalten. | ||
| + | |||
| + | <div class="mw-collapsible-content"> | ||
| + | {| class="noborder" style="float:center" | ||
| + | | valign="top" class="noborder" | | ||
| + | {{Info| | ||
| + | 1. Gehen Sie in das Benutzermenü für eingehende Anrufe. | ||
| + | <br><br> | ||
| + | 2. Bei der Behandlung von Anrufen kann der Aufmerksamkeitston ein- und ausgeschaltet werden. | ||
| + | }} | ||
| + | | valign="bottom" class="noborder" | [[Image:16_Call_Waiting_DE.jpg|800px]] | ||
| + | |} | ||
</div> | </div> | ||
</div> | </div> | ||
Revision as of 10:52, 8 May 2019
CP600 SIP Feature example Videos
Contents
- 1 Short videos (max 60 seconds)
- 1.1 V1 R1
- 1.2 V1 R2
- 1.3 V1 R3
- 1.4 V1 R4
- 1.4.1 Phone number type as icons
- 1.4.2 Call logging for secondary line
- 1.4.3 Alphabetical sorting (LDAP)
- 1.4.4 Type-based alternative number representation
- 1.4.5 Create new conversation (contact)
- 1.4.6 Group call volume (beep)
- 1.4.7 Group call acoustic repeat
- 1.4.8 Popup for secondary lines (idle)
- 1.4.9 Popup for secondary lines (active call)
- 1.4.10 Popup at the end of the call
- 1.4.11 Delay for "Forwarding after time"
- 1.4.12 Video Support
- 1.5 V1 R5
- 1.6 V1 R6 Feature Karten
- 1.6.1 Bluetooth Tastatur
- 1.6.2 Bluetooth Fernauslöser
- 1.6.3 E/A Cockpit und Mobility
- 1.6.4 Bestandsverwaltung mit LLDP-MED
- 1.6.5 Favoriten im Hauptmenü
- 1.6.6 Logo im Hauptmenü
- 1.6.7 Einen neuen Kontakt/Konversation erstellen
- 1.6.8 Filterfunktion für Konversationen
- 1.6.9 Aufmerksamkeitston aus- und einschalten
Short videos (max 60 seconds)
By pressing the "Expand" button, you will be presented with a sample scenario + video.
|
Some functions require certain configurations. These are listed accordingly under the video. |
V1 R1
Conversation
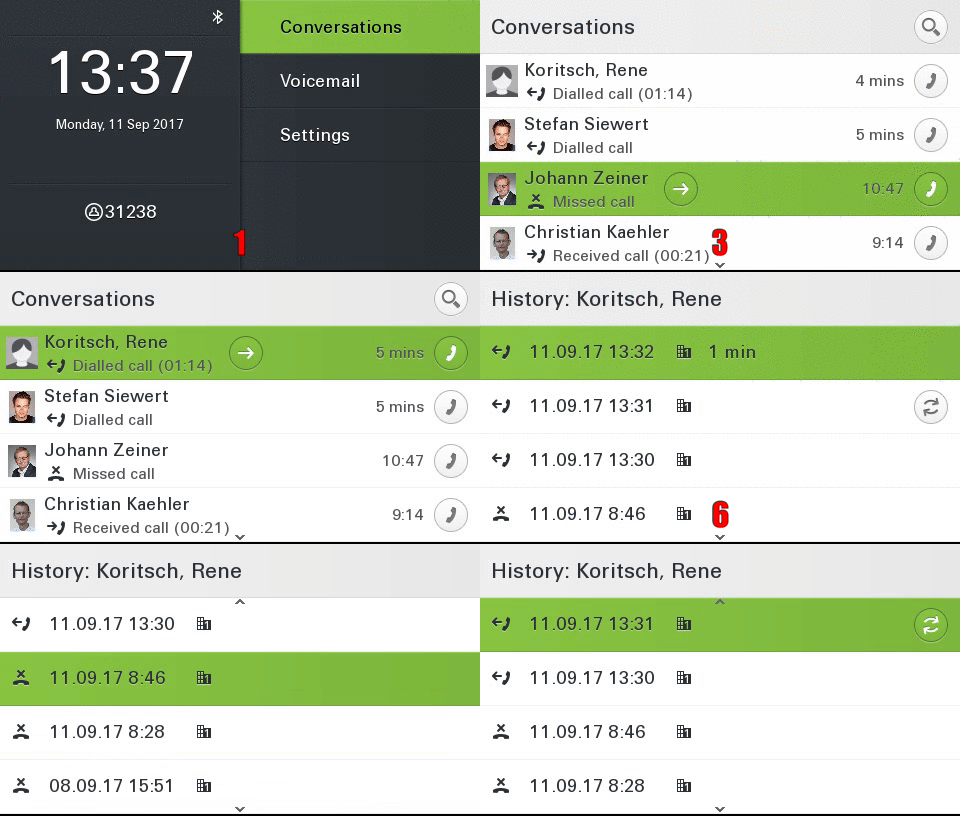
Introduction of the new Innovative Conversation Concept! LDAP, Exchange, and Call History are combined into a dynamic conversation. There is only one conversation per participant under which all relevant data are summarized.
requirement: Canonical settings
Bluetooth Proximity
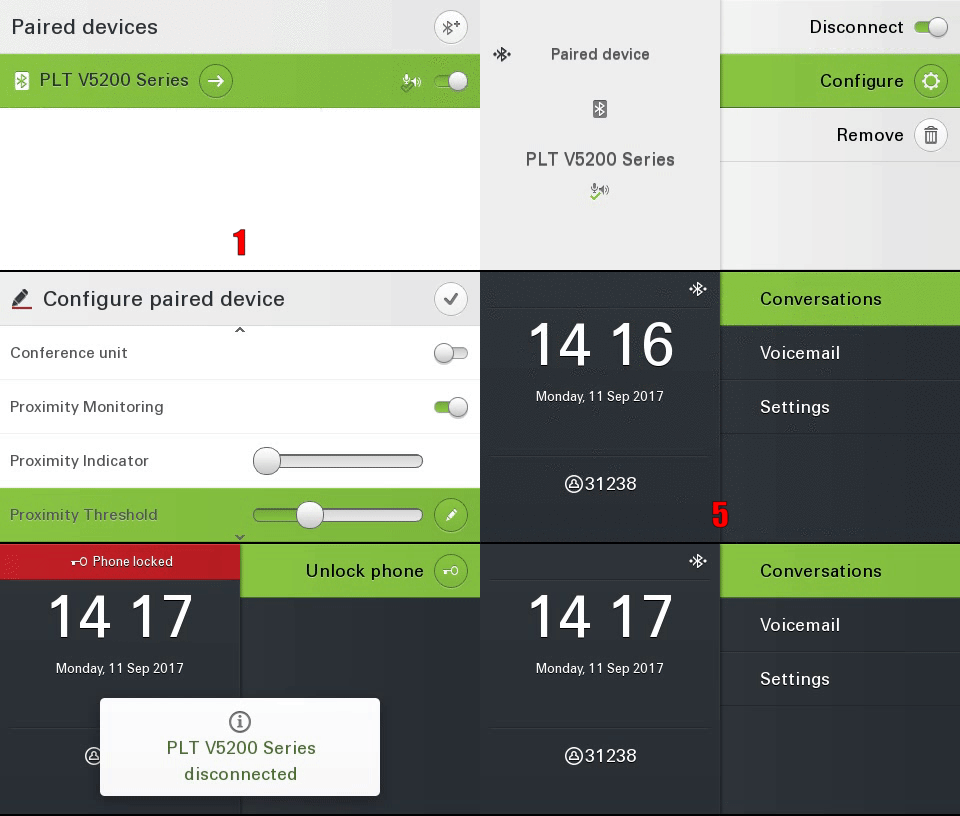
With the help of the extended Bluetooth interface, it is possible to automatically lock the device as well as to unlock it. The signal strength of the Bluetooth device is measured for this purpose. If this value falls below a certain value that is configurable, the device is automatically disabled.
|
|
requirement: Bluetooth
Delete all Conversations
With 3 clicks, it is possible to delete all conversations at the same time.
|
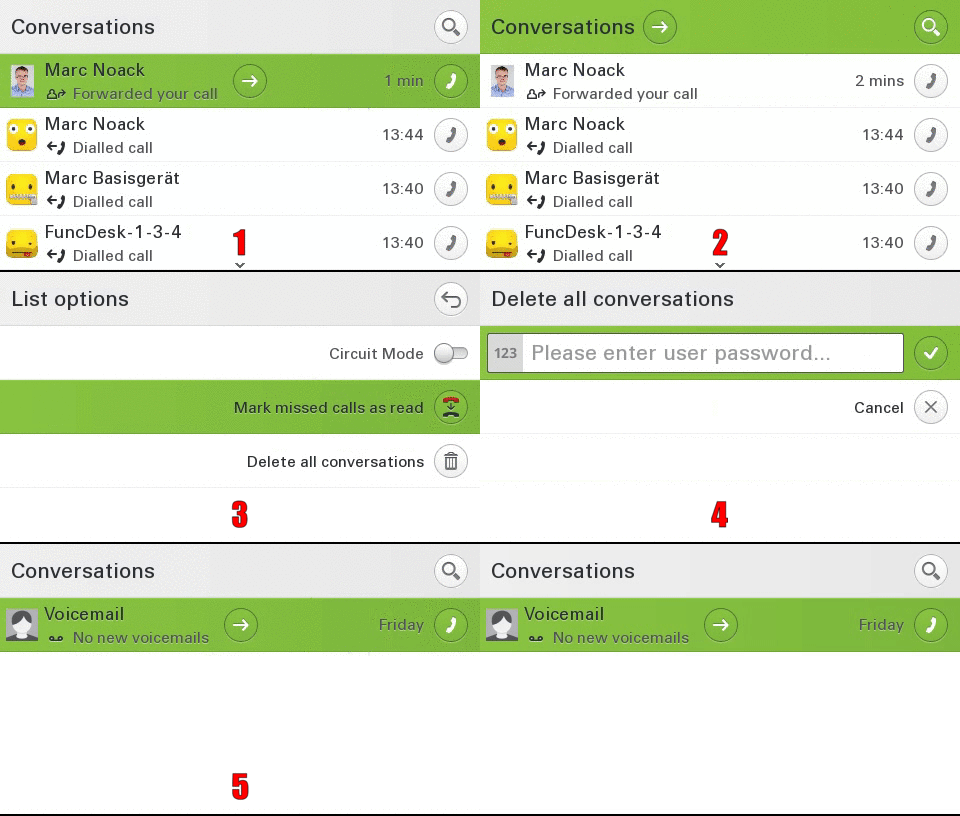
|
requirement: nothing
Intuitive dial out
Even at the outset during dialing the user is shown all phone numbers relevant to the conversations in real time on the display. This saves time and simplifies the choice.
|
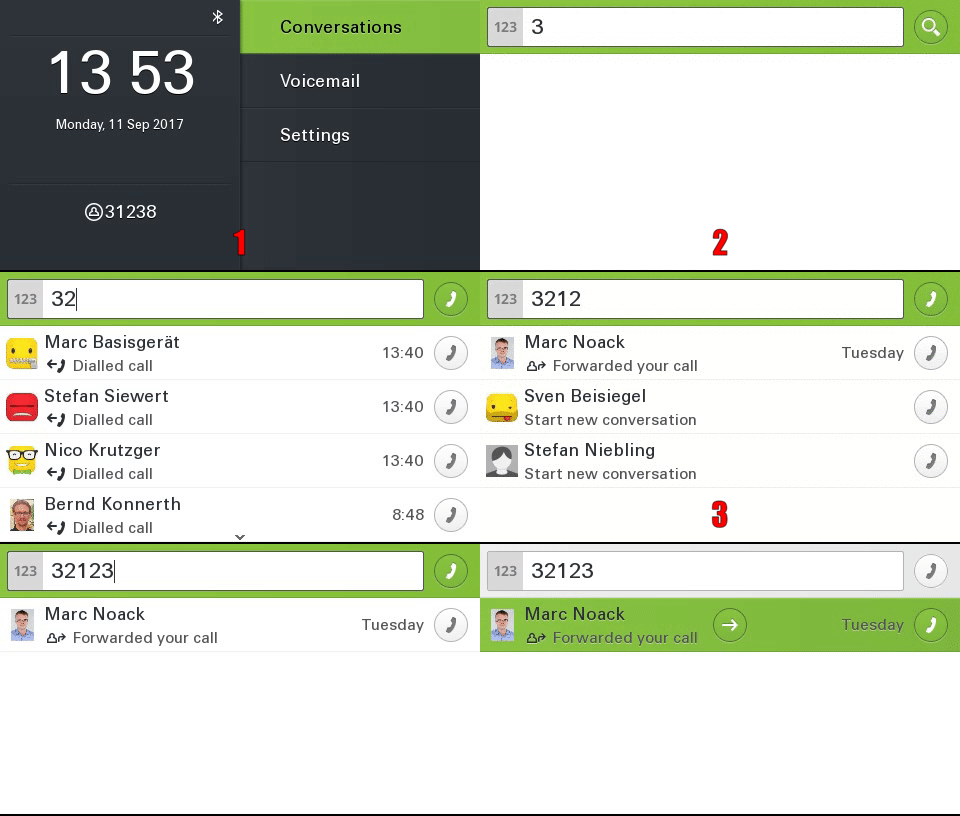
|
requirement: Canonical settings
Exchange
Automatic synchronization of Exchange contacts (e.g., Microsoft Outlook) to the device. Thus their contacts in the device are always up to date. Existing contacts are automatically supplemented by Exchange information.
|
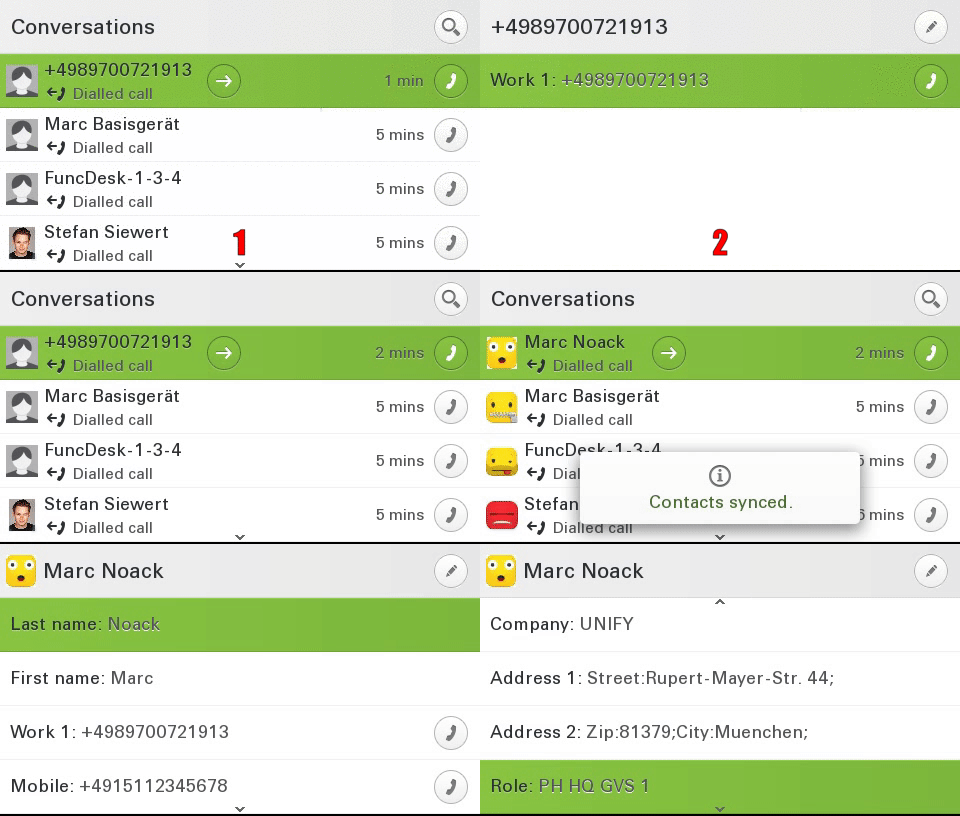
|
requirement: Exchange , Canonical settings
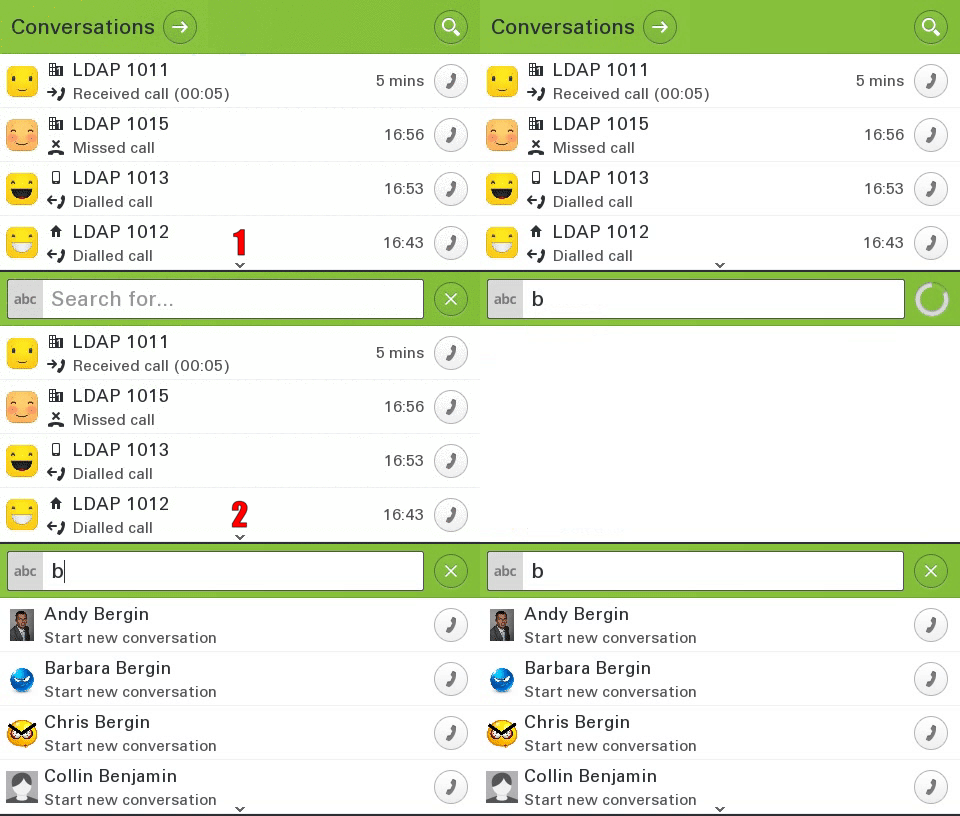
Intuitive search function
The search function has been completely redesigned to give the user an intuitive and easy way to search for both local and corporate contacts at the same time. The local search results are displayed, followed by the company entries (LDAP).
|
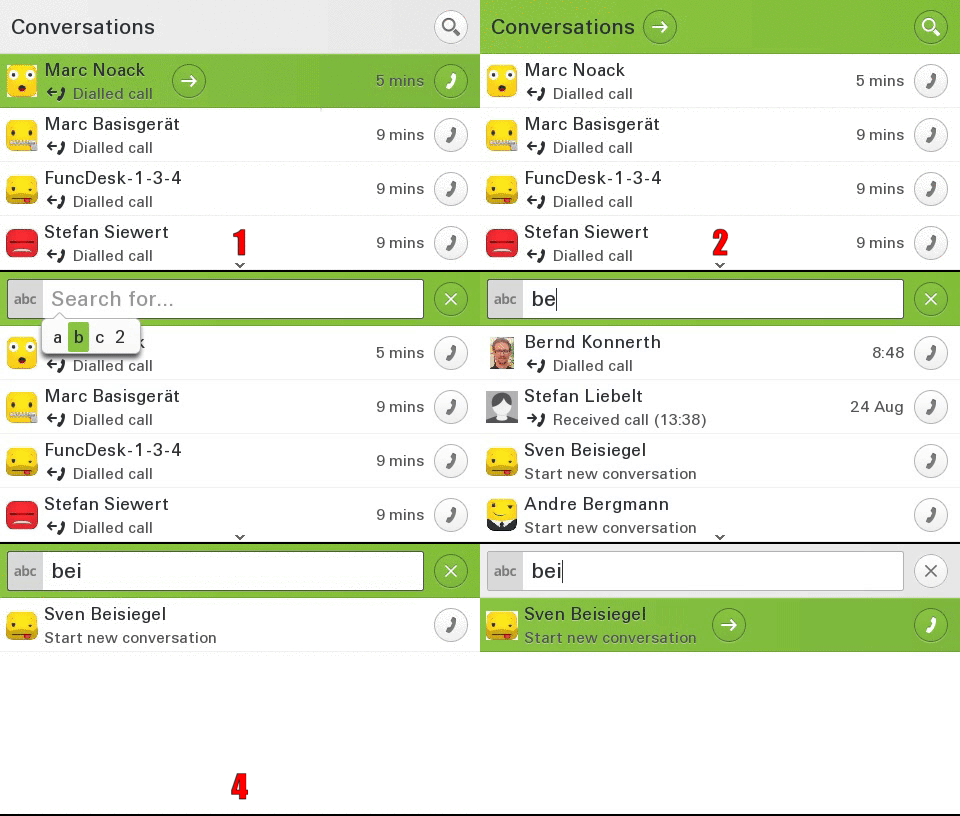
|
requirement:Canonical settings, optional LDAP
Real time LDAP
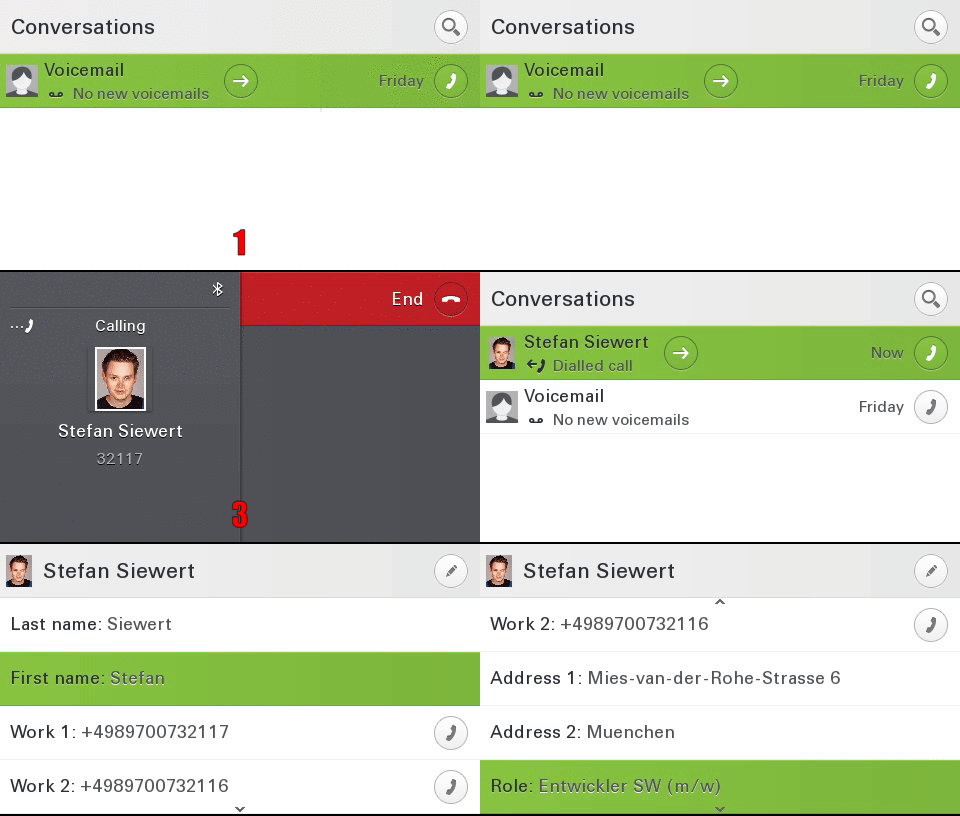
Dialed/incoming phone numbers are automatically synchronized with the corporate directory.
|
|
requirement:Canonical settings, LDAP
V1 R2
Circuit Mode
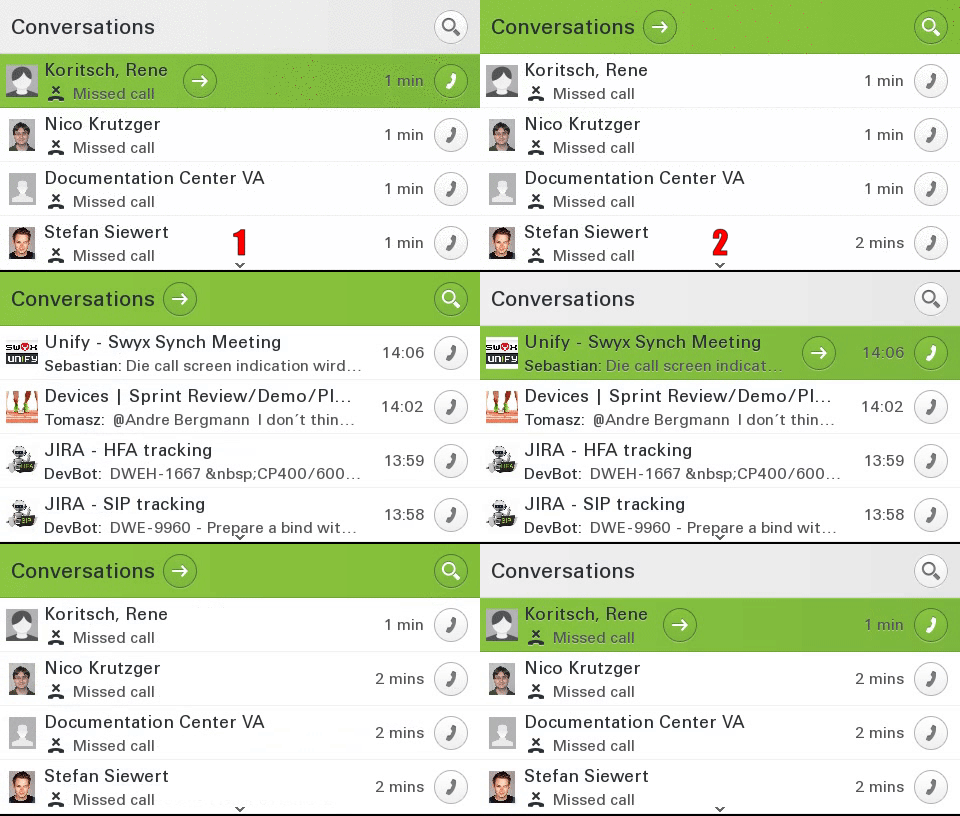
Easy switch between normal and circuit mode.
|
|
requirement:Circuit
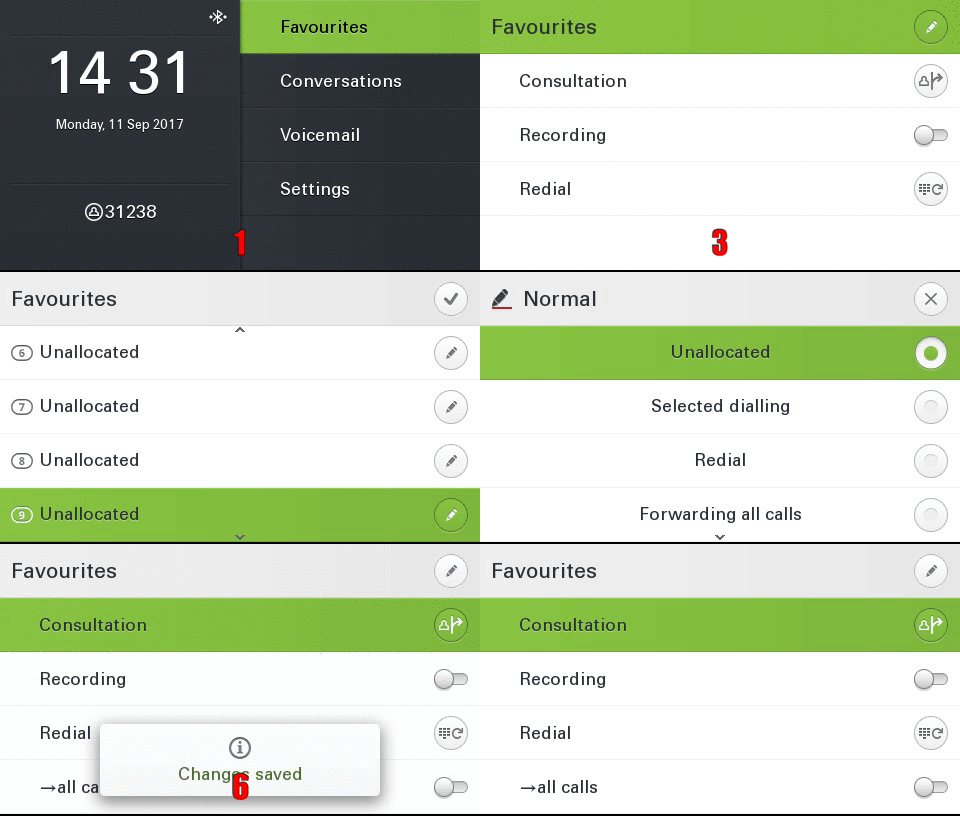
CP600 12 favorites
When the key-module is disconnected, the user is now able to configure up to 12 favorites.
|
|
requirement: nothing
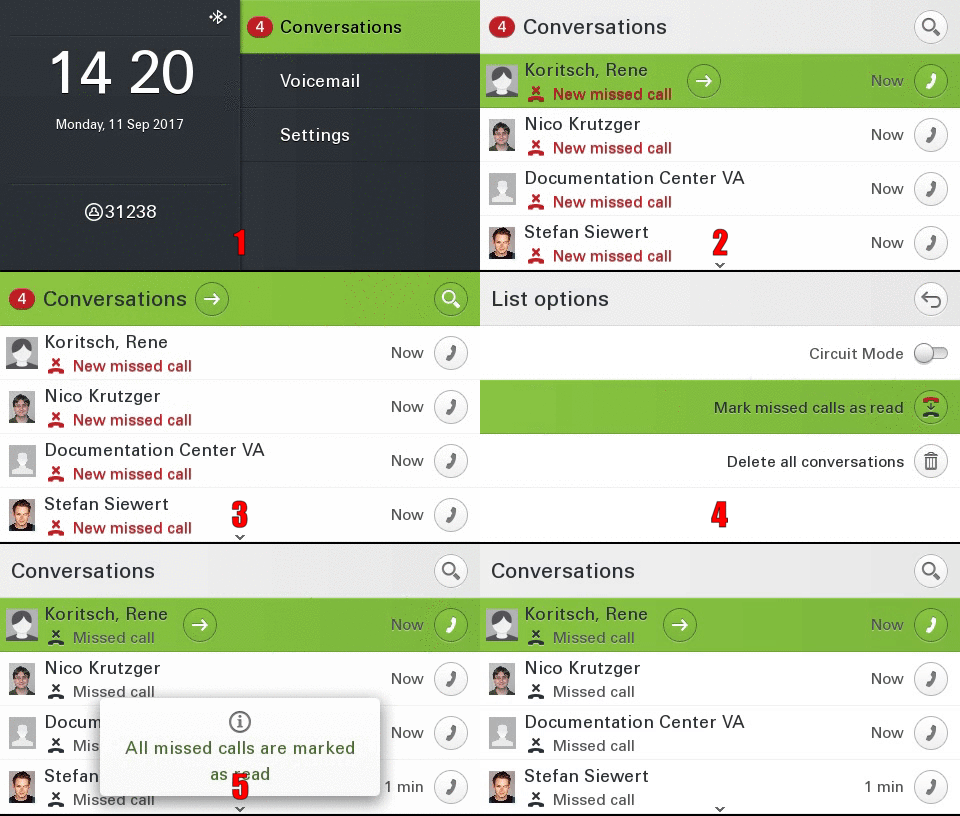
Mark all conversations as read
With 3 clicks it is possible to mark all conversations as read at the same time.
|
|
requirement: nothing
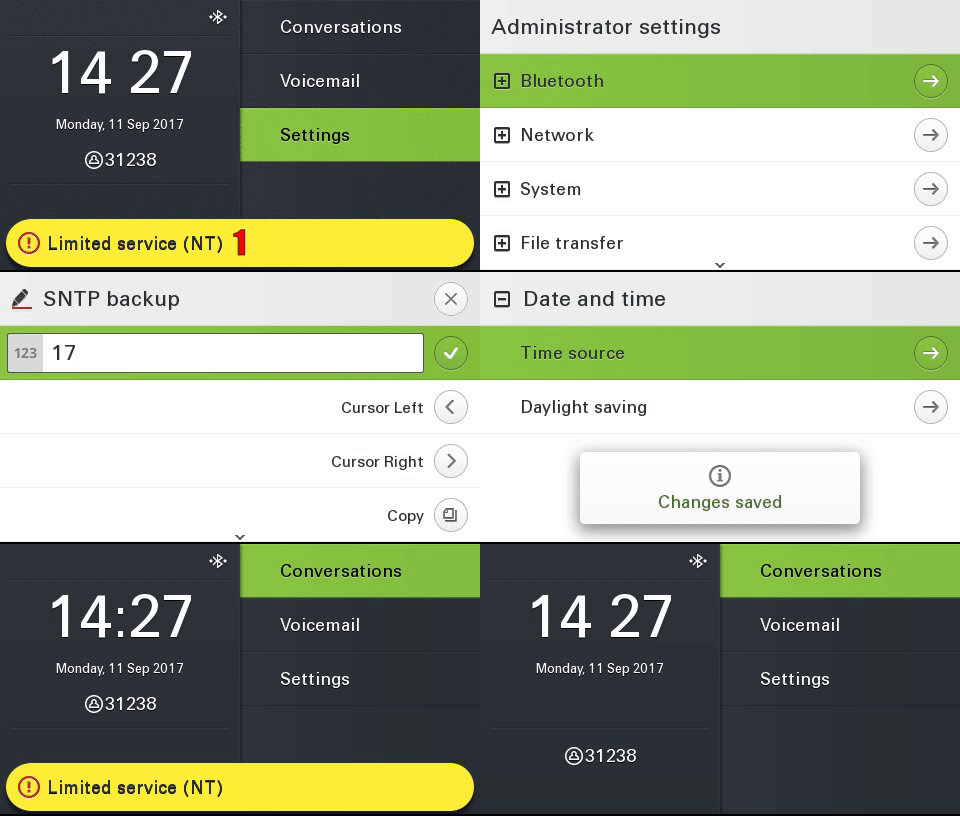
NTP Backup
If the device cannot reach the configured NTP (time) server, an error message is displayed on the display. In addition, it is possible to configure a backup NTP server.
|
|
requirement: Backup NTP
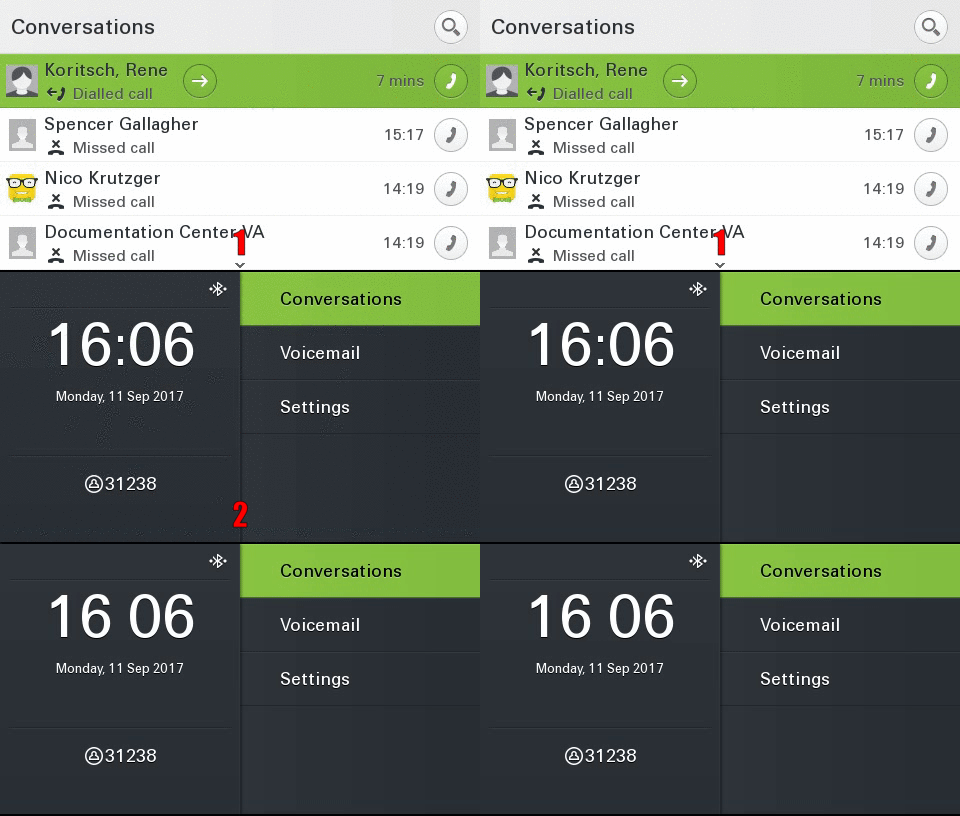
Idle Screen
After a configurable timeout, the device automatically displays the configured idle screen.
|
|
requirement: Idle Screen
V1 R3
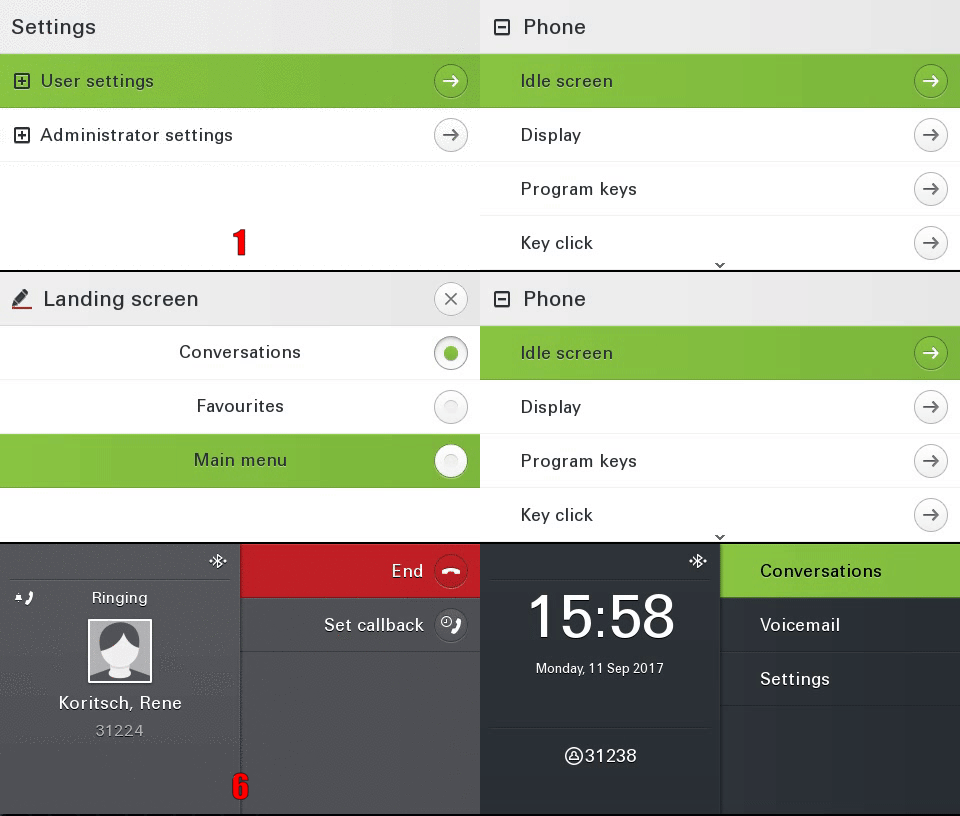
Landing Screen
The user can set the landing screen individually.
|
|
requirement: Landing Screen
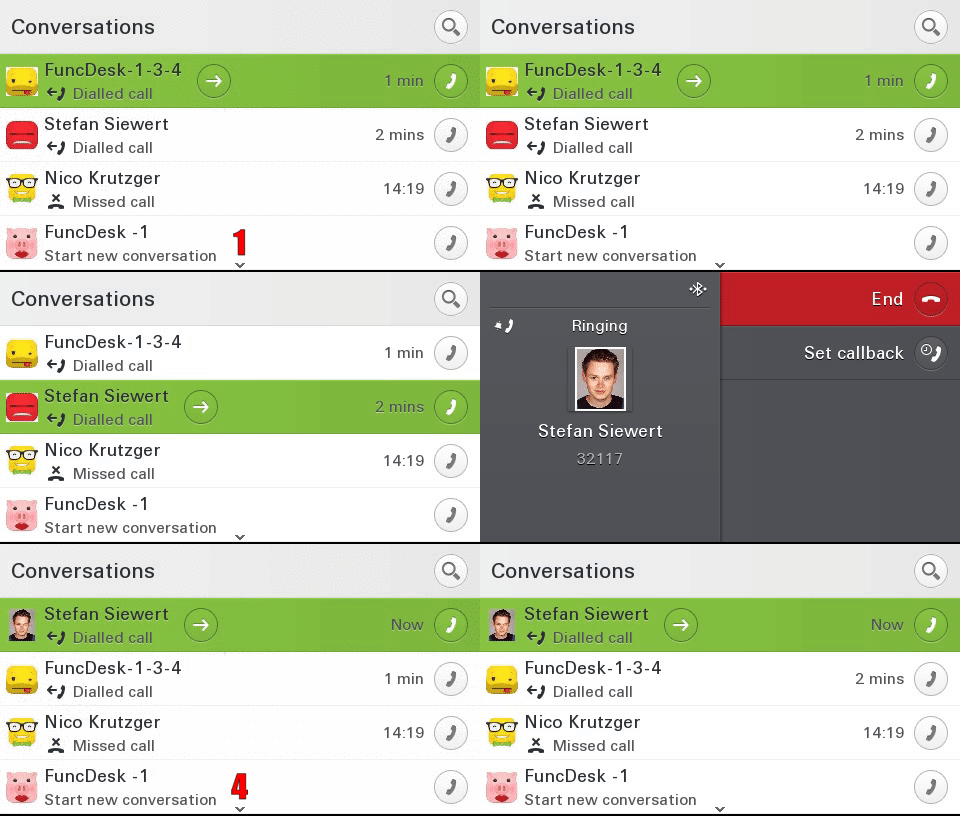
Permanent LDAP Lookup
If activated, an LDAP request is also sent for existing contacts.
|
|
requirement: LDAP , Canonical settings
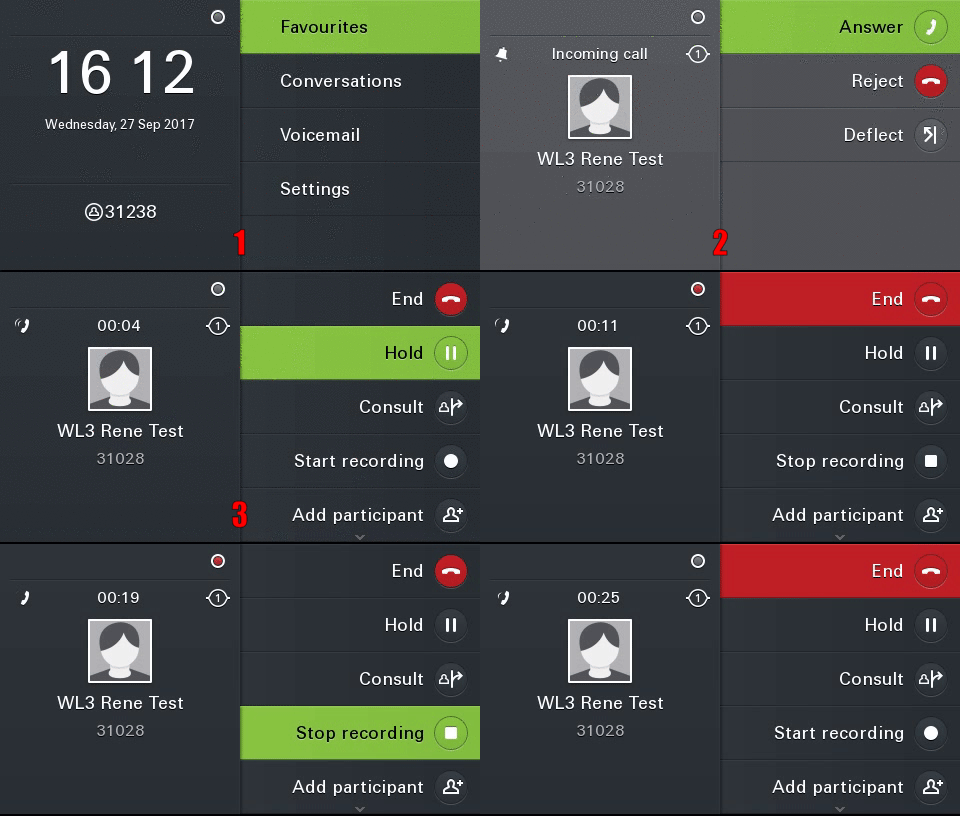
Call Recording
Easy control and overview of call recording status.
|
|
requirement: Call Recording
V1 R4
Phone number type as icons
To increase the overview, a corresponding icon is displayed for each call number type (mobile, basic, business)
|
|
precondition: none
Call logging for secondary line
In the conversation list calls which are answered via the secondary line are logged
|
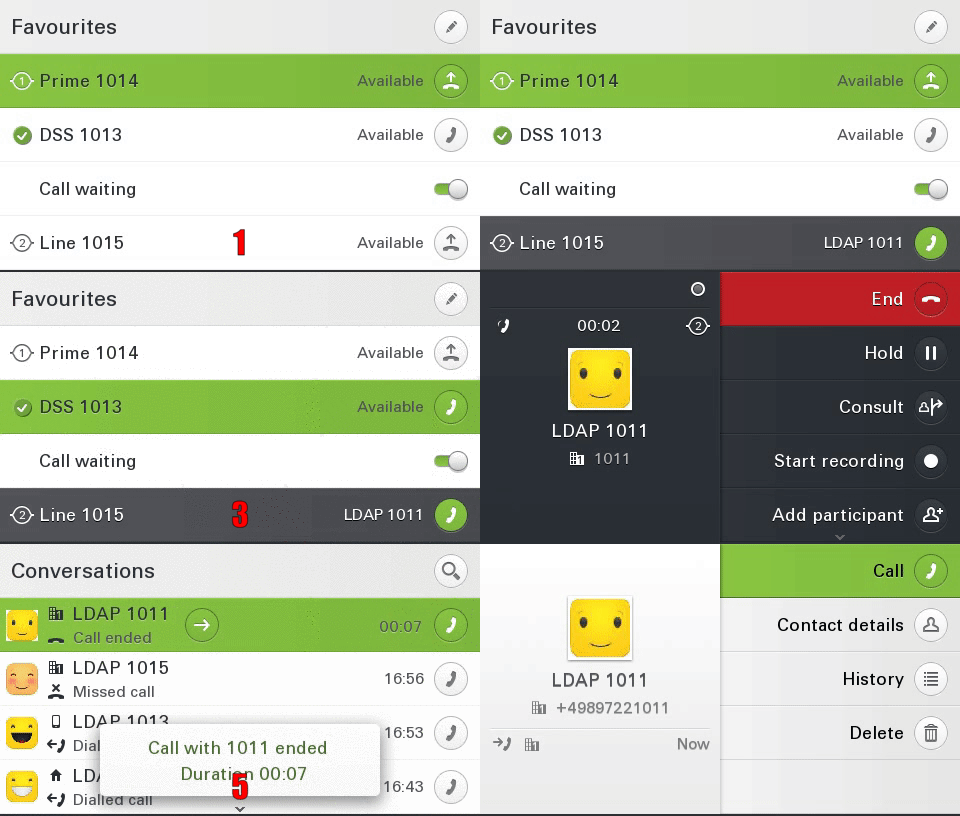
|
precondition: none
Alphabetical sorting (LDAP)
LDAP search results are displayed in alphabetical order
Type-based alternative number representation
The alternative phone numbers are displayed type-based for an outgoing call.
|
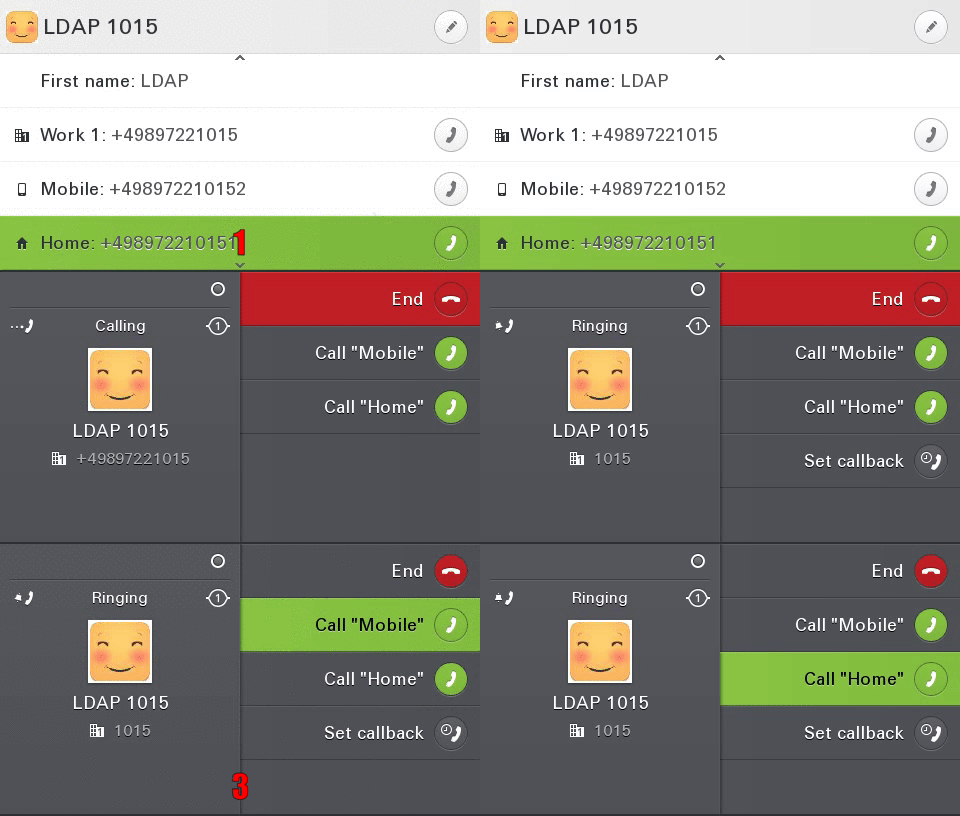
|
precondition: none
Create new conversation (contact)
The user can create an individual conversation (contact)
|
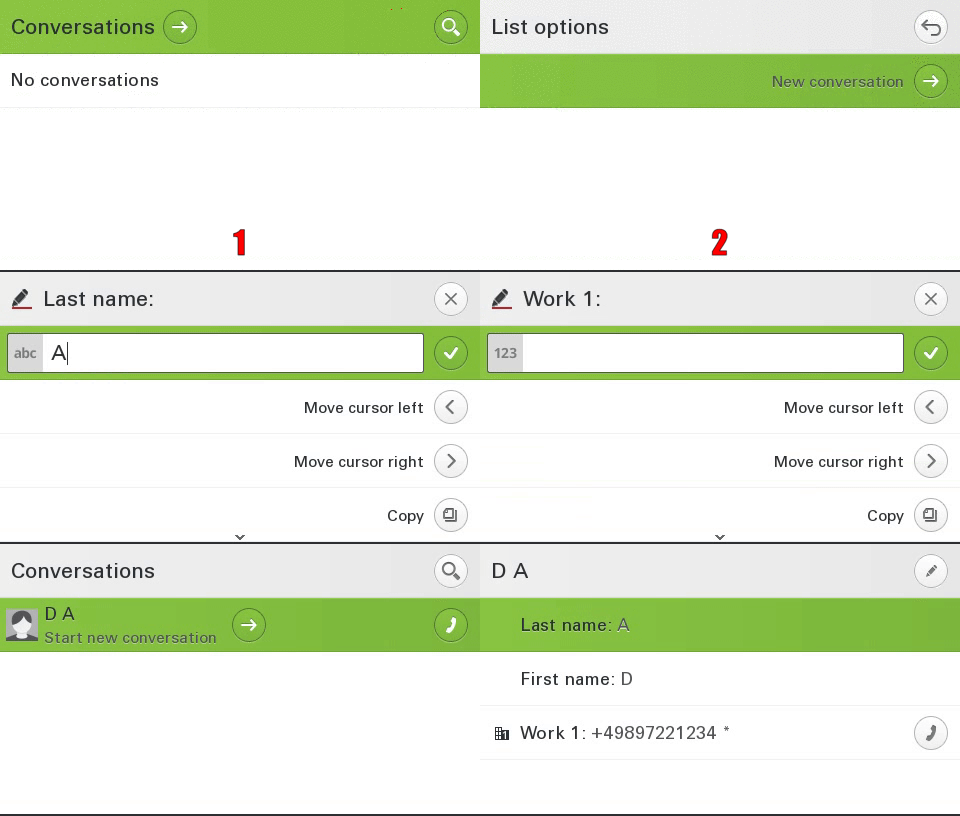
|
precondition: none
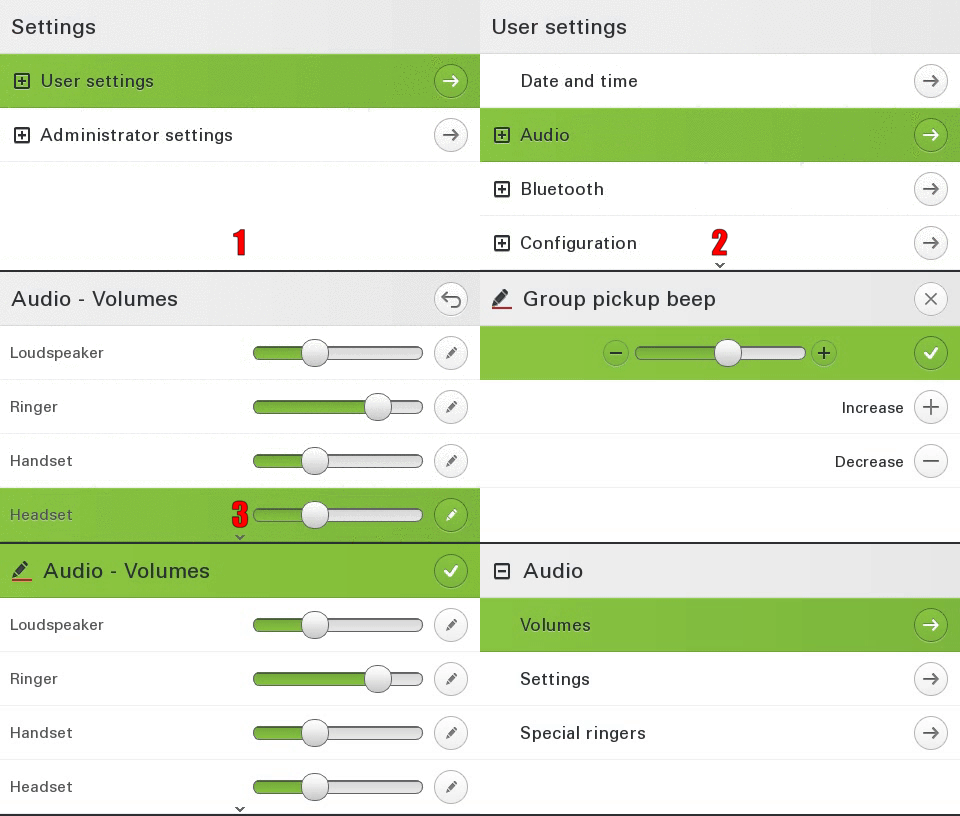
Group call volume (beep)
The volume of the group call (beep) can be set individually by each user
|
|
precondition: none
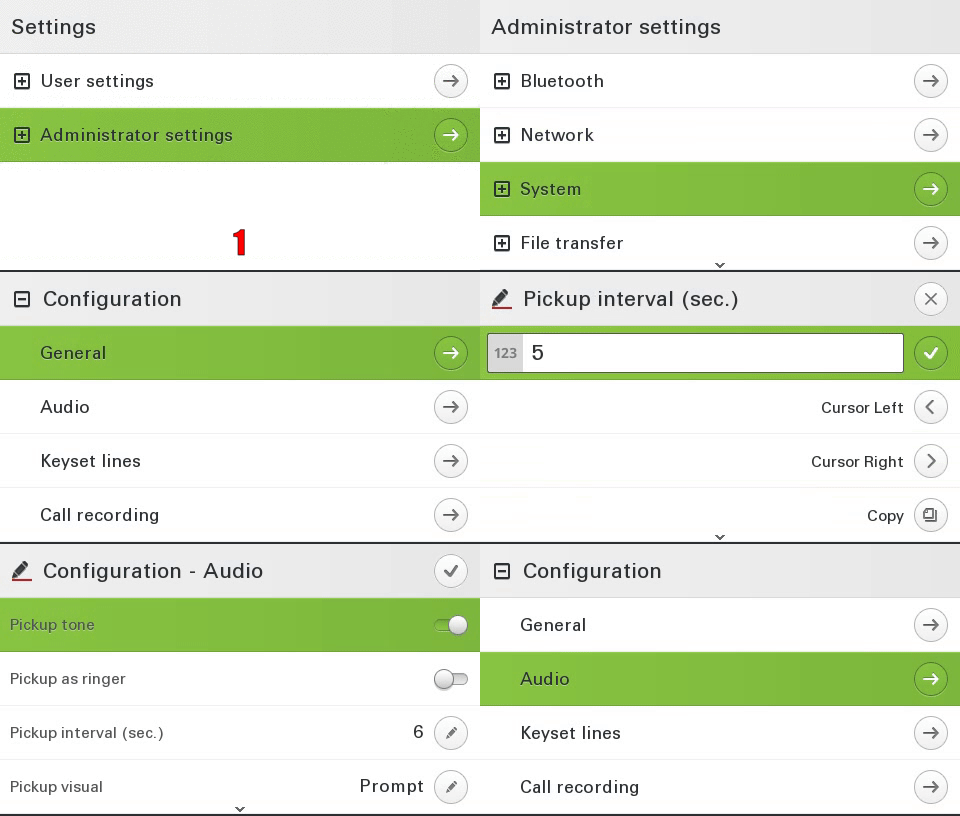
Group call acoustic repeat
The administrator can determine in which time frame the group call is repeated acoustically (from 0 to 30 seconds)
|
|
precondition: Administrative access
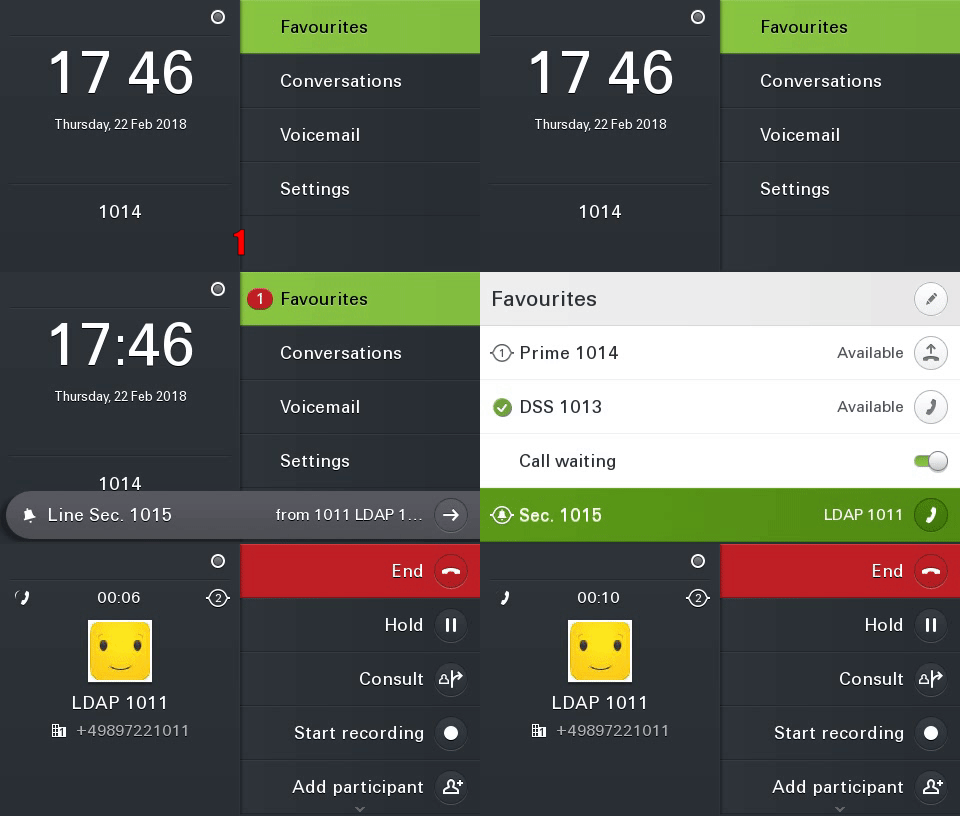
Popup for secondary lines (idle)
incoming calls on the secondary line are signalled on the idle screen by an info popup. This popup contains who is calling and for which line the call is being made.
|
|
precondition: Rollover visual alert: visual alert, Ringing disabled on the line
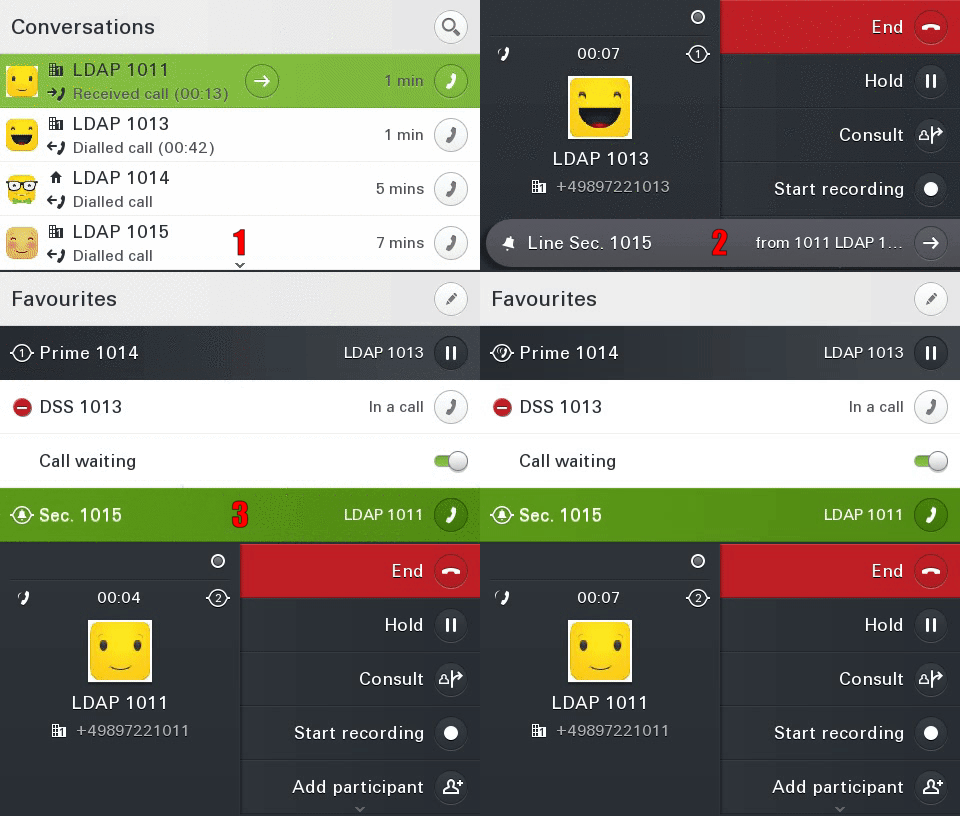
Popup for secondary lines (active call)
incoming calls on the secondary line are signalled by an info popup in call status. This popup contains who is calling and for which line the call is being made.
|
|
precondition: Rollover visual alert: visual alert
Popup at the end of the call
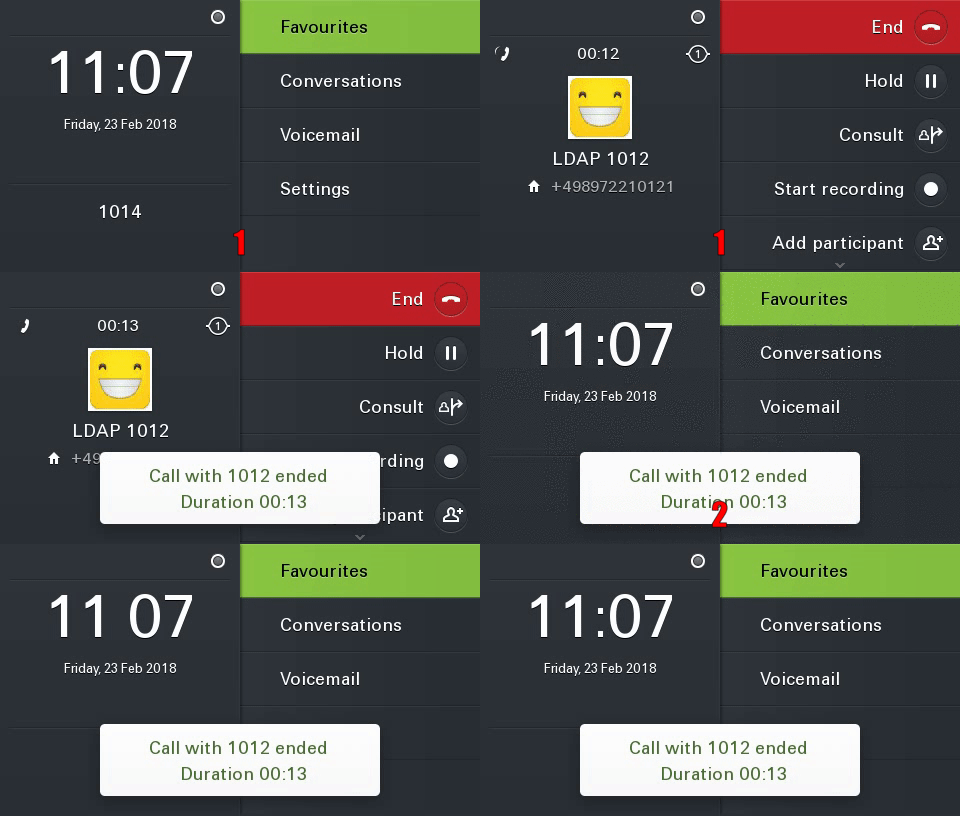
At the end of the call, an info popup with call duration and subscriber is automatically displayed.
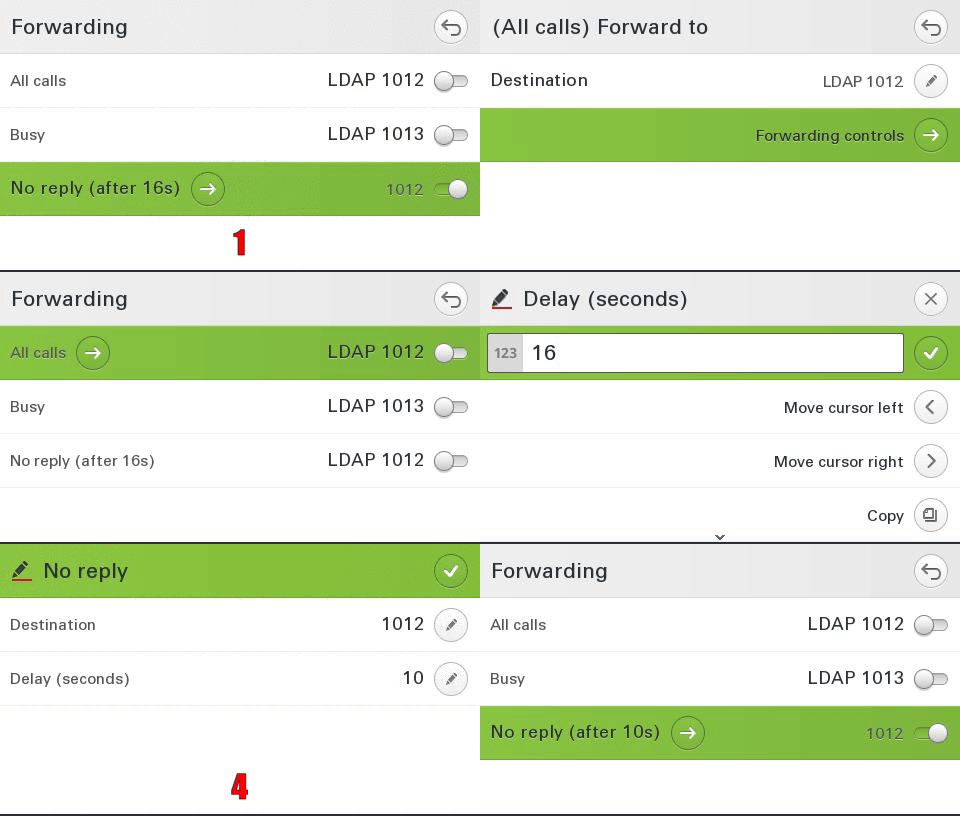
Delay for "Forwarding after time"
The delay for "Forwarding after time" can be set individually by the user
|
|
precondition: Server features disabled
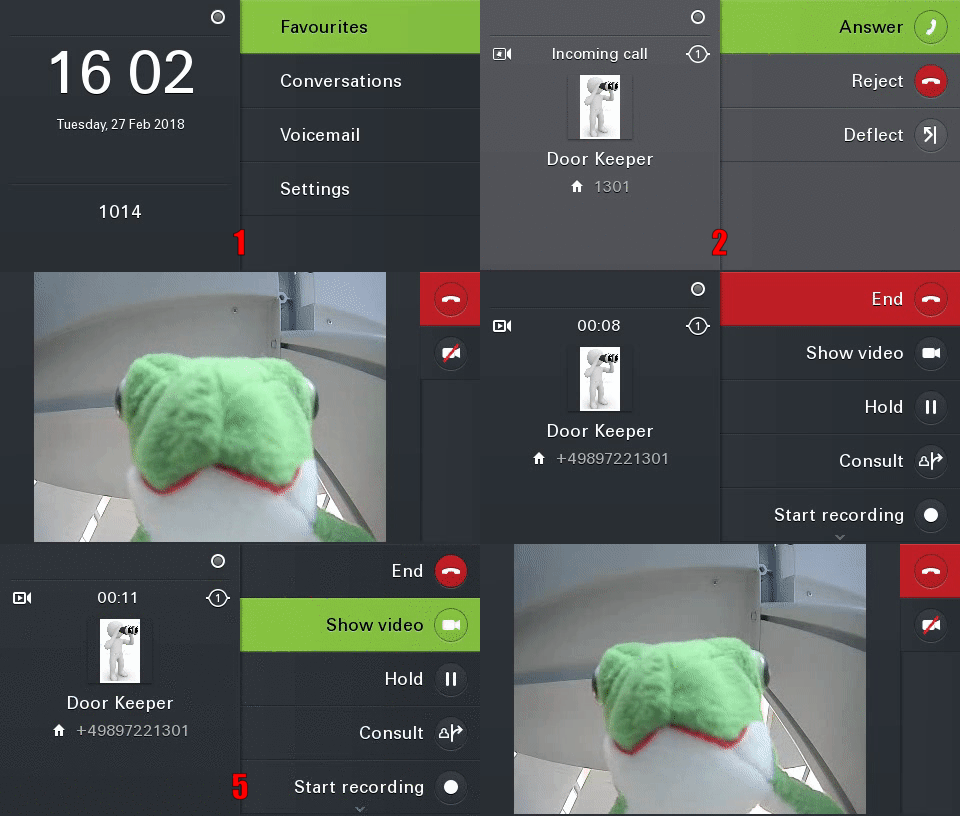
Video Support
The device can display video streams from other participants
|
|
precondition:
V1 R5
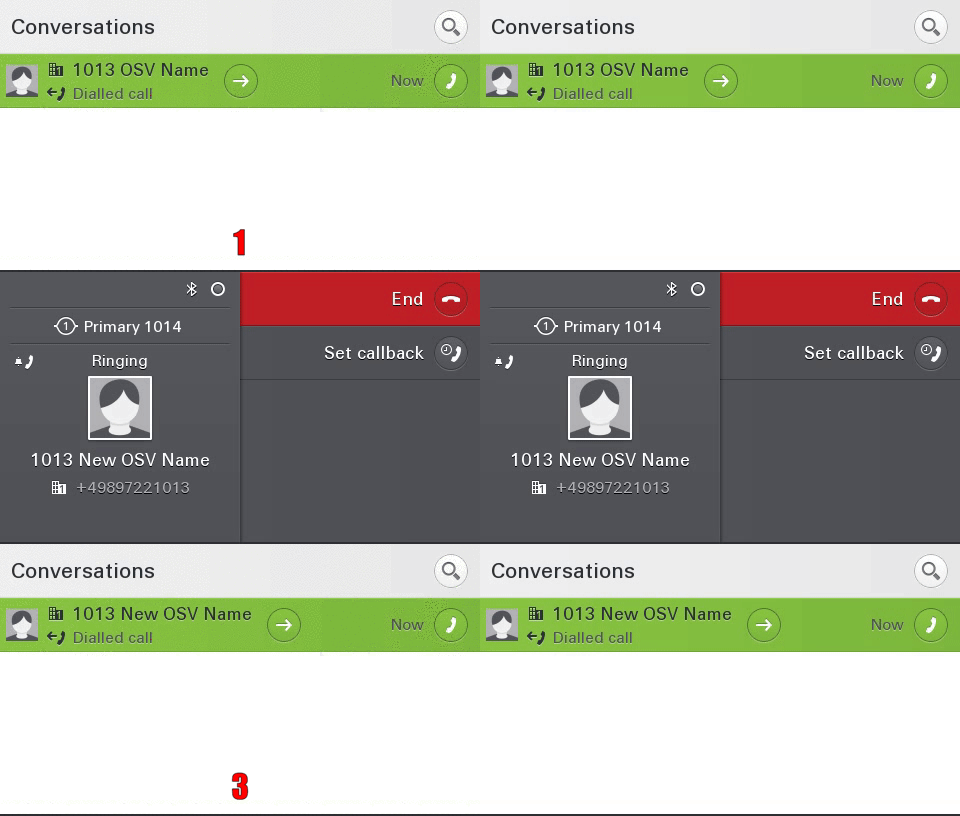
Name Update for existing conversations (Signalling -> Signalling)
With a new configuration option it is now possible to dynamically update the names of existing conversations. In this example, an update of a purely "signaling" based conversation is performed.
|
|
requirement: Master Source configured
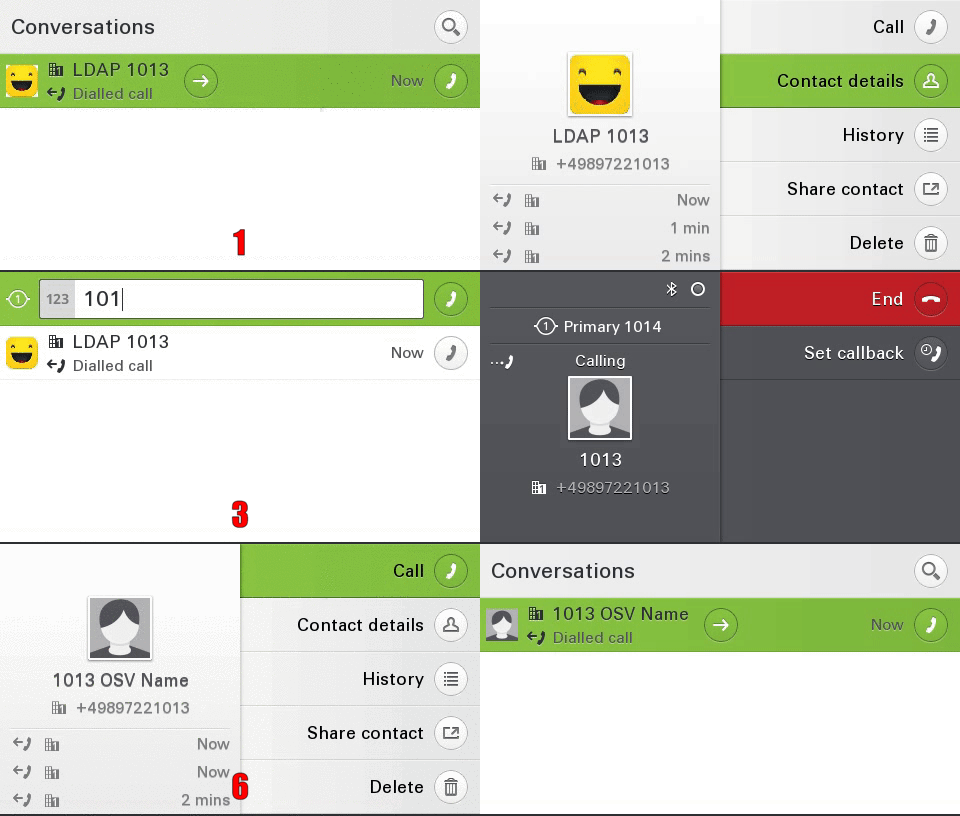
Name Update for existing conversations (LDAP -> Signalling)
With a new configuration option it is now possible to dynamically update the names of existing conversations. In this example, an update of an "LDAP" based conversation to a "Signalling" conversation is performed.
|
|
requirement: Master Source configured
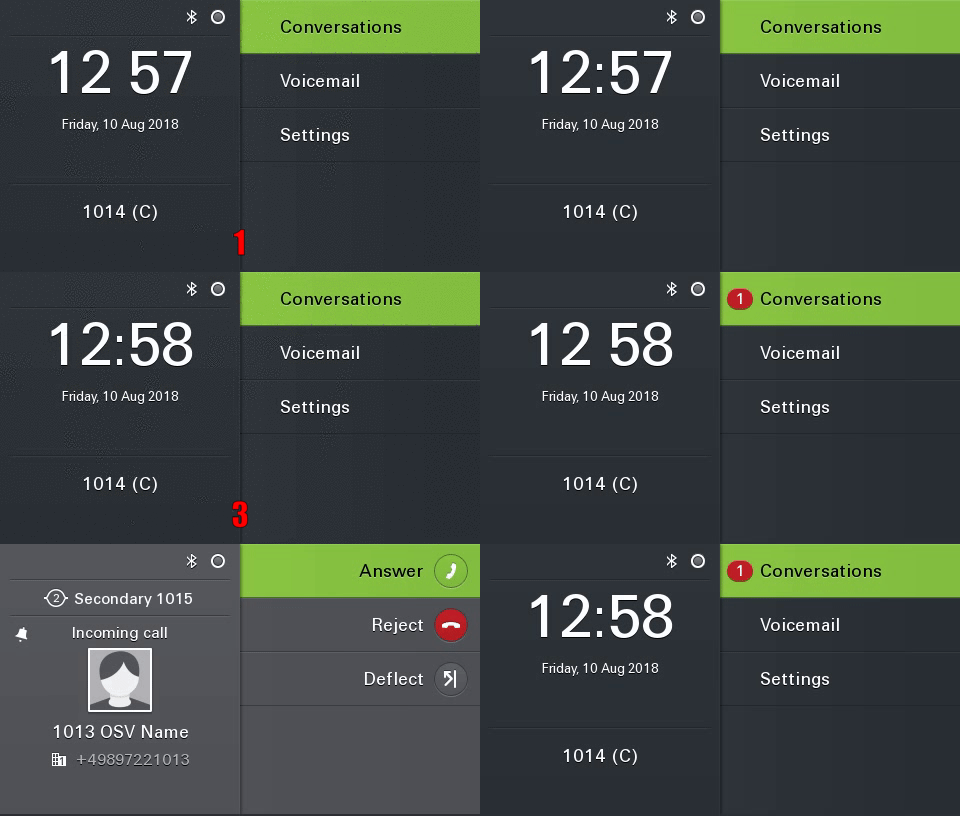
Display of the keyset label (incoming call)
In addition to the line number, the configured "Keyset Label" is now also displayed to increase the overview for the user.
|
|
requirement: Multiline and Configured Label
V1 R6 Feature Karten
Bluetooth Tastatur
Mit der Unterstützung von Bluetooth Tastaturen vereinfacht sich die Eingabe und die Suche nach Kontakten. Das Telefon kann dabei vollständig über die Tastatur gesteuert werden. Bitte beachten Sie, dass jeweils nur eine Tastatur oder ein Fernauslöser an das Telefon angeschlossen werden kann.
|
|
Voraussetzung: Pairing von BT Geräten, wie in diesem Video gezeigt.
Bluetooth Fernauslöser
Mit der Unterstützung von einem Bluetooth Fernauslöser ist es möglich eine Funktion aus den Favoriten oder von einem Key Modul 600 mit einem Fernauslöser zu bedienen. Bitte beachten Sie, dass jeweils nur eine Tastatur oder ein Fernauslöser an das Telefon angeschlossen werden kann.
|
|
Voraussetzung: Pairing von BT Geräten, wie in diesem Video gezeigt.
E/A Cockpit und Mobility
Diese Funktionen verbindet E/A Cockpit mit mobilen Arbeitsplätzen. Verbindet man einen E/A Cockpit Status, z.B. 'Zum Anrufbeantworter' mit der Abmeldung am Telefon, so wird dieser Status automatisch in E/A Cockpit eingestellt, wenn man sich am Telefon abmeldet. Diese Funktion kann vom Administrator eingerichtet werden.
|
|
Voraussetzung: E/A Cockpit ist am Telefon eingerichtet.
Bestandsverwaltung mit LLDP-MED
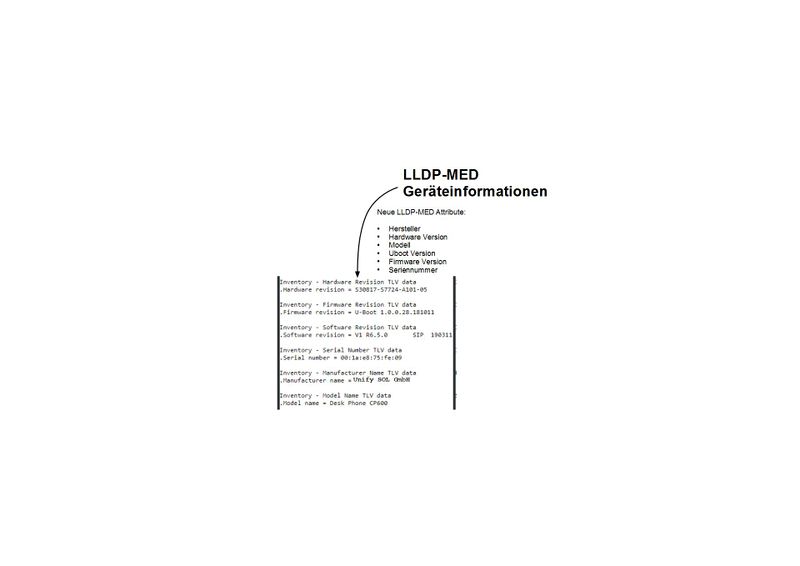
Das LLDP (Link Layer Discovery Protocol) ist ein herstellerunabhängiges Layer-2-Protokoll, das die Möglichkeit bietet, Informationen zwischen Nachbargeräten auszutauschen. Alle CP Telefone teilen nun Informationen zur Hardware und zur Software über dieses Protokoll mit anderen Netzwerkkomponenten, so dass damit eine einfache Bestandsverwaltung möglich wird.
Favoriten im Hauptmenü
Wenn im Hauptmenü unbenutzte Einträge vorhanden sind, werden diese mit Einträgen aus dem Favoritenmenü aufgefüllt. Dadurch erleichtert sich der Zugriff auf diese Favoriten, da sie nun in beiden Menüs zu finden sind.
Logo im Hauptmenü
Der Administrator kann im CP400/600/600E in Logo einspielen, dass dann im Hauptmenü angezeigt wird. Dadurch lassen sich leicht Notrufnummern, Logos oder Gruppenbezeichnungen in das Telefonfon integrieren, so dass es ab individuellen Bedürfnisse des Kunden angepasst werden kann.
Einen neuen Kontakt/Konversation erstellen
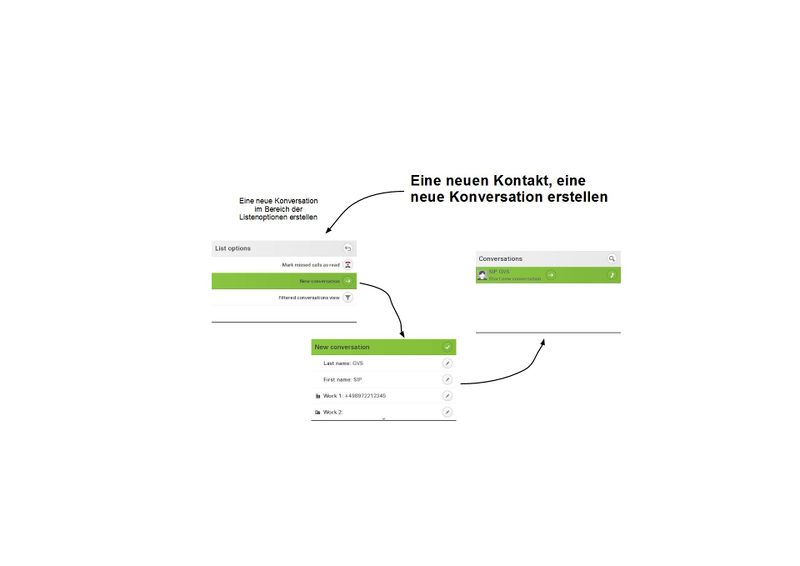
Über das Kontextmenü der Konversationsliste kann eine neue Konversation/Kontakt manuell erstellt werden.
|
|
Wichtig: Der Namensupdate über Signalling muss deaktiviert sein, sonst wird die Konversation mit den Informationen aus der Anlage überschrieben.
Filterfunktion für Konversationen
Konversationen können nach Typ gefiltert werden. Folgende Filterkriterien sind möglich:
- Alle
- Verpasst
- Angenommmen
- Gewählt
- Kontakte
- Andere
Aufmerksamkeitston aus- und einschalten
Der Aufmerksamkeitston signalisiert akustisch einen Zweitanruf in ein bestehendes Gespräch. Dies kann unter Umständen störend sein und den aktiven Anruf unterbrechen. Daher kann man nun den Aufmerksamkeitston für Zweitanrufe abschalten.

