CP600 SIP Feature example Videos
Short videos (max 60 seconds)
By pressing the "Expand" button, you will be presented with a sample scenario + video.
|
Some functions require certain configurations. These are listed accordingly under the video.
|
V1 R1
Conversation
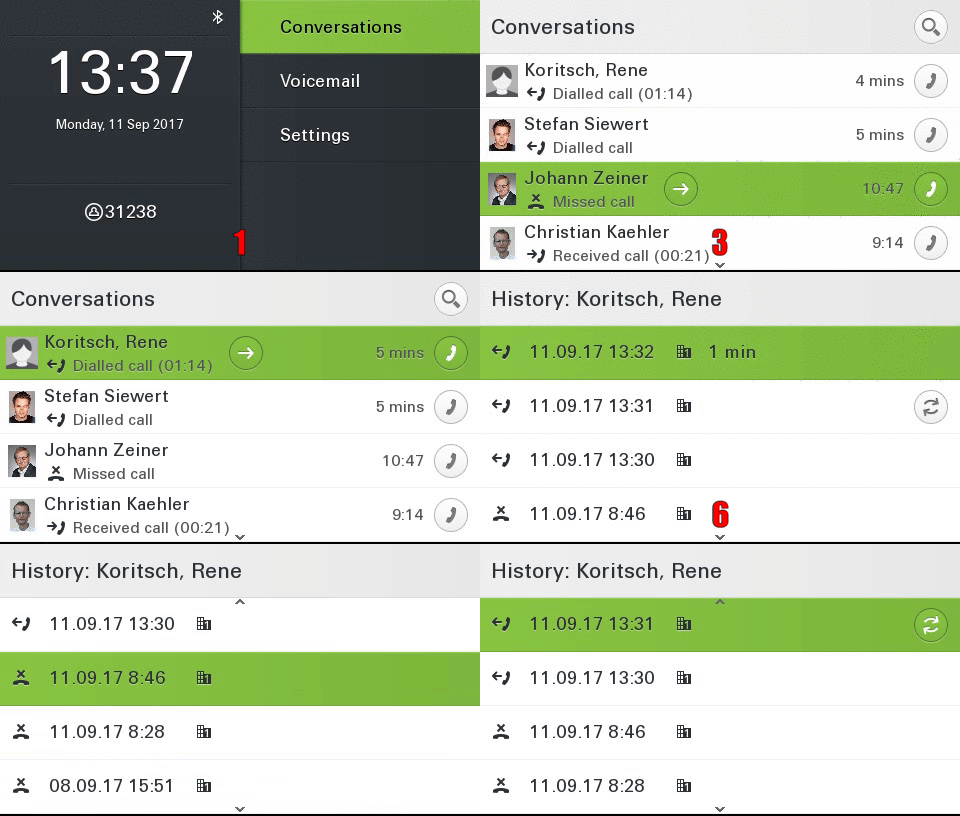
Introduction of the new Innovative Conversation Concept! LDAP, Exchange, and Call History are combined into a dynamic conversation. There is only one conversation per participant under which all relevant data are summarized.
|
1. Idle Screen is visible.
2. The conversation shows all contacts sorted by their last interaction. For a quick overview, the last interaction is displayed by means of a symbol as well as the corresponding text (outgoing call, missed call, etc..).
3. The user can use the up and down button to navigate through the conversation.
4. A long press jumps to the beginning or end of the list.
5. By pressing the right arrow key you can see more details. The last 3 interactions are displayed on the left side of the screen.
6. The "History" shows you the complete call history in a clear way.
7. the circle symbol indicate further information (e.g., call forwarding details). User can toggle the information via OK press.
|
|
|
requirement: Canonical settings
Bluetooth Proximity
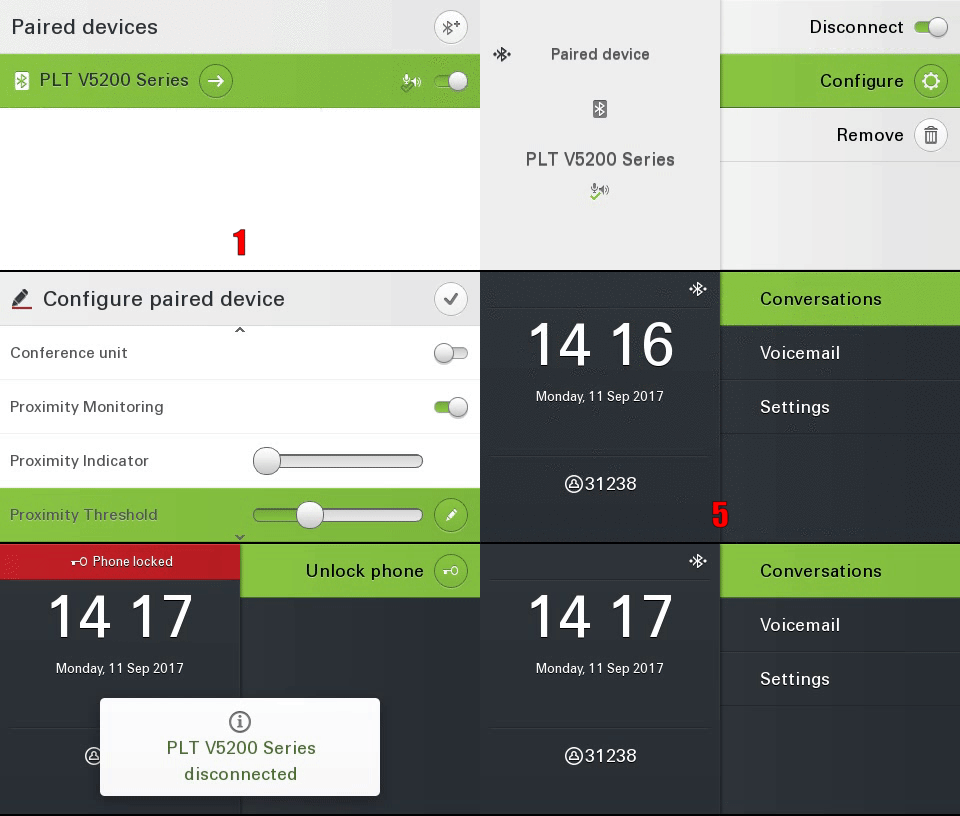
With the help of the extended Bluetooth interface, it is possible to automatically lock the device as well as to unlock it. The signal strength of the Bluetooth device is measured for this purpose. If this value falls below a certain value that is configurable, the device is automatically disabled.
|
1. Paired Bluetooth device is visible.
2. User switches to the Bluetooth configuration menu.
3. Proximity Monitoring will be activated.
It is also possible to change the proximity threshold.
4. With a long press, the user gets to the top configuration option and saves the configurations.
5. User switches to the main menu screen (Bluetooth device is connected).
6. The user leaves his workstation with the headset and the device is automatically locked.
7. The user returns and the device is automatically unlocked
|
|
|
requirement: Bluetooth
Delete all Conversations
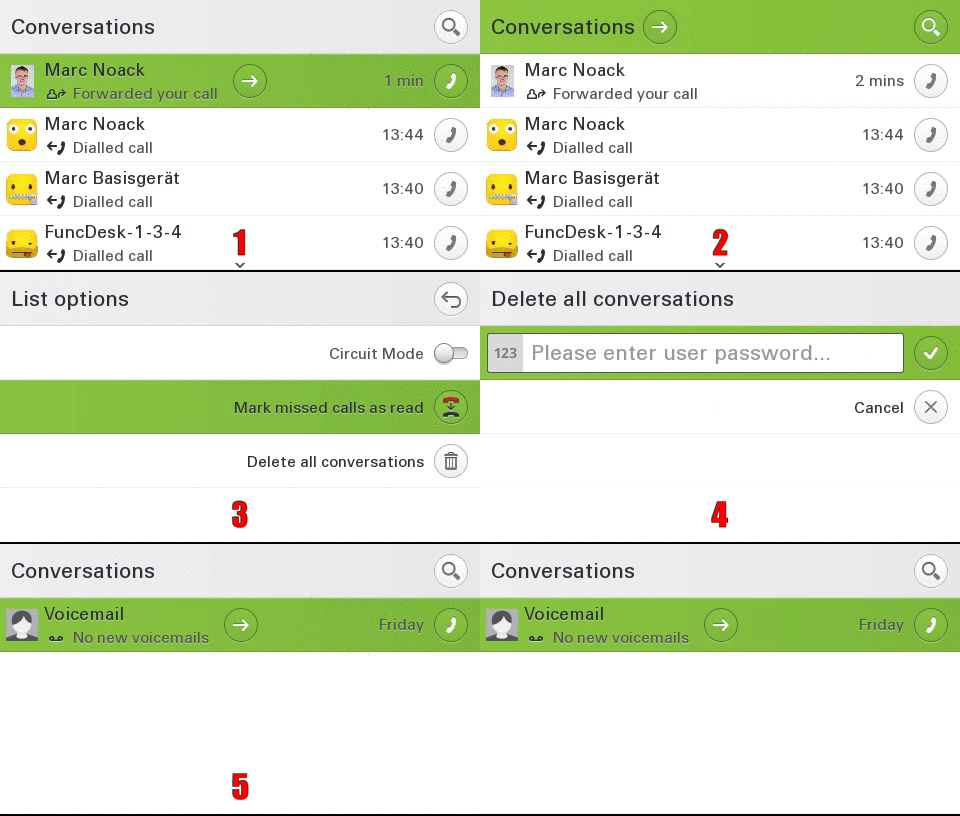
With 3 clicks, it is possible to delete all conversations at the same time.
|
1. The idle screen of the device is displayed.
2. By selecting the conversation line and pressing the OK key, the user accesses the conversation list options.
3. The function "Delete all Conversations" is selected.
4. If a user PW is set up, this must be entered.
5. The device automatically switches to the conversation screen. All conversations are deleted.
|
|
|
requirement: nothing
Intuitive dial out
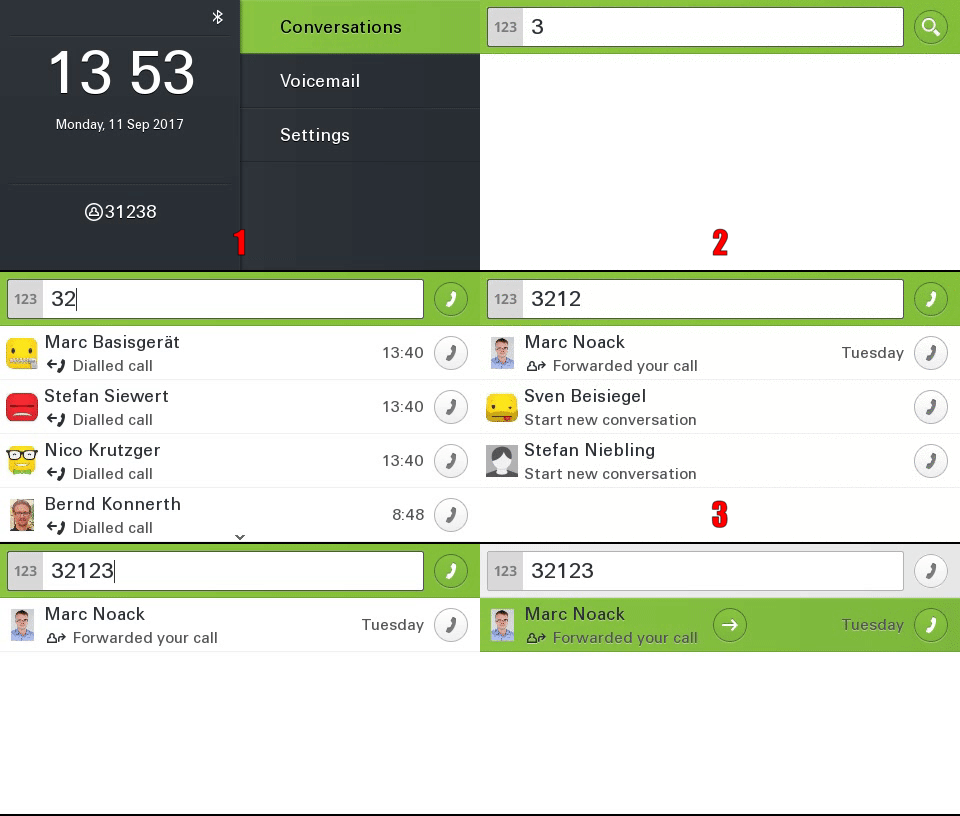
Even at the outset during dialing the user is shown all phone numbers relevant to the conversations in real time on the display. This saves time and simplifies the choice.
|
1. Idle screen is visible.
2. The user begins to dial the desired number. Immediately all the contacts are scanned in real time and displayed accordingly for the user. Each additional digits further restricts the search.
3. The requested contact (XXX23) is displayed at the top position after the fourth digit.
|
|
|
requirement: Canonical settings
Exchange
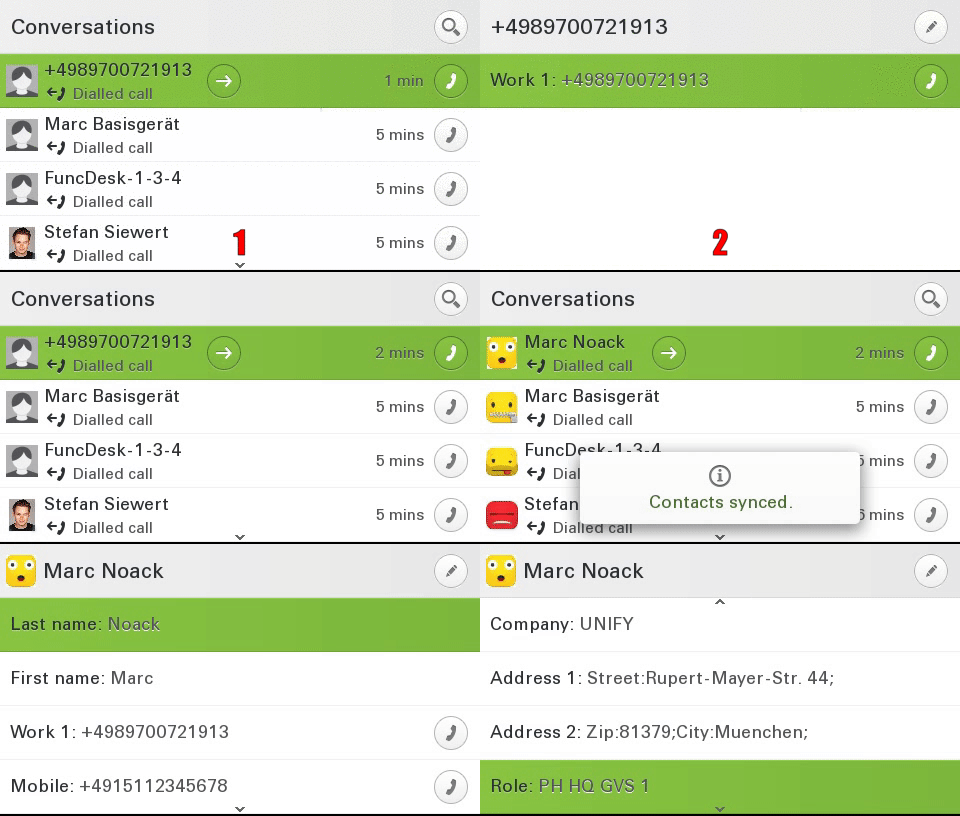
Automatic synchronization of Exchange contacts (e.g., Microsoft Outlook) to the device. Thus their contacts in the device are always up to date. Existing contacts are automatically supplemented by Exchange information.
|
1. Contact list with an unknown number (XX21913) is displayed.
2. The details of the contact show only the phone number.
3. Exchange synchronization starts and the conversation is dynamically updated.
4. From the previously unknown number, XX21913 becomes a complete entry with corresponding picture and contact information. The call history is, of course, not lost.
|
|
|
requirement: Exchange , Canonical settings
Intuitive search function
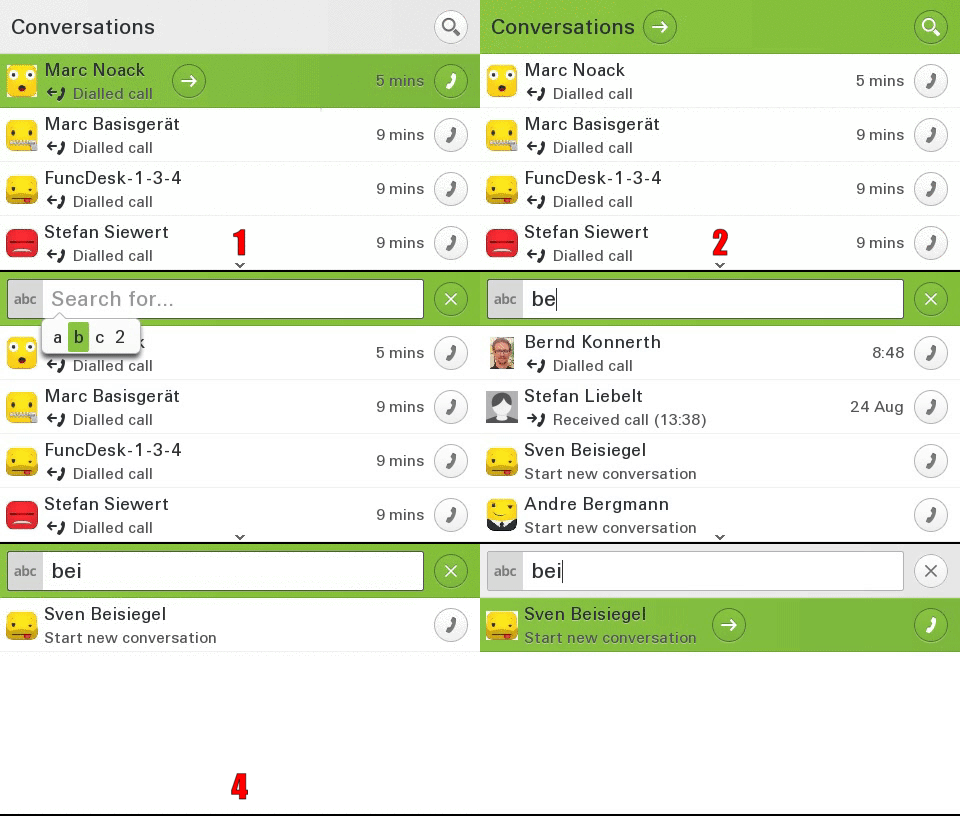
The search function has been completely redesigned to give the user an intuitive and easy way to search for both local and corporate contacts at the same time. The local search results are displayed, followed by the company entries (LDAP).
|
1. The last 4 conversations are displayed.
2. The user selects the search field and starts the search (press OK button). In the local search, both the first and the last name are searched at the same time.
3. Any input from the user restricts the results further.
4. New conversations can be seen very well with the text "Start new conversation" as well as the missing interaction time.
|
|
|
requirement:Canonical settings, optional LDAP
Real time LDAP
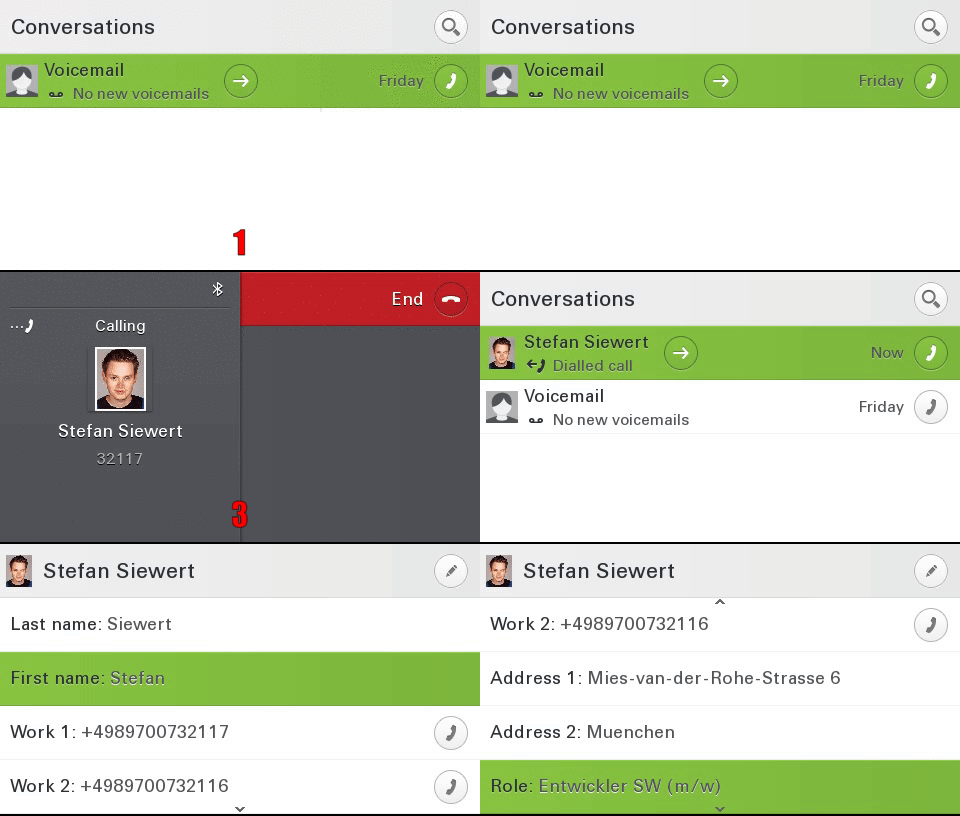
Dialed/incoming phone numbers are automatically synchronized with the corporate directory.
|
1. The example shows a completely empty conversation list.
2. The user dials the previously unknown numbers 32117. The device automatically sends a request for these numbers to the company directory (LDAP). If a hit occurs, all relevant contact information is immediately updated.
3. In this case, the contact picture is automatically downloaded from the configured LDAP server and displayed.
4. After terminating the conversation, the contact is automatically stored locally by the device.
5. By pressing the right arrow key, the user enters the local conversation details and can retrieve all existing corporate directory information.
|
|
|
requirement:Canonical settings, LDAP
V1 R2
Circuit Mode
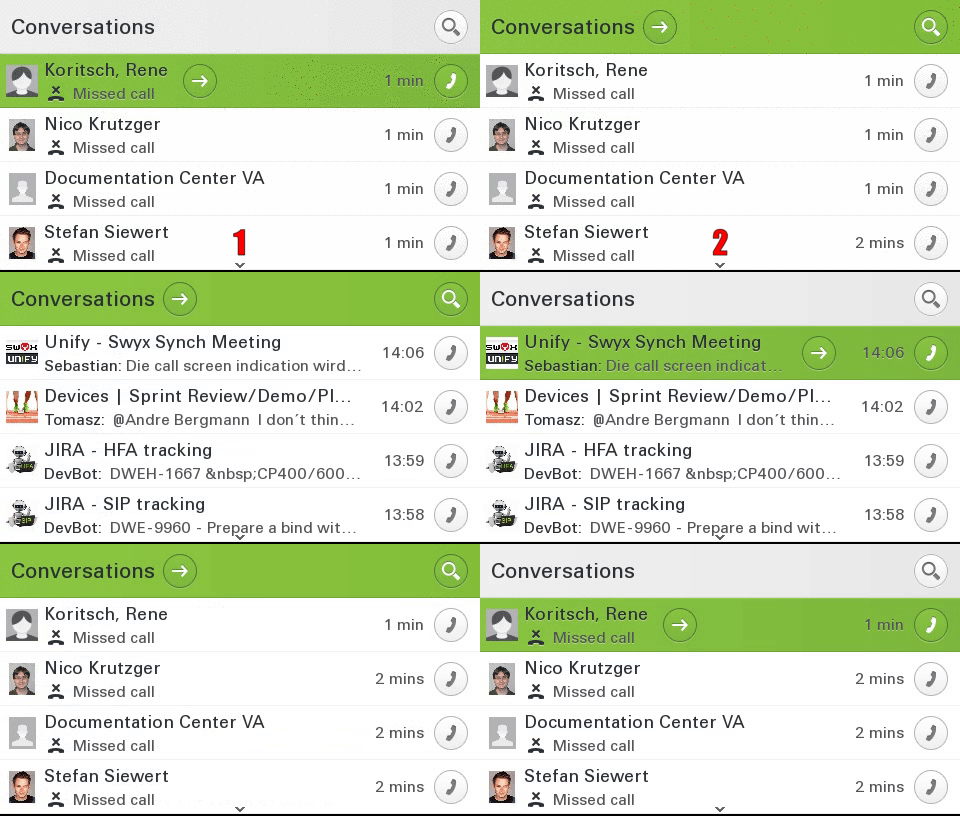
Easy switch between normal and circuit mode.
|
1. The conversation screen is displayed (phone mode is active).
2. By selecting the conversation line and pressing the OK key, the user accesses the conversation list options.
3. Pressing the OK key activates the circuit mode. The device now synchronizes itself automatically with the configured server.
The circuit conversations are displayed.
The local conversations are no longer displayed in this mode.
4. Subsequently, the user returns to the telephone mode in the same way.
|
|
|
requirement:Circuit
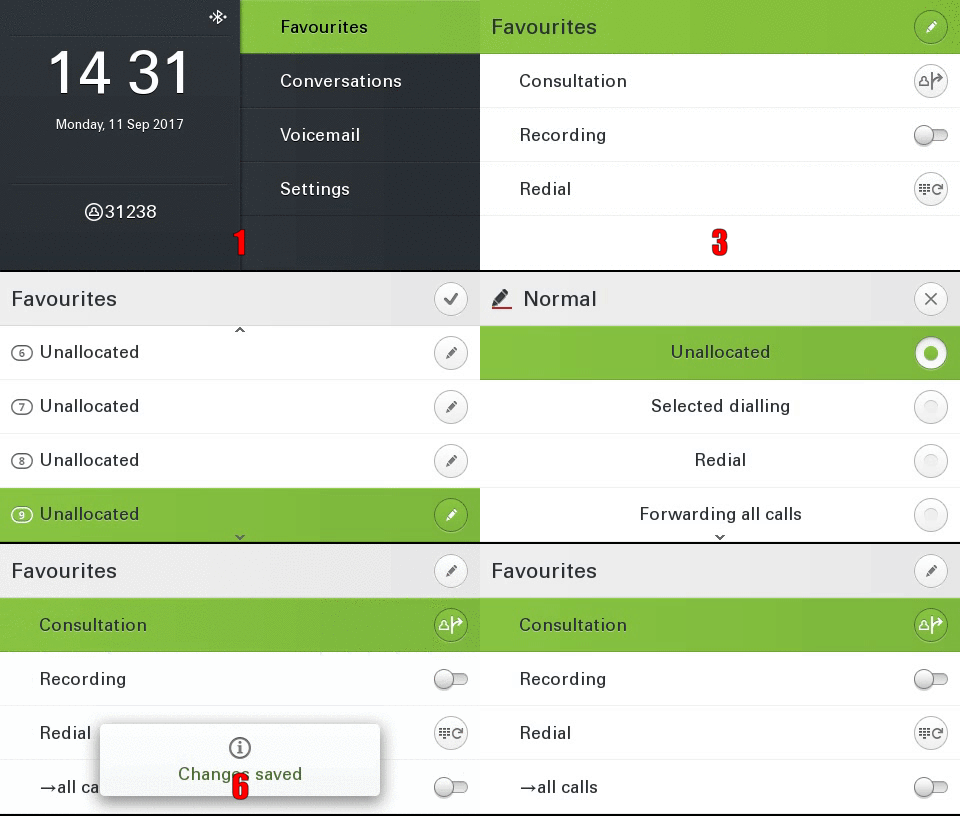
CP600 12 favorites
When the key-module is disconnected, the user is now able to configure up to 12 favorites.
|
1. The idle screen of the phone is displayed, including favorites.
2. Press the OK button to enter the user's favorites menu. All configured favorites are displayed here.
3. The user selects the favorite line and enters the configuration menu by pressing the OK key.
4. In this menu it is possible to program up to 12 individual keys.
5. By pressing the OK button, the user enters the configuration menu. Button 12 is used with the "Forwarding all calls" function.
6. After successful configuration the user automatically reaches his current favorites.
|
|
|
requirement: nothing
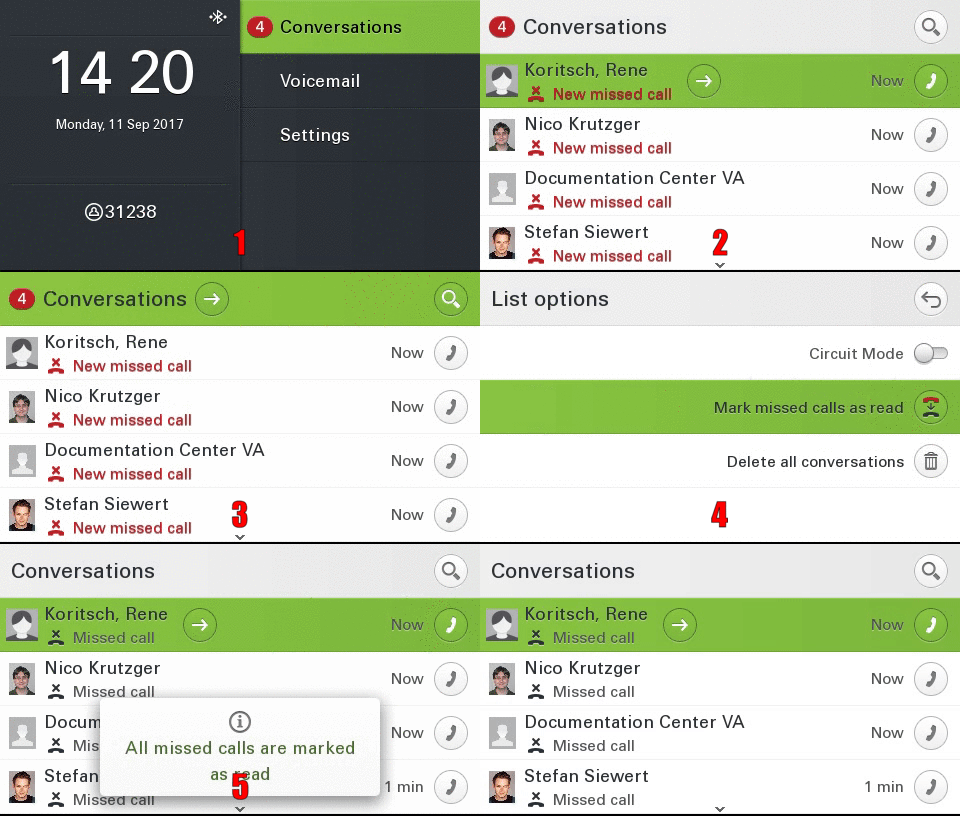
Mark all conversations as read
With 3 clicks it is possible to mark all conversations as read at the same time.
|
1. The idle screen of the device with 4 missed calls is displayed.
2. The user switches to the conversation screen.
3. By selecting the conversation line and pressing the OK key, the user accesses the list options.
4. The function "Mark missed calls as read" is selected.
Press the OK key to execute the function.
5. The device automatically switches to the conversation screen and marks all conversations as read.
|
|
|
requirement: nothing
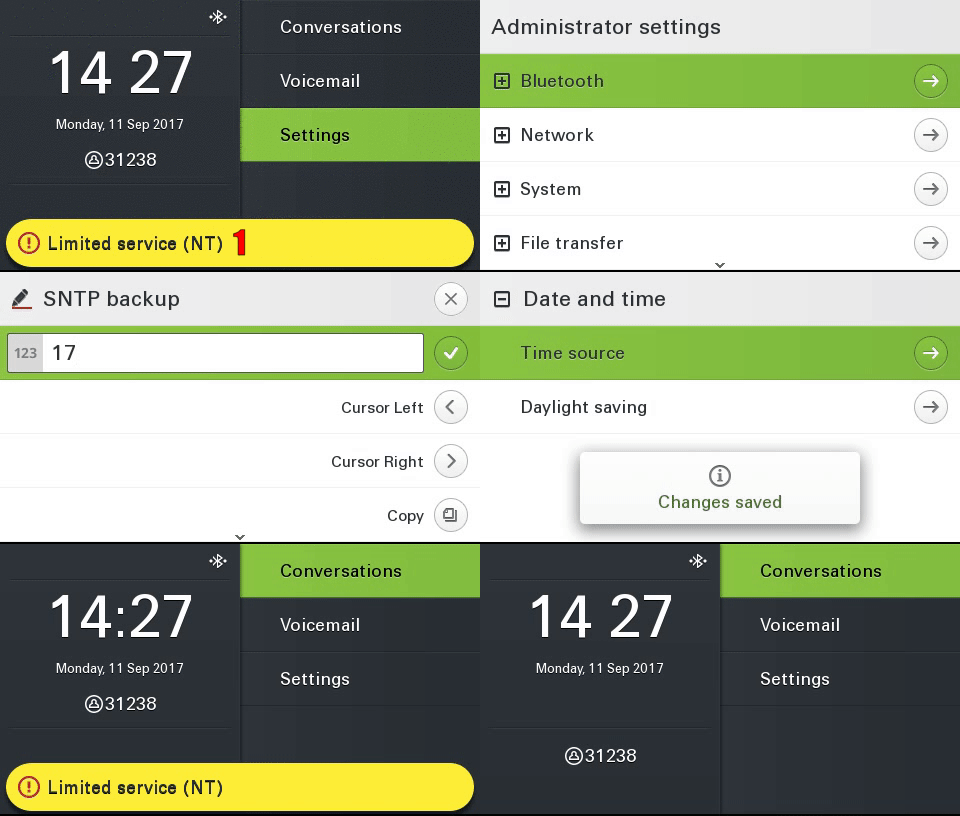
NTP Backup
If the device cannot reach the configured NTP (time) server, an error message is displayed on the display. In addition, it is possible to configure a backup NTP server.
|
1. The current NTP server cannot be reached. Therefore, an error message is displayed for the user.
2. From the Admin menu it is possible to configure a second (backup) NTP server (also via DLS and WBM).
3. The device contacts the newly configured time server (background process).
4. The second NTP server is reachable and transmits the current time. The error message for the user disappears.
|
|
|
requirement: Backup NTP
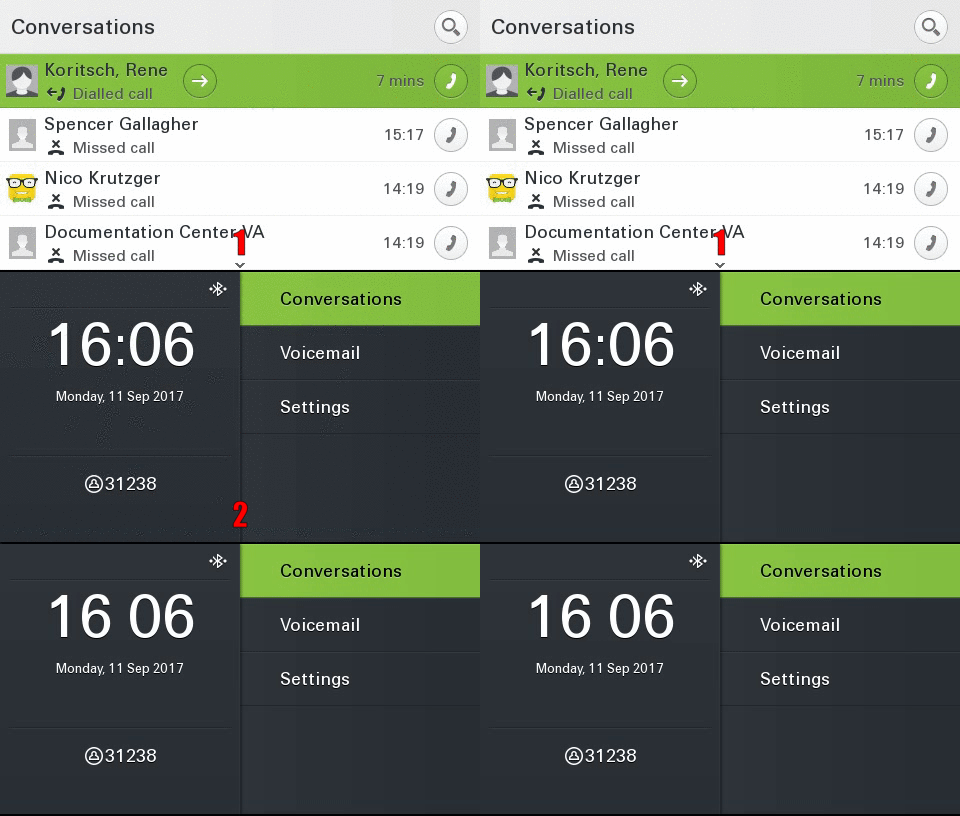
Idle Screen
After a configurable timeout, the device automatically displays the configured idle screen.
|
1. Conversation screen is visible.
2 After the configured timeout, the device automatically switches to the configured idle screen.
In this case, the idle screen is configured to "Menu screen."
|
|
|
requirement: Idle Screen
V1 R3
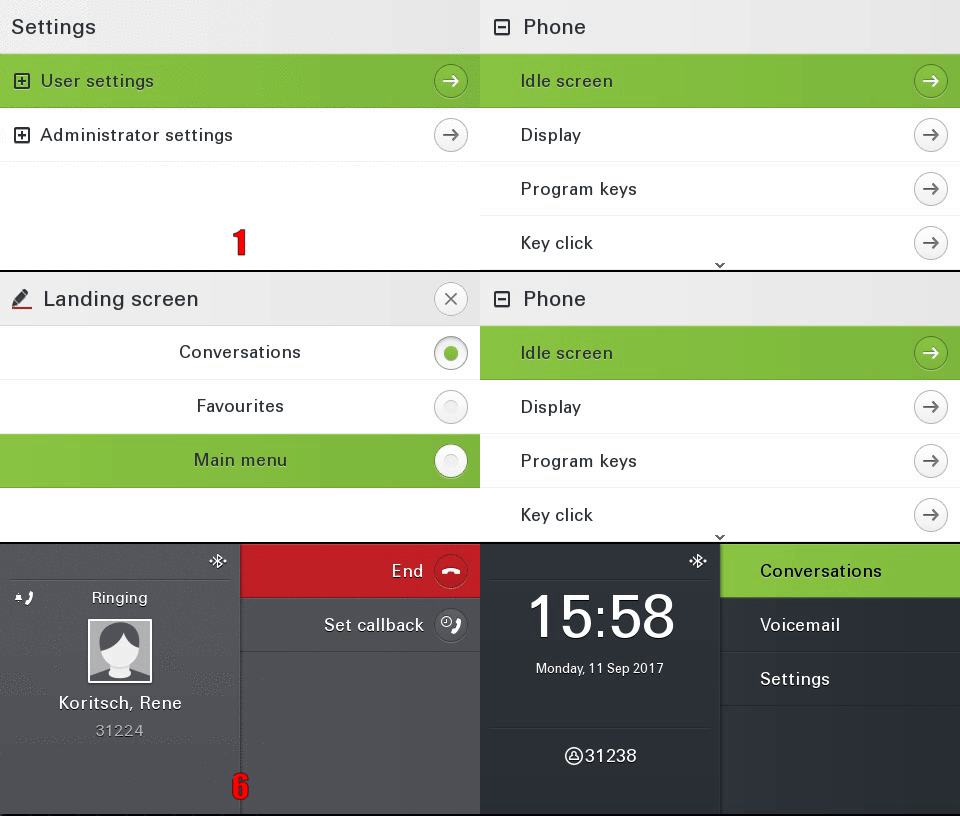
Landing Screen
The user can set the landing screen individually.
|
1. Settings menu is visible.
2. The configuration menu can be accessed via the menu settings/phone/idle screen.
3. The user is given a selection list of the available landing screens by selecting and then pressing the OK button.
4. After successful configuration the settings are stored (main menu).
5. The conversation screen is visible.
6. Outgoing call to XX224.
7. After terminating the call, the device automatically switches to the configured landing screen.
|
|
|
requirement: Landing Screen
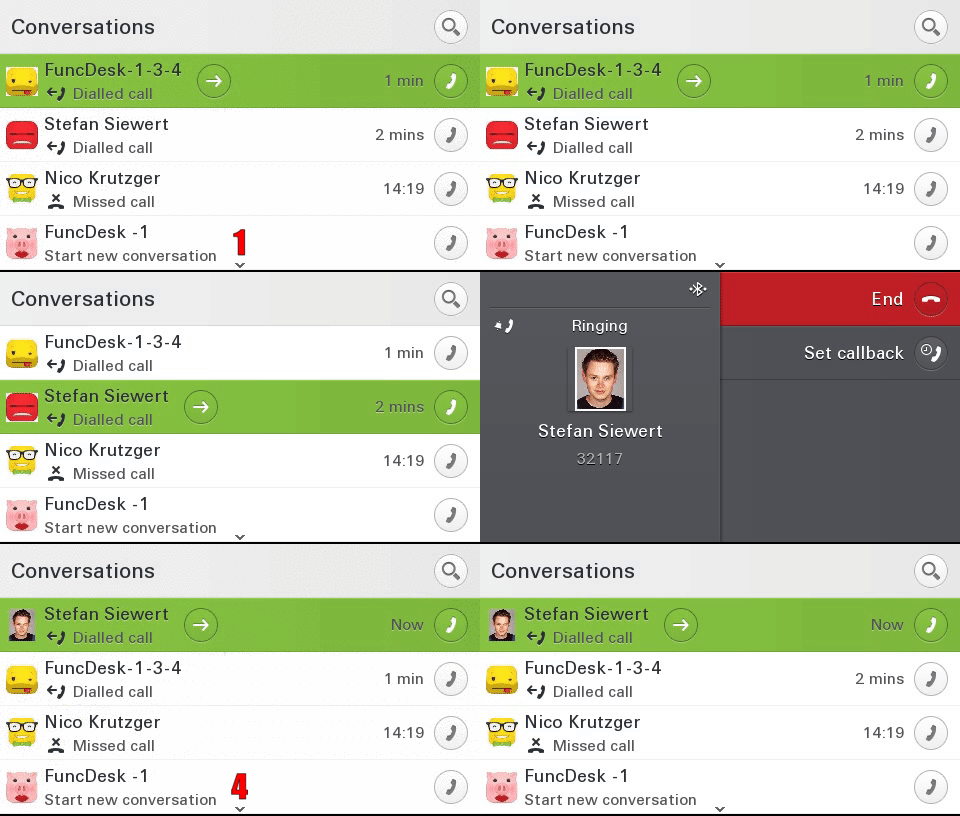
Permanent LDAP Lookup
If activated, an LDAP request is also sent for existing contacts.
|
1. Conversation screen with local LDAP contacts is displayed.
2. User selects the conversation "Stefan Siewert" and starts an outgoing call (OK press).
3. The device sends an LDAP request to the server despite the existing contact information. If the server can resolve the LDAP contact, the existing contact is dynamically updated (in this case, the contact image is updated).
4. After the call has ended, the device displays the conversations with the updated image.
|
|
|
requirement: LDAP , Canonical settings
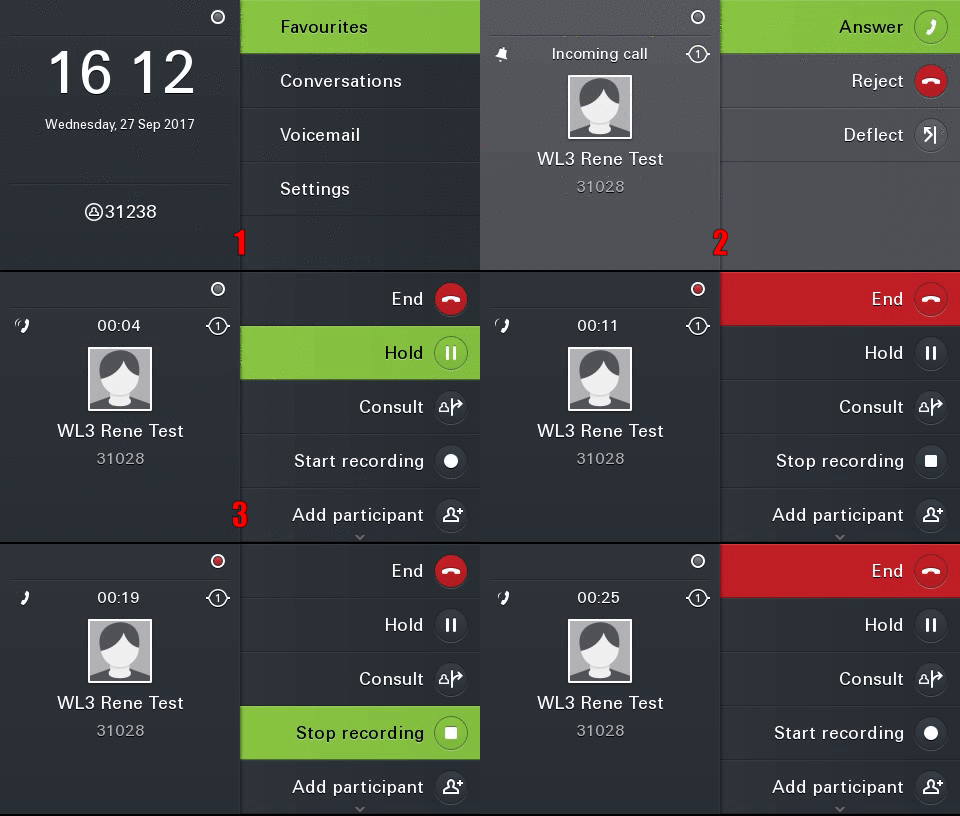
Call Recording
Easy control and overview of call recording status.
|
1. Once the voice recording feature has been configured, the corresponding icon appears on the upper screen.
2. Incoming call is accepted by the user.
3. By selecting the "recording" option and then pressing the OK key, the user starts the call recording.
4. The symbol turns red and signals the user that the recording is active.
5. By re-selecting the "recording" option and then pressing the OK key, the voice recording is terminated.
6. The icon becomes gray again and signals to the user that the recording is deactivated.
|
|
|
requirement: Call Recording
V1 R4
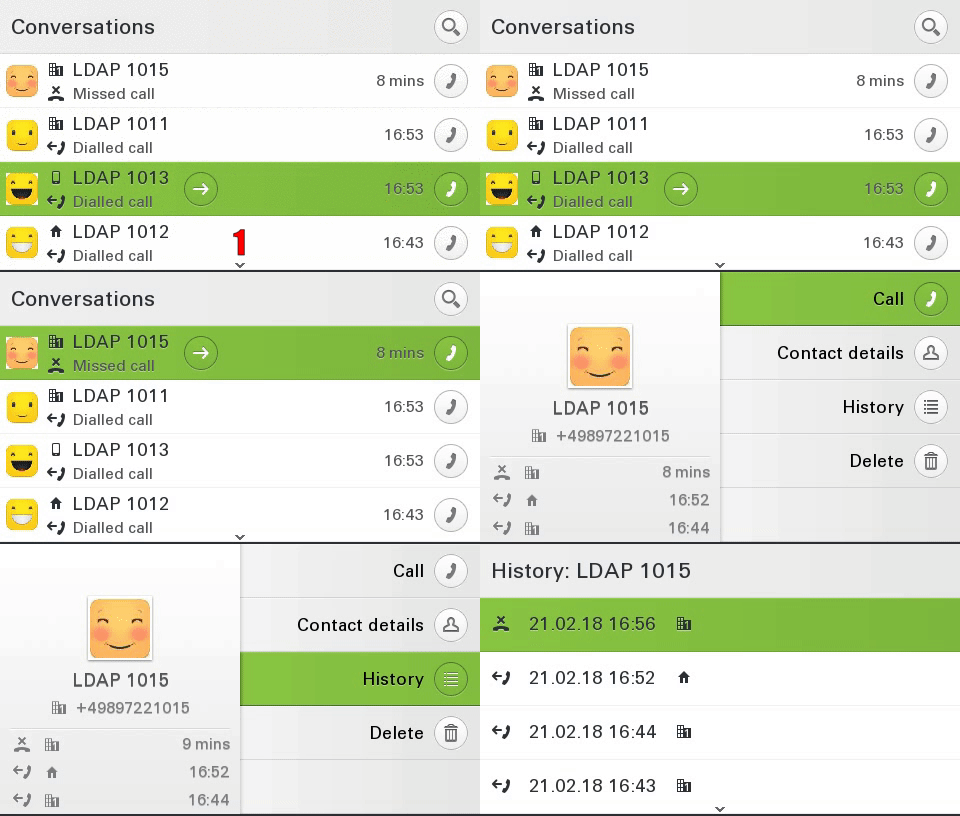
Rufnummerntyp als Icons
To increase the overview, a corresponding icon is displayed for each call number type (mobile, basic, business)
|
1. the conversation list is shown. Via the various icons in the conversations you can immediately see which phone number type was the last to interact with (1013 Mobil, 1011 Business 1, 1012 Home)
2. the user switches to the details of conversation 1015, where the icons on the left side of the screen immediately indicate which phone number type was contacted
3. the user switches to the "History" screen which also displays the corresponding icons
|
|
|
precondition: none
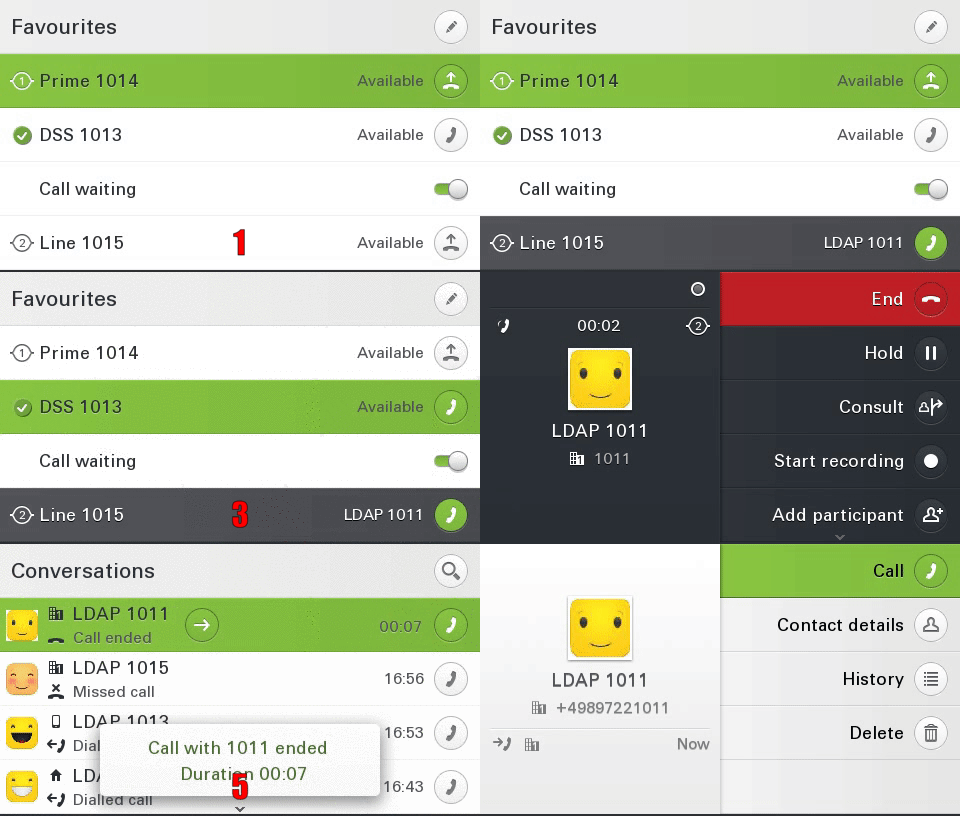
Call logging for secondary line
In the conversation list calls which are answered via the secondary line are logged
|
1. The Favorites screen is visible. One primary(1014) and secondary(1015) line is configured
2. Incoming call from 1011 on the secondary line
3. the user accepts the call by selecting the line and pressing the OK key
4. active call over the secondary line of the terminal device (the 2 in the middle of the screen)
5. the call is ended and logged in the conversation list as an accepted call
6. the corresponding conversation details show an accepted call for conversation 1011
|
|
|
precondition: none
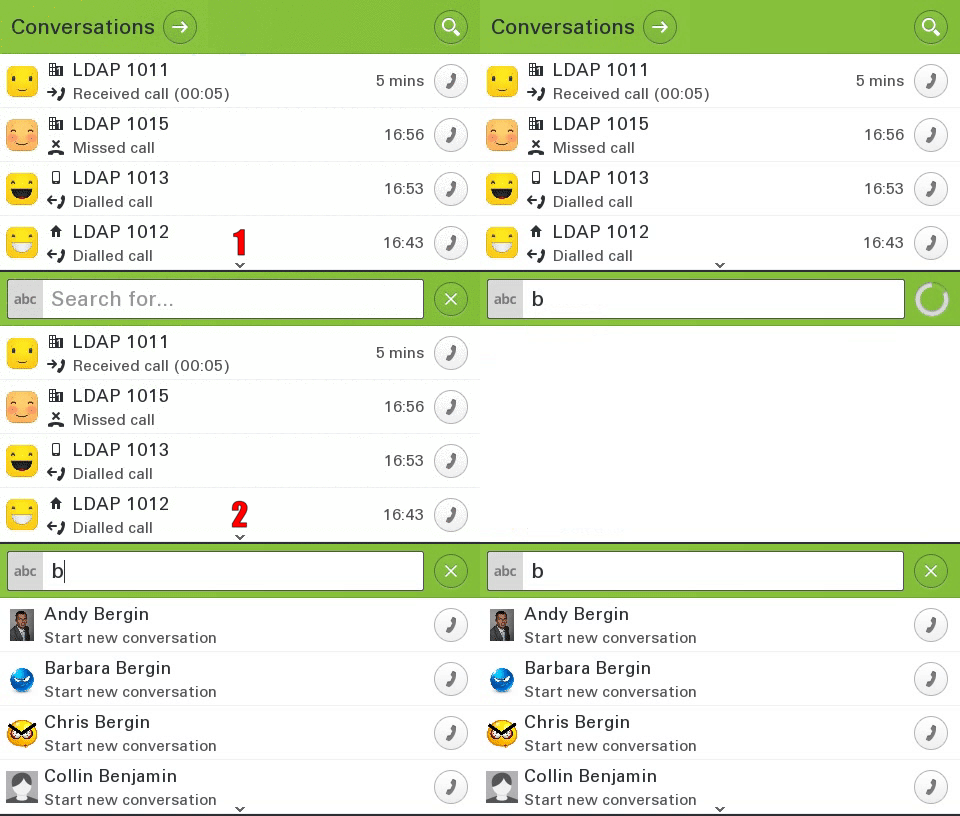
Alphabetical sorting (LDAP)
LDAP search results are displayed in alphabetical order
|
1. the conversation screen is displayed
2. an LDAP search for "b" is started
3. to make the search easier for the user, the results are automatically displayed in alphabetical ordert
|
|
|
precondition: none
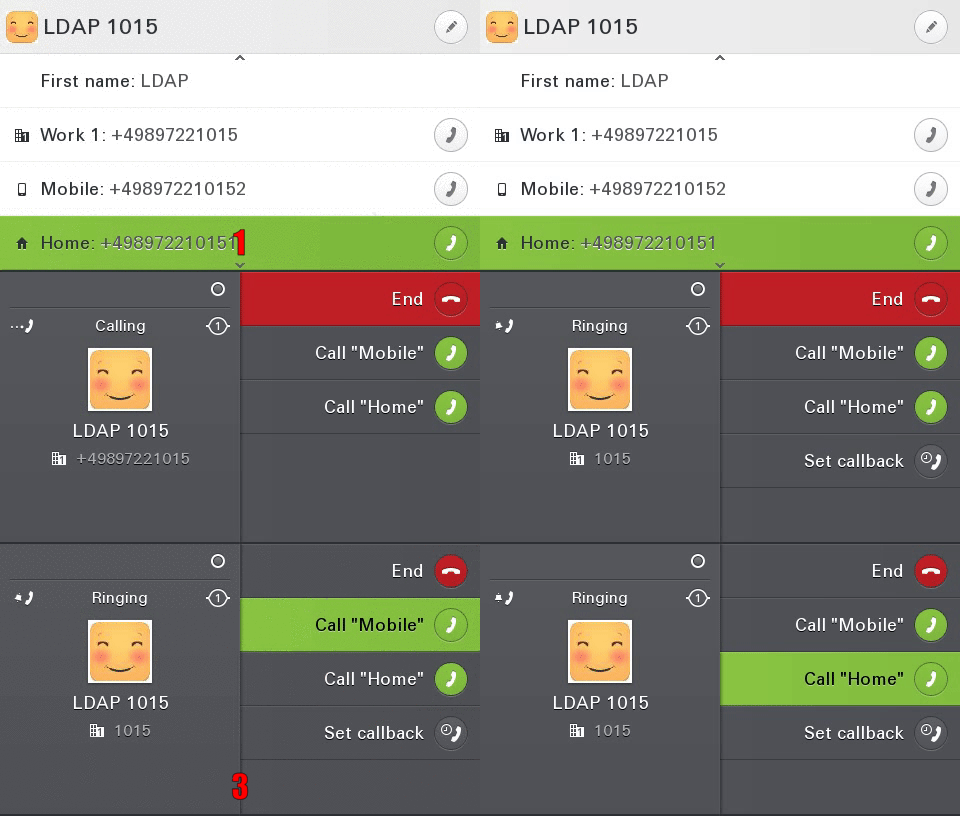
Type-based alternative number representation
The alternative phone numbers are displayed type-based for an outgoing call.
|
1. the contact details of the conversation "LDAP 1015" are displayed, it has a Work 1, Mobile and Home phone number configured
2. the pre-defined "work 1" phone number is selected and called
3. to increase the overview for the user the alternative number types are displayed instead of the number itself (in this case Mobile and Home)
|
|
|
precondition: none
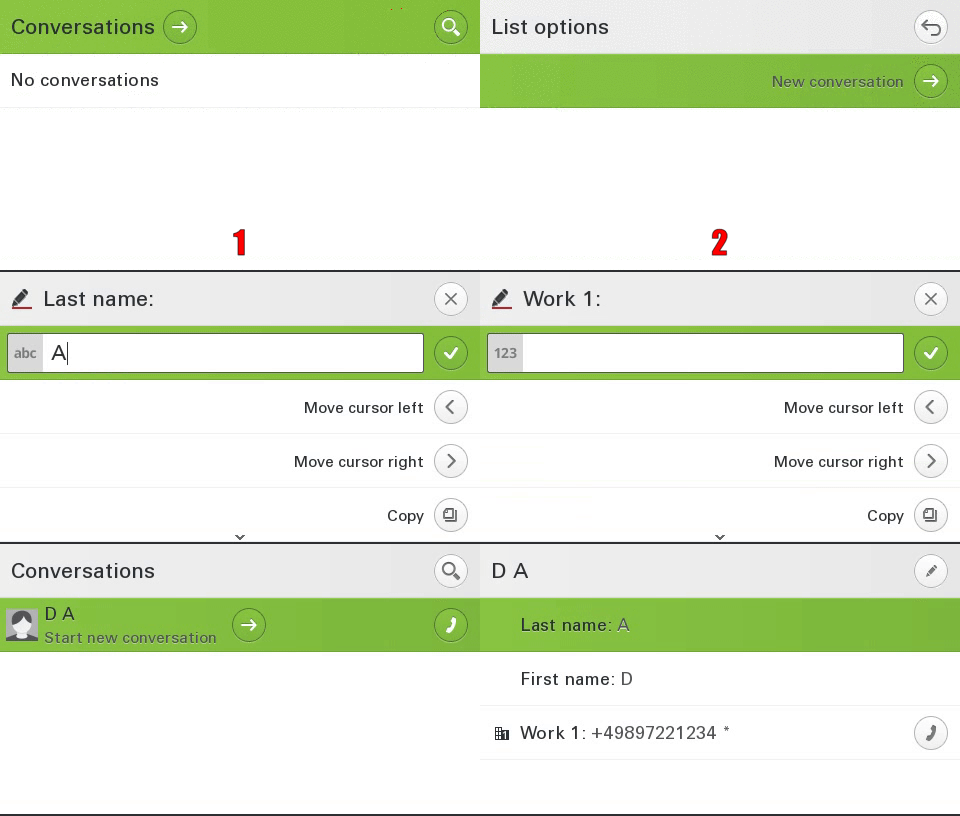
Create new conversation (contact)
The user can create an individual conversation (contact)
|
1. an empty conversation list is displayed
2. by pressing the "right" key the list options are displayed
3. By selecting the "New Conversation" option and then pressing the OK button, the user enters the menu for creating a new conversation. Here he can now create an individual conversation
4. after all desired fields are filled in, the conversation is saved by selecting the top line and pressing the OK key
5. by pressing the "right" button the user gets to the details of the conversation which contains the corresponding filled in fields
|
|
|
precondition: none
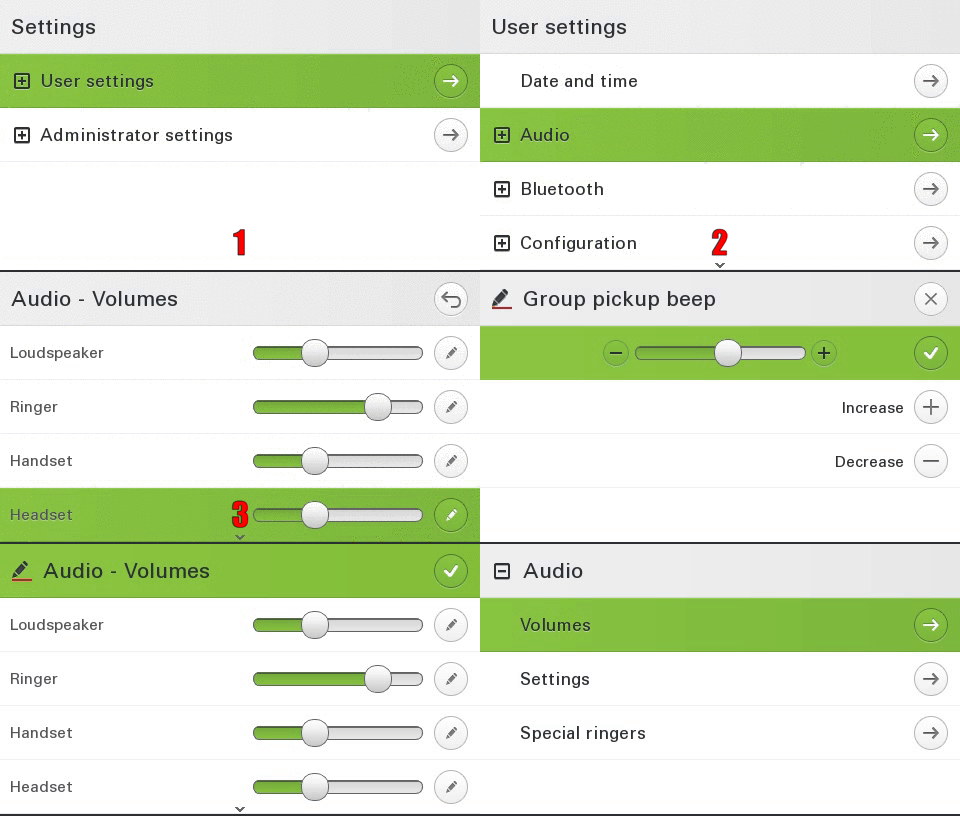
Group call volume (beep)
The volume of the group call (beep) can be set individually by each user
|
1. the settings menu is displayed
<
2. via user → Audio → Volumes the user enters the volume configuration menu in which the volume for the group call (beep) can be configured
<
3. by selecting the configuration option and then pressing the OK key, the menu for configuring the volume opens. The volume can now be configured individually with the + and - keys
<
4. The configuration is terminated by pressing the OK key again. By selecting the top line and then pressing the OK key, the values are finally saved.
Translated with www.DeepL.com/Translator
|
|
|
precondition: none
Group call acoustic repeat
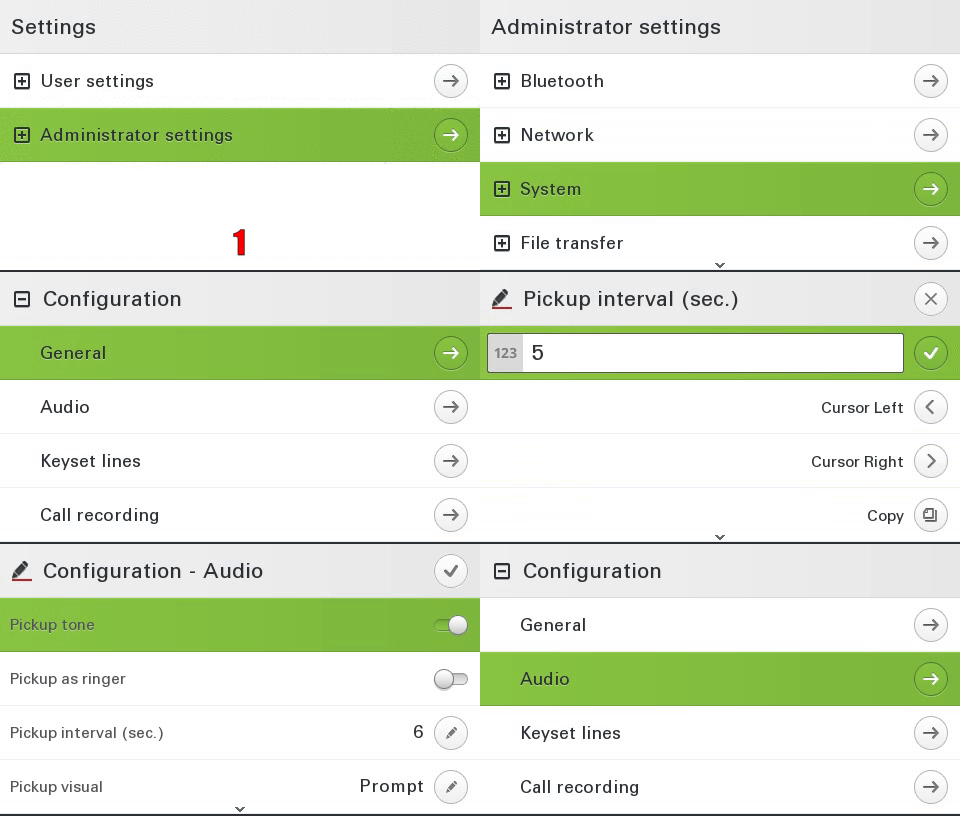
The administrator can determine in which time frame the group call is repeated acoustically (from 0 to 30 seconds)
|
1. the settings menu is displayed
<
2. via admin → System → Features→ Features→ Configuration→ Audio the admin gets to the Audio Configuration menu where the group pickup timer can be configured
<
3. the value can now be changed accordingly (from 0 to 30)
<
4. Select the top line and press the OK key to save the values
|
|
|
precondition: Administrative access
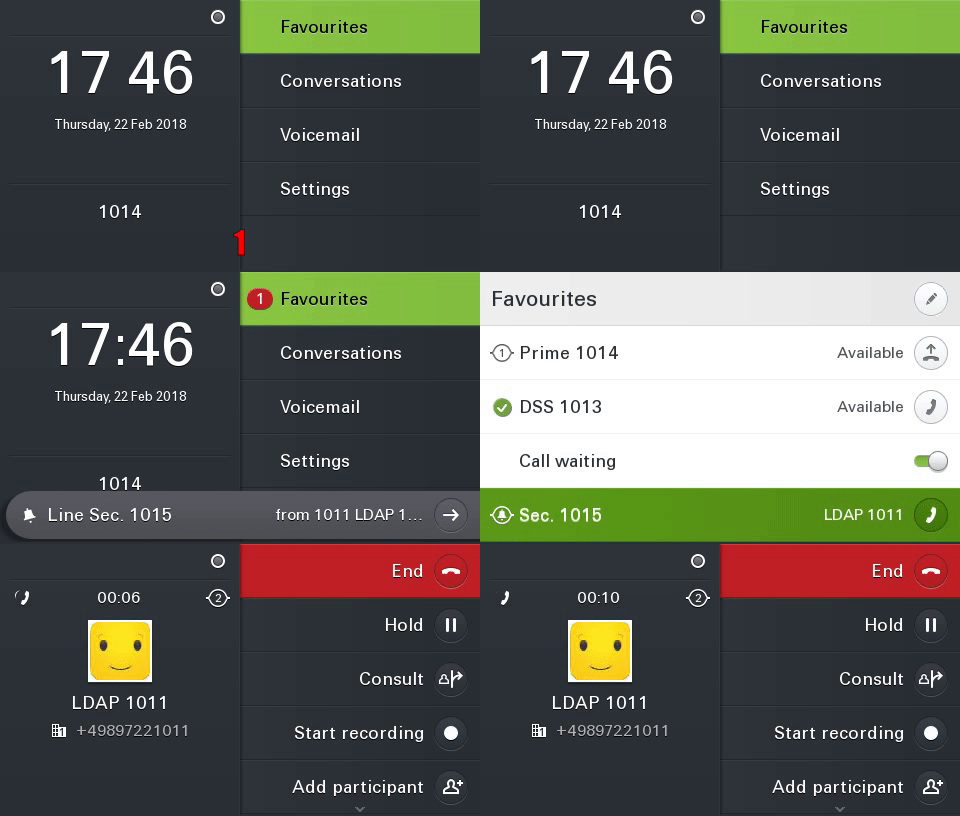
incoming calls on the secondary line are signalled on the idle screen by an info popup. This popup contains who is calling and for which line the call is being made.
|
1. the idle screen of the terminal is displayed
<
2. an incoming call is signalled with the help of an info popup. You can immediately see who is calling(1011) and for which line(1015) the call is made
<
3. by pressing the 5 key (same level as the popup), the user enters the Favourites menu. The secondary line is selected automatically
<
4. by pressing the OK key, the user accepts the call via the second line (indicated by the small 2 in the middle of the screen)
|
|
|
precondition: none
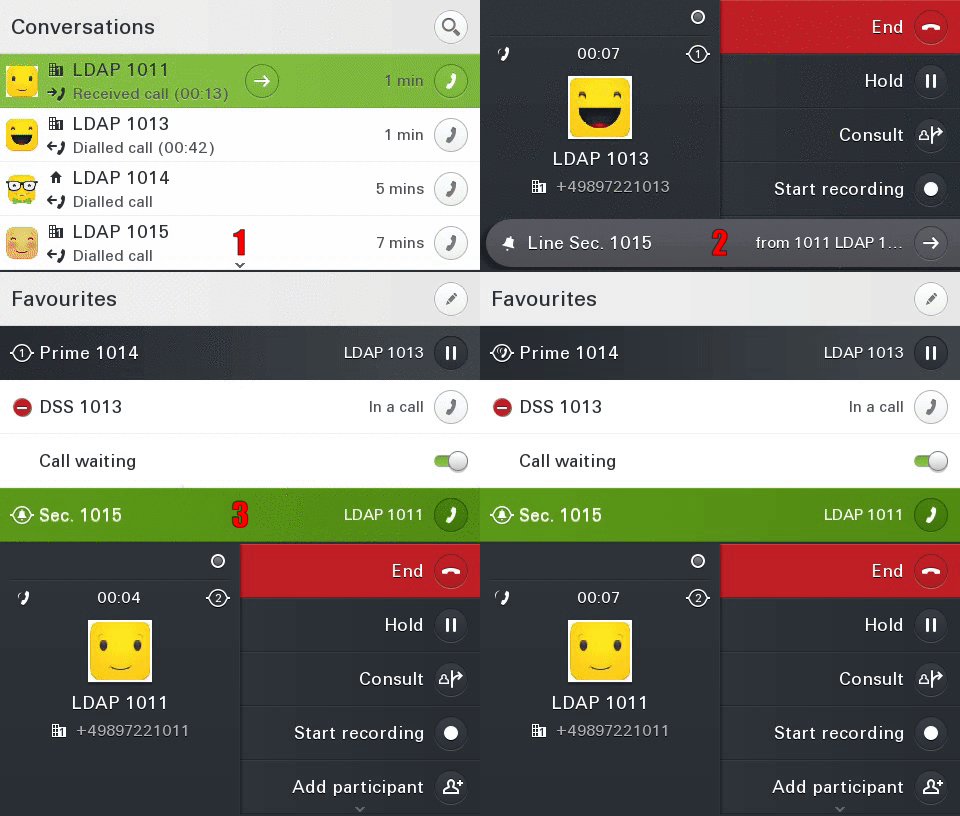
incoming calls on the secondary line are signalled by an info popup in call status. This popup contains who is calling and for which line the call is being made.
|
1. active call via the primary line(1) is visible
<
2. an incoming call is signalled with the help of an info popup. You can immediately see who is calling(1011) and for which line(1015) the call is made
<
3. by pressing the 5 key (same level as the popup), the user enters the Favourites menu. The secondary line is selected automatically
<
4. by pressing the OK key the user accepts the call via the second line, the first call is automatically put on hold
|
|
|
precondition: none
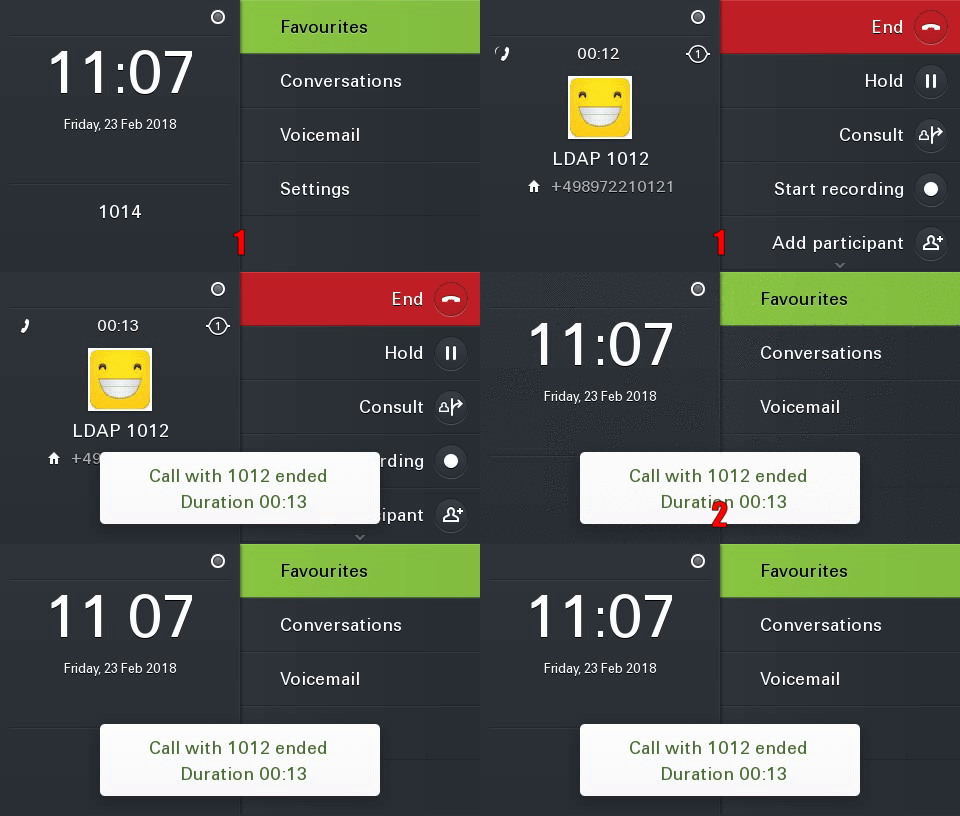
At the end of the call, an info popup with call duration and subscriber is automatically displayed.
|
1. active call is visible
<
2. after the call is ended, an info popup with subscriber and duration of the call is displayed
|
|
|
precondition: none
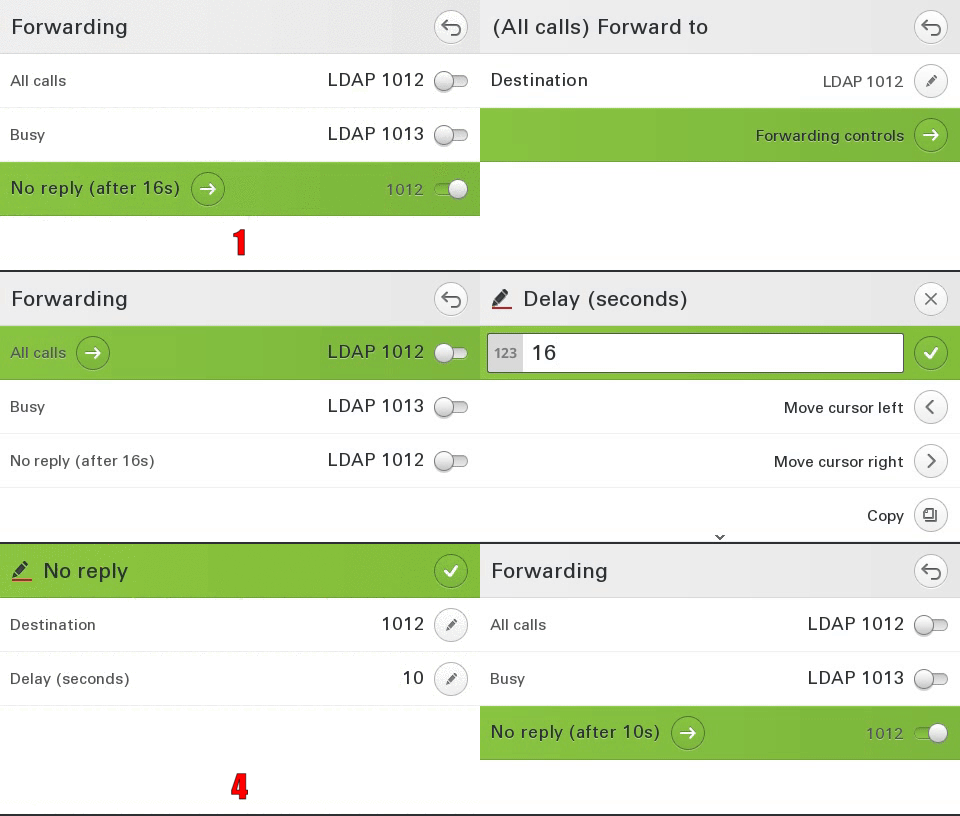
Delay for "Forwarding after time"
The delay for "Forwarding after time" can be set individually by the user
|
1. the user is in the presence screen
<
2. with the OK key the user navigates to the call forwarding menu
<
3. by selecting the "After time" option and pressing the OK key it is now possible for the user to adjust the settings accordingly
<
4. the setting is saved and the previous menu is displayed, forwarding is activated automatically
|
|
|
precondition: Server features disabled
Video Support
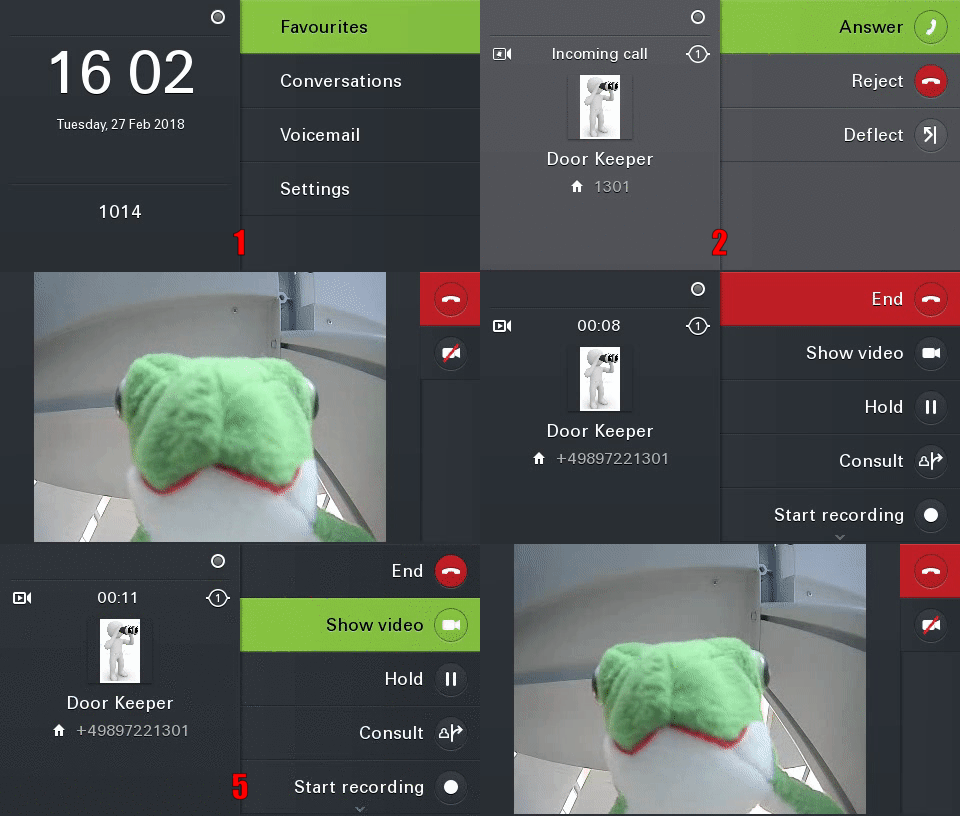
The device can display video streams from other participants
|
1. the idle screen of the device is displayed
<
2. Incoming call from 1301, The video icon in the upper left corner signals to the user that the call is a video call.
<
3. the call is accepted, the video is automatically displayed as full screen
<
4. in order to see the normal call options, the user must leave full screen mode
<
5. the option "Show Video" allows the user to switch back to video mode at any time
|
|
|
precondition:


