Difference between revisions of "Send URL"
The Wiki of Unify contains information on clients and devices, communications systems and unified communications. - Unify GmbH & Co. KG is a Trademark Licensee of Siemens AG.
Hans.zeiner (talk | contribs) (→Technical details) |
|||
| (10 intermediate revisions by 2 users not shown) | |||
| Line 2: | Line 2: | ||
== Introduction == | == Introduction == | ||
| + | The Send URL functionality on the phone is the users personal IoT button. The user can trigger any kind of remote action and in return can be notified of the status. | ||
| + | The status may include | ||
| + | |||
| + | * different colours (red, yellow or green) | ||
| + | * different blinking modes | ||
| + | * a label update (Desk Phone CP600 only) | ||
| + | |||
| + | Using the Send URL button, the OpenScape Desk Phone CP devices can be used to connect to services like IFTTT or Zapier. See the example code and playground section. | ||
| + | |||
| + | == Technical details == | ||
The Send URL function on the OpenScape Desk Phone CP devices, allows a user to send a predefined HTTP or HTTPS request to a server in order to trigger a remote action. The functionality is available from a free programmable key (FPK), that has been configured for this feature. | The Send URL function on the OpenScape Desk Phone CP devices, allows a user to send a predefined HTTP or HTTPS request to a server in order to trigger a remote action. The functionality is available from a free programmable key (FPK), that has been configured for this feature. | ||
| − | |||
| − | |||
| − | |||
| − | |||
| − | |||
* The request can be sent in plain HTTP or encrypted HTTPS | * The request can be sent in plain HTTP or encrypted HTTPS | ||
* The request can be of type GET or POST | * The request can be of type GET or POST | ||
* The phone will not follow any type of redirect (3XX) | * The phone will not follow any type of redirect (3XX) | ||
| − | * Authentication User ID and password will be sent as Parameters ( | + | * Authentication User ID and password will be sent as Parameters within the GET or POST request (see details below) |
* When using HTTPS, the connected server can be validated according to the Authentication Policy (see Administration Guide) | * When using HTTPS, the connected server can be validated according to the Authentication Policy (see Administration Guide) | ||
| Line 80: | Line 85: | ||
| devicetype=OpenStage | | devicetype=OpenStage | ||
|} | |} | ||
| + | |||
| + | You can simulate this request by using cURL. As GET request, like in the example above | ||
| + | |||
| + | {{#tag:nowiki|curl --url "https://10.10.0.255:443/?userid=MyUsername&password=MyPassword&id=1&item=2&ipaddress=<IP-OF-DEVICE>&phonenumber=<E164-OF-DEVICE>&devicetype=OpenStage&symbn=MySymbolicName"}} | ||
| + | |||
| + | The same example, send as POST request | ||
| + | |||
| + | {{#tag:nowiki|curl --url "https://10.10.0.255:443/" \}} | ||
| + | {{#tag:nowiki|--data "userid=MyUsername&password=MyPassword&id=1&item=2&ipaddress=<IP-OF-DEVICE>&phonenumber=<E164-OF-DEVICE>&devicetype=OpenStage&symbn=MySymbolicName"}} | ||
== Server response == | == Server response == | ||
| Line 137: | Line 151: | ||
A sample cURL HTTPS POST request directed at the phones web server, that hosts the web based management. This push support feature works, even if the web based management has been disabled on the phone. | A sample cURL HTTPS POST request directed at the phones web server, that hosts the web based management. This push support feature works, even if the web based management has been disabled on the phone. | ||
| − | {{#tag:nowiki|curl --url "https://<IP-OF-PHONE>/server_push.html/ServerPush" \}} | + | {{#tag:nowiki|curl -H "Content-Type: application/x-www-form-urlencoded" --url "https://<IP-OF-PHONE>/server_push.html/ServerPush" \}} |
{{#tag:nowiki|--data "MidletName=MySymbolicName&ServerProtocol=https&ServerAddr=10.10.0.255&ServerPort=443&ProgramName=MySymbolicName&RequestType=sendURL"}} | {{#tag:nowiki|--data "MidletName=MySymbolicName&ServerProtocol=https&ServerAddr=10.10.0.255&ServerPort=443&ProgramName=MySymbolicName&RequestType=sendURL"}} | ||
| Line 178: | Line 192: | ||
| RequestType=sendURL (fixed required parameter) | | RequestType=sendURL (fixed required parameter) | ||
|} | |} | ||
| + | |||
| + | == Example code & Playground == | ||
| + | === node-red example === | ||
| + | If you want to play with Send URL and the enhancements compared to OpenStage / Desk Phone IP, node-red (https://nodered.org/) is the perfect tool for you. We have released a node-red addon for easy creation of node-red flows (https://www.npmjs.com/package/node-red-contrib-sendurl) | ||
| + | |||
| + | Getting started with node-red. | ||
| + | * get a copy of nodejs from here: https://nodejs.org | ||
| + | * install node-red 'npm install node-red' | ||
| + | * isntall the node-red module for Send URL 'npm install node-red-contrib-sendurl' | ||
| + | |||
| + | You can import the following node-red flow as a starting point | ||
| + | |||
| + | [[File:node-red-sendURL-example-flow.zip|node-red example code]] | ||
| + | |||
| + | === IFTTT example === | ||
| + | You can also use cloud based IoT services like IFTTT in order to trigger an action using the IFTTT "Maker channel" | ||
| + | |||
| + | * go to https://ifttt.com/my_applets and create a new applet | ||
| + | * as trigger (this) select the Maker channel -> select "receive a web request" and pick a name for your CP IoT Button, eg "CP600btn" | ||
| + | * select your action, e.g. turn on your hue light | ||
| + | * got to https://internal-api.ifttt.com/maker and select "How to trigger Events". On this website, you can find the remaining information required to configure your FPK. The value1, value2 and value3 parameters are optional, but can contain additional data that will be send in the request. | ||
| + | [[File:SendURL_ifttt_example_config.png|200px|thumb|left|WBM ’Send URL FPK’ configuration for IFTTT example]] | ||
| + | [[File:SendURL_ifttt_maker_config.png|200px|thumb|left|IFTTT Maker channel example ]]<br clear="left" /> | ||
Latest revision as of 15:29, 18 December 2025
Contents
Introduction
The Send URL functionality on the phone is the users personal IoT button. The user can trigger any kind of remote action and in return can be notified of the status. The status may include
- different colours (red, yellow or green)
- different blinking modes
- a label update (Desk Phone CP600 only)
Using the Send URL button, the OpenScape Desk Phone CP devices can be used to connect to services like IFTTT or Zapier. See the example code and playground section.
Technical details
The Send URL function on the OpenScape Desk Phone CP devices, allows a user to send a predefined HTTP or HTTPS request to a server in order to trigger a remote action. The functionality is available from a free programmable key (FPK), that has been configured for this feature.
- The request can be sent in plain HTTP or encrypted HTTPS
- The request can be of type GET or POST
- The phone will not follow any type of redirect (3XX)
- Authentication User ID and password will be sent as Parameters within the GET or POST request (see details below)
- When using HTTPS, the connected server can be validated according to the Authentication Policy (see Administration Guide)
Configuration
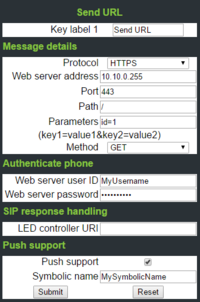
A Send URL FPK can be configured via web based management or DLS. Please see example screenshot from WBM.
This FPK (if pressed) will trigger the following request
https://10.10.0.255:443/?userid=MyUsername&password=MyPassword&id=1&item=2&ipaddress=<IP-OF-DEVICE>&phonenumber=<E164-OF-DEVICE>&devicetype=OpenStage&symbn=MySymbolicName
The parts of the URL linked to the configuration items can be seen in the following table
| URL part | Configuration Item | Example Value |
|---|---|---|
| Method | Method | GET |
| Protocol | Protocol | https |
| Hostname | Web server address | 10.10.0.255 |
| Port | Port | 443 |
| Path | Path | / |
| Parameter | Parameters | id=1&item=2 |
| Parameter | Web server user ID | userid=MyUsername |
| Parameter | Web server password | password=MyPassword |
| Parameter | Symbolic name | symbn=MySymbolicName |
| Parameter | not configurable | ipaddress=<IP-OF-DEVICE> |
| Parameter | not configurable | phonenumber=<E164-OF-DEVICE> |
| Parameter | not configurable | devicetype=OpenStage |
You can simulate this request by using cURL. As GET request, like in the example above
curl --url "https://10.10.0.255:443/?userid=MyUsername&password=MyPassword&id=1&item=2&ipaddress=<IP-OF-DEVICE>&phonenumber=<E164-OF-DEVICE>&devicetype=OpenStage&symbn=MySymbolicName"
The same example, send as POST request
 curl --url "https://10.10.0.255:443/" \
 --data "userid=MyUsername&password=MyPassword&id=1&item=2&ipaddress=<IP-OF-DEVICE>&phonenumber=<E164-OF-DEVICE>&devicetype=OpenStage&symbn=MySymbolicName"
Server response
In order to make use of the Send URL FPK specific features (LED colour and blink mode), the server needs to reply with a specific XML content. Also the HTTP header needs to contain the 'Content-Type', which is 'text/xml'. The HTTP response code needs to be 200, in order for the CP phone to process the XML body.
There is a special handling of server responses, which have a response code of 200, but an empty or invalid XML body. In this case, the Desk Phone CP will make it's LED lid green for 2 seconds and then turn it off again. This can be interesting for using the Desk Phone CP with IoT services like IFTTT or Zapier.
 <Batch>
 <Capabilities_Req TYPE="ALL_OF">
 <Capability NAME="XML_LED_STATE_CONTROL" />
 </Capabilities_Req>
 <Remote_Control>
 <Turnled ID="MySymbolicName" WAKE="FALSE" STATE="FLASH" COLOUR="GREEN" LABEL="FPK label" />
 </Remote_Control>
 </Batch>
The interesting part for a Send URL application developer is the <Turnled> element. Let's see the different attributes and their possible values.
| Attribute | Description | Type | Possible values |
|---|---|---|---|
| ID | Should contain the symbolic name configured. | String | as configured for the FPK |
| WAKE | Wakes up the device from power saving or screen saver mode. | Boolean | TRUE or FALSE |
| STATE | Defines the state of the LED | Enumeration | ON, OFF, FLASH or FLUTTER |
| COLOUR | Defines the colour of the LED. Requires STATE to be ON, FLASH or FLUTTER | Enumeration | RED, YELLOW or GREEN |
| LABEL | Defines the FPK label text. Only applicable for Desk Phone CP600 | String | e.g. "My new label" |
Push support
If the LED colour and state are used to represent a status, you might want to push new information to the phone (to change the colour or LED state). This is what we call "push support". Via the push support, you can make the phone trigger the configured Send URL FPK without user interaction, and download new data from the Send URL application server.
For security reasons, it is not allowed to send new data directly to the phone. Via the push support feature, we make sure the phone only contacts the configured server.
A sample cURL HTTPS POST request directed at the phones web server, that hosts the web based management. This push support feature works, even if the web based management has been disabled on the phone.
 curl -H "Content-Type: application/x-www-form-urlencoded" --url "https://<IP-OF-PHONE>/server_push.html/ServerPush" \
 --data "MidletName=MySymbolicName&ServerProtocol=https&ServerAddr=10.10.0.255&ServerPort=443&ProgramName=MySymbolicName&RequestType=sendURL"
| URL part | Example Value |
|---|---|
| Method | POST |
| Protocol | https |
| Hostname | <IP-OF-PHONE> |
| Port | 443 |
| Path | /server_push.html/ServerPush |
| Parameter | MidletName=MySymbolicName (must match FPK configuration) |
| Parameter | ServerProtocol=https (must match FPK configuration) |
| Parameter | ServerAddr=10.10.0.255 (must match FPK configuration) |
| Parameter | ServerPort=443 (must match FPK configuration) |
| Parameter | ProgramName=MySymbolicName (must match FPK configuration) |
| Parameter | RequestType=sendURL (fixed required parameter) |
Example code & Playground
node-red example
If you want to play with Send URL and the enhancements compared to OpenStage / Desk Phone IP, node-red (https://nodered.org/) is the perfect tool for you. We have released a node-red addon for easy creation of node-red flows (https://www.npmjs.com/package/node-red-contrib-sendurl)
Getting started with node-red.
- get a copy of nodejs from here: https://nodejs.org
- install node-red 'npm install node-red'
- isntall the node-red module for Send URL 'npm install node-red-contrib-sendurl'
You can import the following node-red flow as a starting point
File:node-red-sendURL-example-flow.zip
IFTTT example
You can also use cloud based IoT services like IFTTT in order to trigger an action using the IFTTT "Maker channel"
- go to https://ifttt.com/my_applets and create a new applet
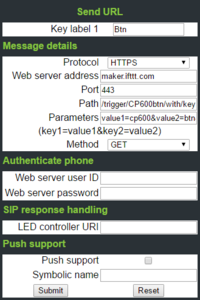
- as trigger (this) select the Maker channel -> select "receive a web request" and pick a name for your CP IoT Button, eg "CP600btn"
- select your action, e.g. turn on your hue light
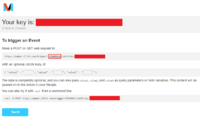
- got to https://internal-api.ifttt.com/maker and select "How to trigger Events". On this website, you can find the remaining information required to configure your FPK. The value1, value2 and value3 parameters are optional, but can contain additional data that will be send in the request.


