Difference between revisions of "How to install Microsoft SQL Server"
The Wiki of Unify contains information on clients and devices, communications systems and unified communications. - Unify GmbH & Co. KG is a Trademark Licensee of Siemens AG.
| (24 intermediate revisions by the same user not shown) | |||
| Line 12: | Line 12: | ||
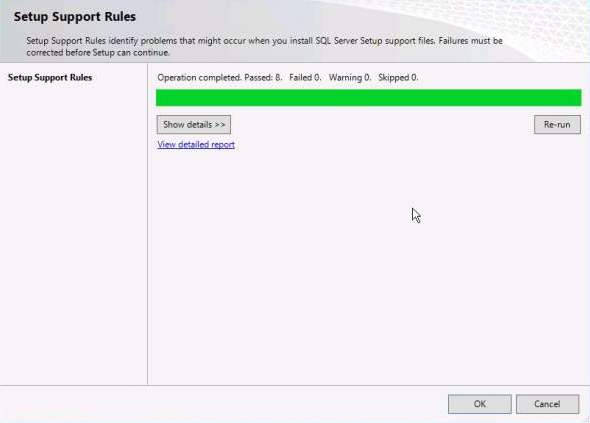
4. '''Setup Support Rules''' will run to identify problems that may occur during the Setup Support Files installation: | 4. '''Setup Support Rules''' will run to identify problems that may occur during the Setup Support Files installation: | ||
| − | [[File: | + | [[File:Setup_support_rules1.jpg]] |
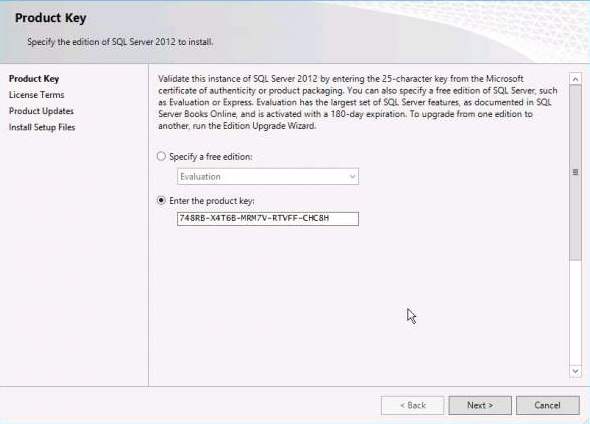
| − | 5. Once this step finishes click '''OK''' to proceed to '''Product Key''' window. In the '''Product Key''' window, enter the '''Product license key''' (if required), and click '''Next''' to continue: | + | 5. Once this step finishes, click '''OK''' to proceed to '''Product Key''' window. In the '''Product Key''' window, enter the '''Product license key''' (if required), and click '''Next''' to continue: |
| − | [[File: | + | [[File:Product_Key1.jpg]] |
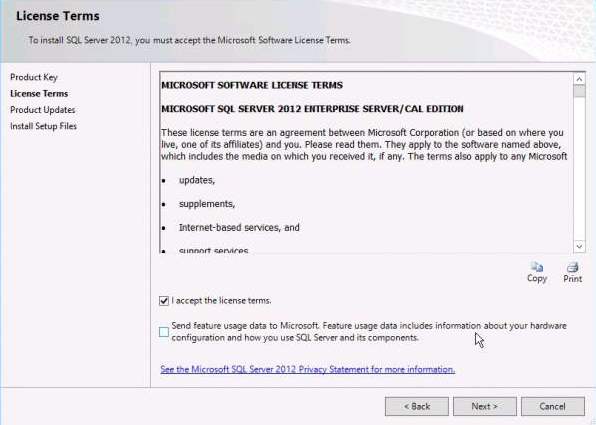
6. In the '''License Terms''' window, tick the box '''I accept the license terms''' and then click '''Next''' to continue. | 6. In the '''License Terms''' window, tick the box '''I accept the license terms''' and then click '''Next''' to continue. | ||
| Line 22: | Line 22: | ||
'''You must accept the license agreement before you can continue the installation of SQL Server. Send feature usage data to Microsoft option is optional.''' | '''You must accept the license agreement before you can continue the installation of SQL Server. Send feature usage data to Microsoft option is optional.''' | ||
| − | [[File: | + | [[File:License_terms1.jpg]] |
| Line 31: | Line 31: | ||
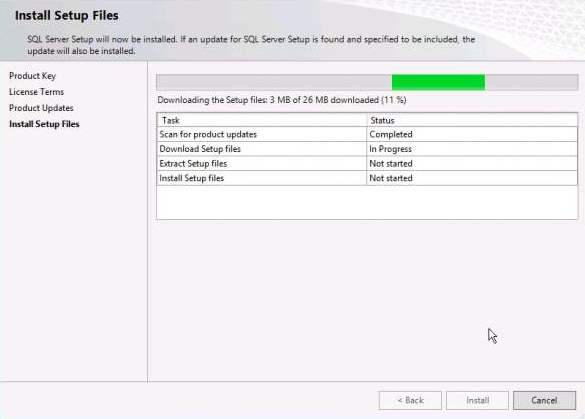
Setup files are necessary to perform the actual installation. Following the installation of the setup support files, you will be presented with another compatibility check. Following dialog appears once you successfully pass these checks. You can click the '''Show Details''' button under the green progress bar if you want to see the individual checks listed.Click '''Next'''. | Setup files are necessary to perform the actual installation. Following the installation of the setup support files, you will be presented with another compatibility check. Following dialog appears once you successfully pass these checks. You can click the '''Show Details''' button under the green progress bar if you want to see the individual checks listed.Click '''Next'''. | ||
| − | [[File: | + | [[File:Install_setup_files1.jpg]] |
8. In the '''Setup Role''' window, select '''SQL Server Feature Installation'''.Click '''Next''' to continue to '''Feature Selection'''. | 8. In the '''Setup Role''' window, select '''SQL Server Feature Installation'''.Click '''Next''' to continue to '''Feature Selection'''. | ||
| Line 39: | Line 39: | ||
9. Select the following features for installation: '''Database Engine Services''', '''Management Tools - Basic''', '''Management Tools - Complete'''.You can also specify the shared feature directory where share features components will be installed. | 9. Select the following features for installation: '''Database Engine Services''', '''Management Tools - Basic''', '''Management Tools - Complete'''.You can also specify the shared feature directory where share features components will be installed. | ||
| − | + | [[File:Feature_selection1.jpg]] | |
| − | + | 10. Click '''Next''' to continue to the '''Installation Rules''' window. | |
| + | [[File:Installation_rules1.jpg]] | ||
| − | 12. In '''Server Configuration''', you can specify service startup and authentication.Click on the '''Collation''' tab and then click the '''Customize''' button to specify the collation for your Database Engine and Analysis Services instance that best matches your application need. | + | 11.Instance name should be DLS. |
| + | '''Note:''' If the instance name here is not DLS, then the DB instance field in "MSSQL specific entries" in DLS Multinode installer must match the entry filled here. | ||
| + | |||
| + | [[File:Instance_Configuration.png]] | ||
| + | |||
| + | 12. Click '''Next''' to proceed to the '''Disk Space Requirements''' window. This is just a information page that does not require you to make any choices. Click '''Next''' to go to Server Configuration window. | ||
| + | |||
| + | [[File:Disk_space_req1.jpg]] | ||
| + | |||
| + | 13.In '''Server Configuration''', you can specify service startup and authentication.Under the '''Service Account''' tab, for the services SQL Server Agent and SQL Server Database Engine, enter the data of that user which the DLS nodes utilize for connecting to the database. This user must be part of the administrators group. In Startup Type, select '''Manual''' for the SQL Server Agent, and '''Automatic''' for the SQL Server Database Engine. | ||
| + | |||
| + | [[File:service_accounts_.jpg]] | ||
| + | |||
| + | |||
| + | 14.Click on the '''Collation''' tab and then click the '''Customize''' button to specify the collation for your Database Engine and Analysis Services instance that best matches your application need. | ||
[[File:sserverstep12.jpg]] | [[File:sserverstep12.jpg]] | ||
| − | + | 15.During installation of SQL Server the administrator must be defined. | |
| + | |||
| + | a. Click '''Add Current User''' if current user is going to be the SQL | ||
| + | Server administrator. Add any other domain user in case the current local | ||
| + | user is not the database user to be used in DLS. | ||
| + | |||
| + | [[File:step_15afix1.png]] | ||
| + | |||
| + | b. Alternate configuration : Since there are numerous GVS cases where the domain or local user changed, deleted, etc, and forgotten from our engineers | ||
| + | ,define mixed mode authentication with a strong provided password and there | ||
| + | will always be a default user '''sa''' that we could connect using the provided | ||
| + | password. | ||
| + | |||
| + | [[File:step_15bfix1.png]] | ||
| + | |||
| + | 16. Click '''Next''' to advance to '''Error Reporting'''.Tick the check box if you want to send Windows and SQL Server error reports to Microsoft. | ||
| + | |||
| + | [[File:Error_report1.jpg]] | ||
| + | |||
| + | 17. '''Installation Configuration''' will run some more rules that will validate your computer configuration with the SQL Server features you have specified.Correct any errors reported in the '''Installation Configuration Rules''' screen and click on '''Next'''. | ||
| + | |||
| + | [[File:Install_config_rules.jpg]] | ||
| + | |||
| + | 18. The '''Ready to Install''' page shows a tree view of installation options that were specified during Setup. Click on the '''Install''' button to start SQL Server installation. The Setup will first install the required prerequisites for the selected features followed by the feature installation. The '''Installation Progress''' window provides status so that you can monitor the installation progress as Setup continues. | ||
| − | + | [[File:ReadytoInstall1.jpg]] | |
| − | + | 19. When the installation is complete, click on '''Next''' to '''Complete''' window. | |
| − | + | [[File:Complete1.jpg]] | |
This finalizes the installation process for SQL Server. | This finalizes the installation process for SQL Server. | ||
Latest revision as of 16:37, 16 August 2018
1. Insert the SQL Server installation media. From the root folder, double-click Setup.exe. To install from a network share, locate the root folder on the share, and then double-click Setup.exe. Proceed with the SQL installation.
2. The Installation Wizard runs the SQL Server Installation Center. To create a new installation of SQL Server, select the Installation option on the left side, and then click New SQL Server stand-alone installation or add features to an existing installation:
3. Setup is now preparing to launch Setup Support Rules window.
4. Setup Support Rules will run to identify problems that may occur during the Setup Support Files installation:
5. Once this step finishes, click OK to proceed to Product Key window. In the Product Key window, enter the Product license key (if required), and click Next to continue:
6. In the License Terms window, tick the box I accept the license terms and then click Next to continue.
You must accept the license agreement before you can continue the installation of SQL Server. Send feature usage data to Microsoft option is optional.
7. Click Install to Install Setup Files.
Allow SQL to scan for important product updates and install them prior to any further action.
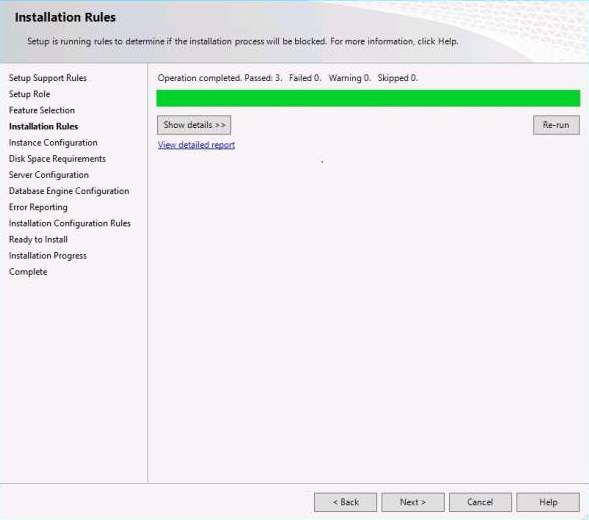
Setup files are necessary to perform the actual installation. Following the installation of the setup support files, you will be presented with another compatibility check. Following dialog appears once you successfully pass these checks. You can click the Show Details button under the green progress bar if you want to see the individual checks listed.Click Next.
8. In the Setup Role window, select SQL Server Feature Installation.Click Next to continue to Feature Selection.
In case of any warning of a setup support rule action, please take any remedy action and press Re-scan.
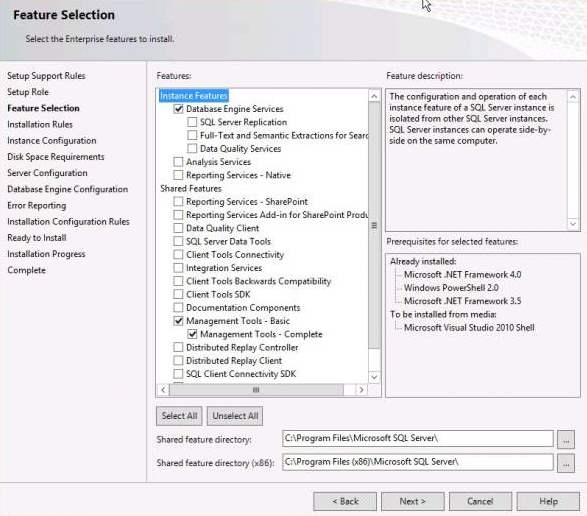
9. Select the following features for installation: Database Engine Services, Management Tools - Basic, Management Tools - Complete.You can also specify the shared feature directory where share features components will be installed.
10. Click Next to continue to the Installation Rules window.
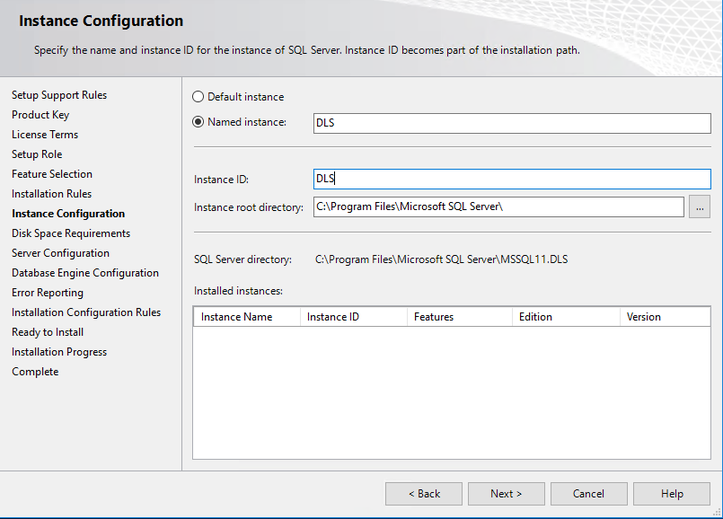
11.Instance name should be DLS. Note: If the instance name here is not DLS, then the DB instance field in "MSSQL specific entries" in DLS Multinode installer must match the entry filled here.
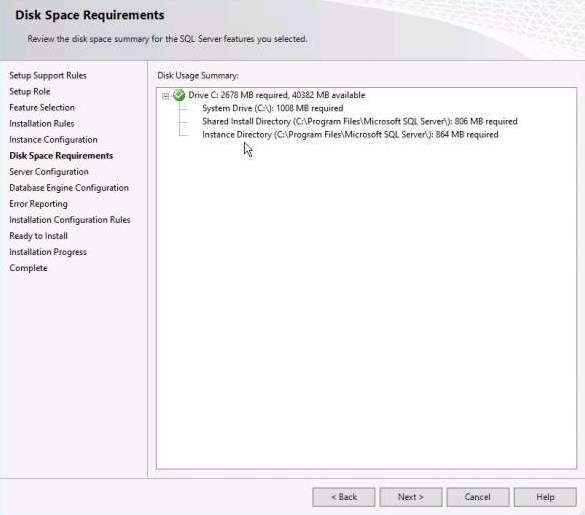
12. Click Next to proceed to the Disk Space Requirements window. This is just a information page that does not require you to make any choices. Click Next to go to Server Configuration window.
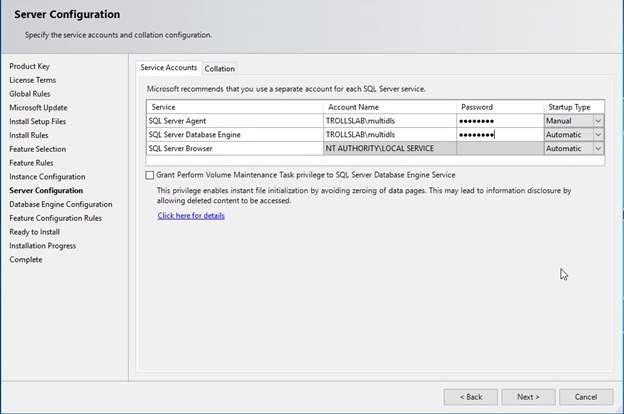
13.In Server Configuration, you can specify service startup and authentication.Under the Service Account tab, for the services SQL Server Agent and SQL Server Database Engine, enter the data of that user which the DLS nodes utilize for connecting to the database. This user must be part of the administrators group. In Startup Type, select Manual for the SQL Server Agent, and Automatic for the SQL Server Database Engine.
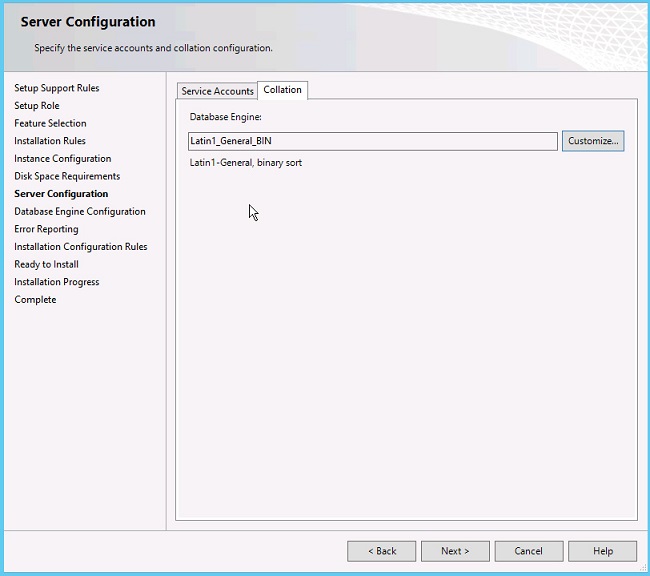
14.Click on the Collation tab and then click the Customize button to specify the collation for your Database Engine and Analysis Services instance that best matches your application need.
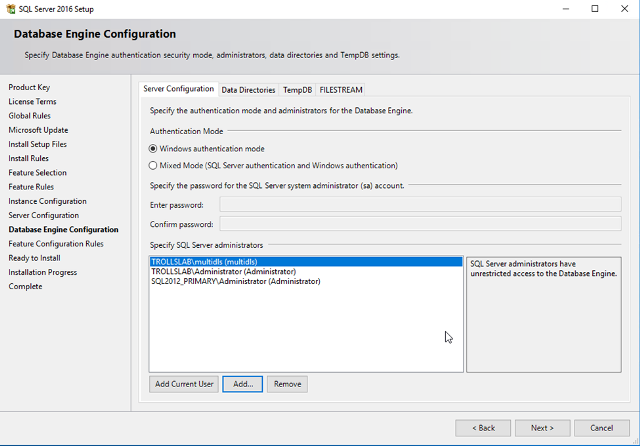
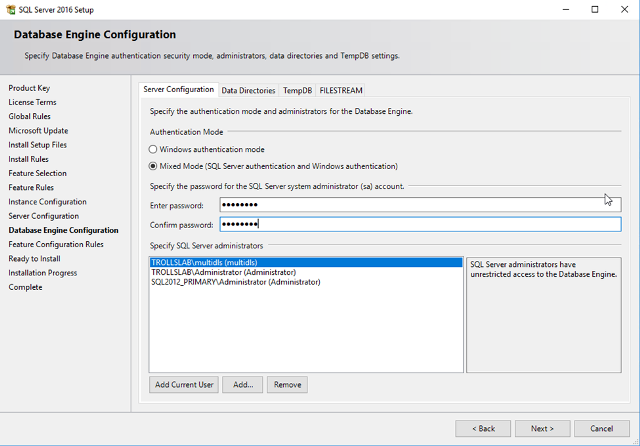
15.During installation of SQL Server the administrator must be defined.
a. Click Add Current User if current user is going to be the SQL Server administrator. Add any other domain user in case the current local user is not the database user to be used in DLS.
b. Alternate configuration : Since there are numerous GVS cases where the domain or local user changed, deleted, etc, and forgotten from our engineers ,define mixed mode authentication with a strong provided password and there will always be a default user sa that we could connect using the provided password.
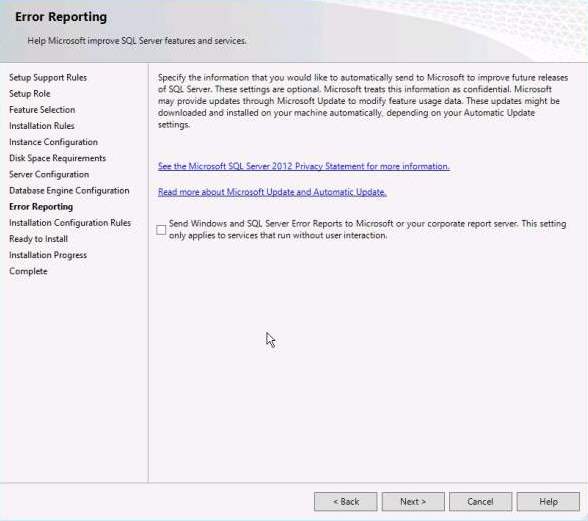
16. Click Next to advance to Error Reporting.Tick the check box if you want to send Windows and SQL Server error reports to Microsoft.
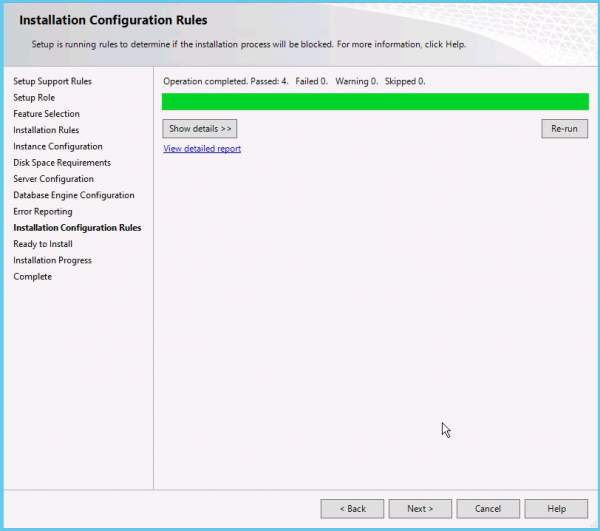
17. Installation Configuration will run some more rules that will validate your computer configuration with the SQL Server features you have specified.Correct any errors reported in the Installation Configuration Rules screen and click on Next.
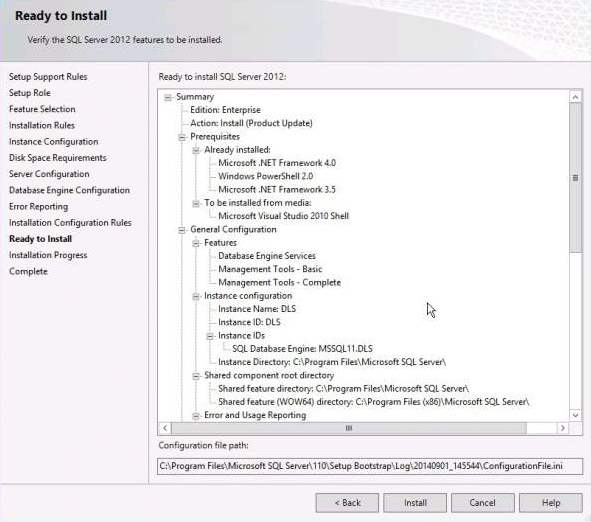
18. The Ready to Install page shows a tree view of installation options that were specified during Setup. Click on the Install button to start SQL Server installation. The Setup will first install the required prerequisites for the selected features followed by the feature installation. The Installation Progress window provides status so that you can monitor the installation progress as Setup continues.
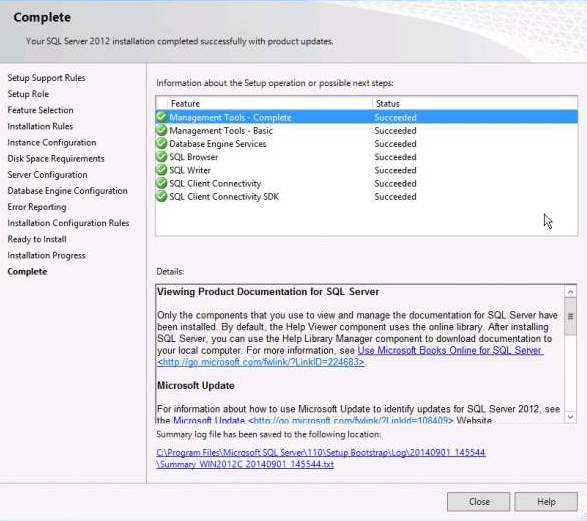
19. When the installation is complete, click on Next to Complete window.
This finalizes the installation process for SQL Server.

