Difference between revisions of "Screenshots from OpenStage Phone Display"
The Wiki of Unify contains information on clients and devices, communications systems and unified communications. - Unify GmbH & Co. KG is a Trademark Licensee of Siemens AG.
| Line 16: | Line 16: | ||
Making a screenshot on OpenStage is a little bit tricky. You need some experience in network technologies. But once configured the making of screenshots is quite easy and can be done whenever you want. The following description is a step by step manual following an example configuration. | Making a screenshot on OpenStage is a little bit tricky. You need some experience in network technologies. But once configured the making of screenshots is quite easy and can be done whenever you want. The following description is a step by step manual following an example configuration. | ||
| − | IP-Address PC: 172.28.133.107 | + | * IP-Address PC: 172.28.133.107 |
| − | IP-Address Phone: | + | * IP-Address Phone: |
'''1. Software preparation:''' | '''1. Software preparation:''' | ||
| Line 28: | Line 28: | ||
Remark: Be sure, that the plugins for irfanview are installed. Otherwise the raw format can not be read. | Remark: Be sure, that the plugins for irfanview are installed. Otherwise the raw format can not be read. | ||
| − | ... | + | '''2. Start the TFTP server:''' |
| + | |||
| + | [[File:Screenshots from OpenStage Phone Display 01.png|200px]] | ||
| + | |||
| + | Files can be up- and downloaded from/to the phone by using tftp. The server shows the listening IP address and the files directory.: | ||
| + | |||
| + | * IP Address of the TFTP server: 172.28.133.107 | ||
| + | * File transfer directory: C:\FTPD | ||
| + | |||
| + | '''3. Enable the SSH access at the phone:''' | ||
| + | |||
| + | [[File:Screenshots from OpenStage Phone Display 02.png|300px]]<br/> | ||
| + | SSH access configuration | ||
| + | |||
| + | * Enable Access: Activate the SSH session = Yes | ||
| + | * Session Password: Login password for the SSH session, example: 123456 | ||
| + | * Access minutes: Set to 15 minutes | ||
| + | * Session minutes: Set to 60 minutes | ||
| + | |||
| + | '''4. Enable the SSH access at the phone:''' | ||
| + | |||
| + | Use the SSH client to connect to the phone. | ||
| + | The user name for ssh access is always ''admin''. Please use the configured password for login. | ||
| + | |||
| + | * User: admin | ||
| + | * Password: 123456 | ||
| + | |||
| + | [[File:Screenshots from OpenStage Phone Display 03.png|300px]]<br/> | ||
| + | Successful SSH Login | ||
| + | |||
| + | An open terminal session is present after successful login. | ||
Revision as of 08:18, 12 July 2010
| Systematics | |
| Family: | OpenStage |
| Model: | OpenStage 15 OpenStage 20 OpenStage 40 OpenStage 60 OpenStage 80 |
| Relation: | API/SDK related |
| Release: | V2 R1 |
Software Requirements
Following software is necessary for making OpenStage screenshots:
- OpenStage V2 R0 software
- SSH Client (suggested: putty: http://www.chiark.greenend.org.uk/~sgtatham/putty/download.html)
- TFTP Server (suggested tftp32: http://tftpd32.jounin.net/)
- Picture viewer (suggested irwanview + Plugins: http://www.irfanview.de/)
Making a screenshot on OpenStage is a little bit tricky. You need some experience in network technologies. But once configured the making of screenshots is quite easy and can be done whenever you want. The following description is a step by step manual following an example configuration.
- IP-Address PC: 172.28.133.107
- IP-Address Phone:
1. Software preparation:
- Download and Install Putty
- Download and Install tftp32
- Download and install irfanview
- Download and install irfanview Plugins
Remark: Be sure, that the plugins for irfanview are installed. Otherwise the raw format can not be read.
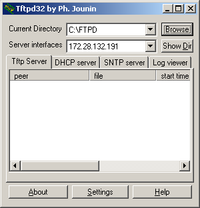
2. Start the TFTP server:
Files can be up- and downloaded from/to the phone by using tftp. The server shows the listening IP address and the files directory.:
- IP Address of the TFTP server: 172.28.133.107
- File transfer directory: C:\FTPD
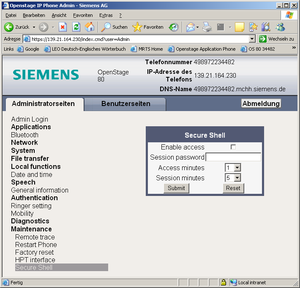
3. Enable the SSH access at the phone:
- Enable Access: Activate the SSH session = Yes
- Session Password: Login password for the SSH session, example: 123456
- Access minutes: Set to 15 minutes
- Session minutes: Set to 60 minutes
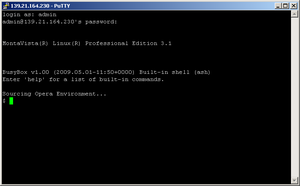
4. Enable the SSH access at the phone:
Use the SSH client to connect to the phone. The user name for ssh access is always admin. Please use the configured password for login.
- User: admin
- Password: 123456
An open terminal session is present after successful login.


