How to set up an OpenStage XML Application
The Wiki of Unify contains information on clients and devices, communications systems and unified communications. - Unify GmbH & Co. KG is a Trademark Licensee of Siemens AG.
Revision as of 08:58, 26 September 2007 by Harald.saller (talk | contribs)
Follow this step-by-step instructions to set up an example XML application on your OpenStage 60/80.
Contents
Prerequisites
Required
- OpenStage 60/80 SIP/HFA phone with appropriate firmware version (V1R3.x).
- The phone must be connected to an IP network.
Optional
- Web server for the delivery of XML data to the IP phone, like Tomcat, Apache, Microsoft IIS. Please note that the MIME type has to be set to "text/xml" on the server.
- For interactive applications, an application platform must run on the server, for instance Java Servlet, ASP, CGI, PHP.
- XML Editor: A validating XML editor is recommended, e.g. Oxygen, XMLWriter, EditiX, XMLSpy.
- For developing Java Servlets: An applicable development environment, for instanceEclipse, NetBeans, IBM Websphere Studio.
Set up an XML Application
Setup Using the Local Phone Menu
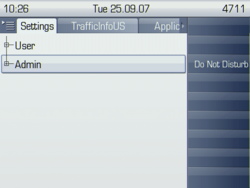
- Press the menu/applications key repeatedly until the Settings tab is active (the key toggles between the Settings menu, the Applications menu, and the applications currently running.)

- With the TouchGuide, navigate to the Admin menu and press OK.
- You are prompted to enter the administrator password.
If the password is numeric, just type it using the number keys. On typing the first digit, an input text field will open up.
For entering non-numeric characters, press the key once or repeatedly, depending on the desired character. The key cycles around the input modes as follows: (Abc) -> (abc) -> (ABC) -> (123) -> back to start. To correct an entry, use this key on the TouchGuide:

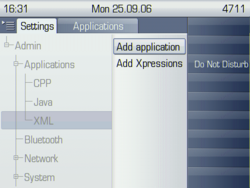
- On pressing OK, the admin menu opens. With the TouchGuide, navigate to the Applications item.To navigate, you can either run your finger around the sensor ring, or press the up/down keys:


- Press OK to open the Applications item and select XML. On pressing OK again, Add application appears in the context menu.Press OK to open the XML application menu.
- In the application menu, enter the data required to access the example application:
- Display name: TrafficInfoUS
- Application name: TrafficInfoUS
- Server address: 87.106.21.36
- Server port: 8080
- Protocol: http
- Program name: TrafficInfoUS/TrafficInfoUS
- Use Proxy: Yes/No (Depends on your internet access configuration; if a proxy is needed, see for
 Administration Manual OpenStage HiPath 8000, chapter 3.12.1.2 for instructions)
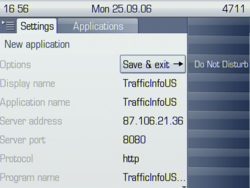
- Navigate to Save & exit and press OK.


Testing the XML Application
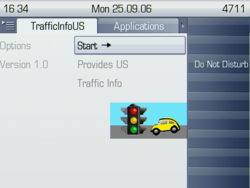
- Press the menu/applications key once or repeatedly until the Applications' tab is active. TrafficInfoUS is available.
- Start TrafficInfoUS by pressing OK. If everything went well, you see the start screen of the application.